
It’s been a long winter here in Melbourne, and I’m craving a little sunshine and COLOUR !
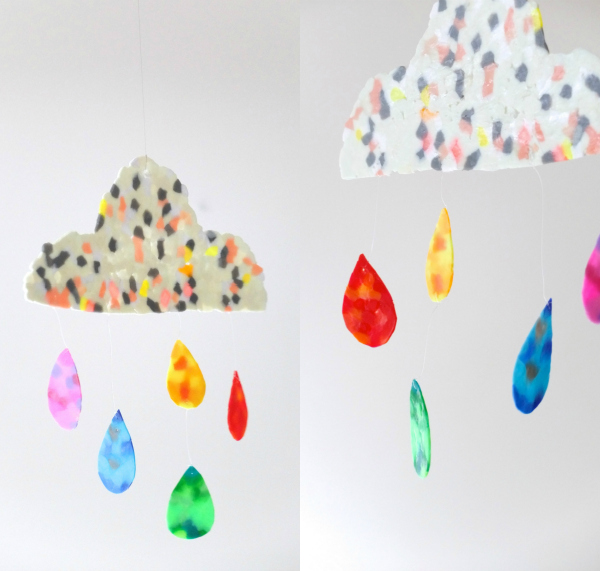
I can’t control the weather outdoors, but I can control the weather on my blog, so I present…The Rainbow Cloud Mobile. Just a little bit of whimsy to brighten up a corner of your world. It was so dark and stormy yesterday when I took these photos, that I was doubtful I’d have anything worth sharing, but thanks to the magic of photoshop and a late night of editing, I’ve managed to cobble something decent together.
This mobile is fairly easy (although not quick) to make. Only a few inexpensive supplies are required, and I’ve included a template for you too! It would look great in nursery, or any corner that needs a little brightening up.
You will need:
Hama (Perler) beads in assorted colours. White and neutrals for cloud, and a rainbow selection for drops (or feel free to select colours to suit your decor)
Silicone baking paper (about 2 x A4 sized pieces should be sufficient)
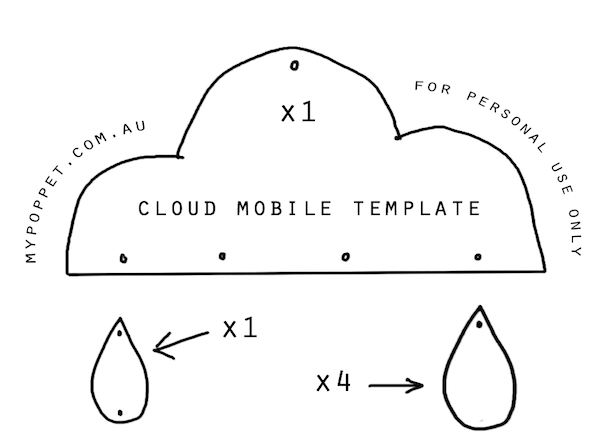
Cloud template
Iron
Scissors (not your best ones)
Hard heat proof surface
Heavy book
Thick tapestry needle
Fine fishing line or invisible thread
How to:
Print out the cloud template – HERE
Use A4 paper and choose fit to page
Sort out you beads by colour, you will need to have enough beads of each colour to roughly cover the template shapes.
Tip: some packs of Hama beads already come pre-sorted.

WARNING: Melted plastic is HOT and can burn skin. Please take care when handling melted beads.
1. On a hard heat proof surface, lay silicone paper over template.
2. Spread you beads over the shape concentrating on the edges first. It doesn’t have to be perfect but try to keep to the shape as much as you can. Also try to have beads laying on their sides as this gives a better end result.
3. Cover with another sheet of silicone paper and start to iron. Iron should be set to hot but NO steam. Press down firmly and work the melting beads towards the center. Flip over and iron on the other side.
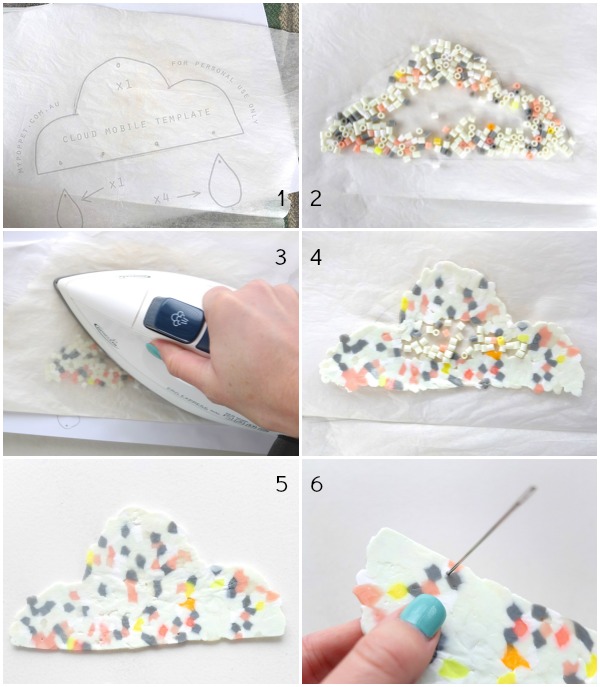
4. Ideal thickness is about 1-2mm. Now fill the remaining gap in the cloud shape with more beads. Repeat ironing until you are happy with thickness and shape.
5. Handling carefully (still hot) place cloud under heavy book to cool. This prevents edges from curling. Once cool enough to handle, trim any very irregular edges with scissors to neaten.
6. Whilst plastic is still slightly warm, push a tapestry needle through cloud shape where marked on template to create holes.
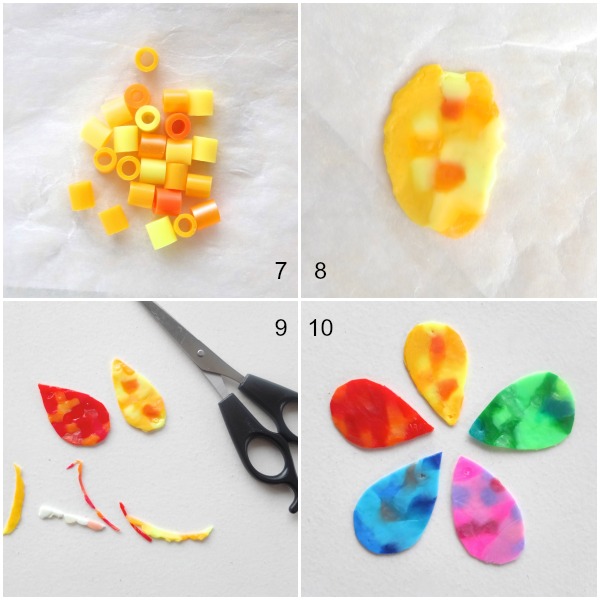
7. To make rain drops, lay coloured beads over drop template and silicone paper.
8. Iron and melt as before. Allow to cool under book.
9. Trim drops to shape.
10. Pierce hole in top with needle. Notice yellow drop has two holes.

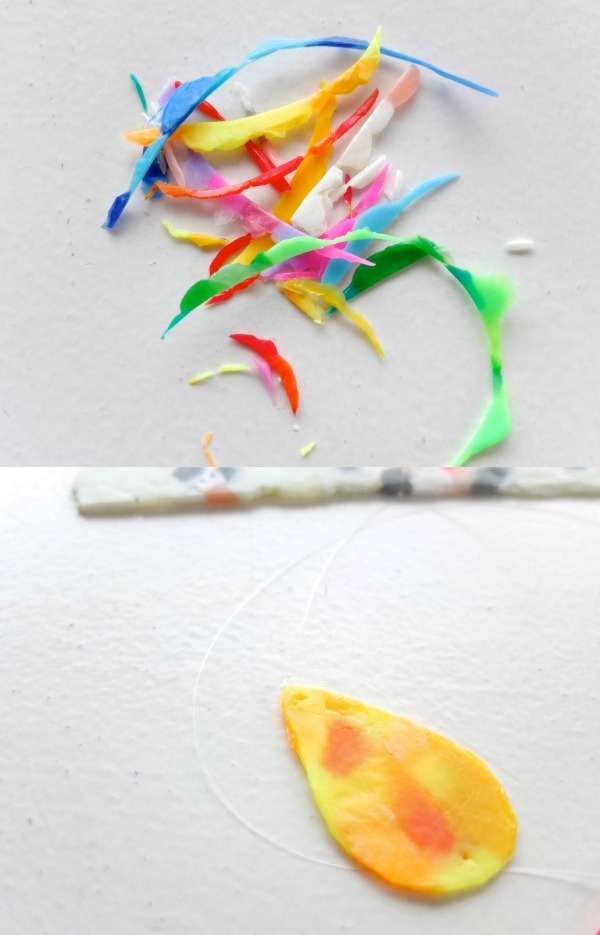
This part is very fiddly.
String mobile pieces together with your thread or fishing line. Tie knots as discretely as possible and trim ends close to knots. Make a loop at the top for easy hanging.
All done! Hang and enjoy!
If you’ve used some translucent beads you get a nice stained glass effect when the light shines through. I think it looks super pretty.


Wow, when I first saw this I thought it was made from paper but Perler beads are a much more fun medium! I had no idea you could do something like this with them. It looks great!
What a great idea! I am going to go create something with hama beads now 🙂
I love it! When I saw it on Instagram I wasn’t sure what it was made out of. It’s so cute. 🙂 I really like that you used some translucent beads and how good are those rainbow rain drops! xx
Love this idea! it’s so colourful and joyful!
Wow! The raindrops are beautiful, the colours are so bright and vivid. This would be a great gift.
Thank you. Yes a perfect nursery gift.
I love that this is made from Hama beads – so much sturdier – and also that you used scissors to cut out the raindrops! Brilliant! I’ll be featuring this on The Crafty Crow soon!
Absolutely love this. We love making mobiles like this and one is very cool…
wooow such a smart cute idea of yours again.
i didn’t knew that you could after melting them with an flat iron into thin flat material to cut them in shape.
I know that you can melt those beads on fabric, but never thought about this.
i’m still using those beads in my own art work because they are pretty and light of weight,
So i’m very glad with the sharing of t his tute and idea of yours.
i will give it a try for making something like yours for my ill sis.
Thank you very much as well for the sharing
greetings
jet 😀
Always lovely to hear from you Jet.