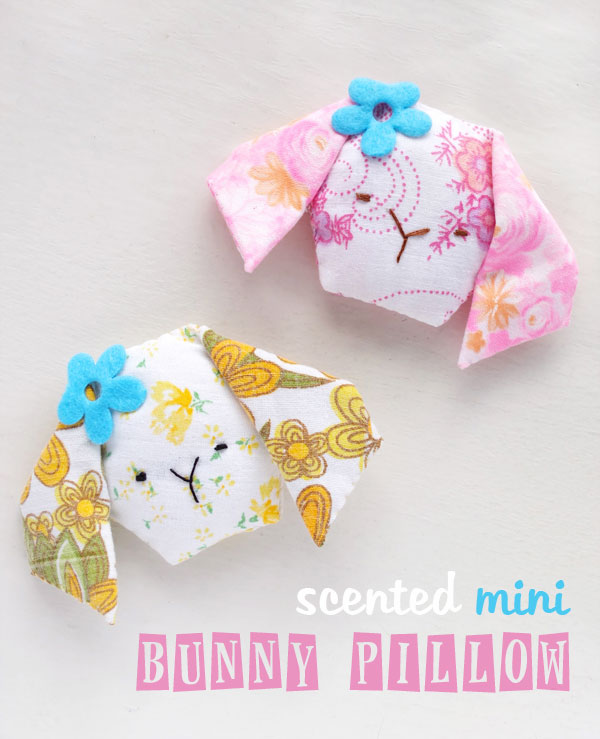
I’ve been tidying up my sewing room and came across a tin full of pastel toned paper pieced hexies that never made it into my Hexagon Table Runner.
All those pretty vintage florals got me thinking about Easter themed crafting, and after having a little play with the hexagon shapes, these cute little bunnies hopped right out at me.
These Mini Bunny Pillows are fun to hand stitch and can be made with the smallest of fabric scraps.
If you’d like them to scent your drawers or wardrobe, include some dried lavender to make them smell just as sweet as they look.
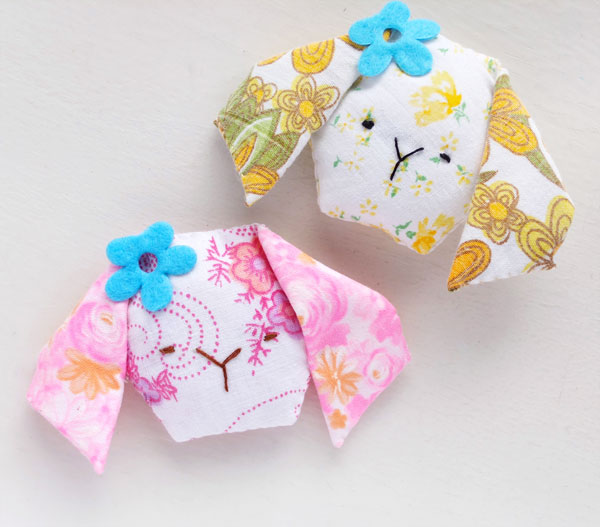
They would make a great Easter gift that lasts all year round, add a pin to the back to turn your mini bunny in to a wearable brooch.
You will need:
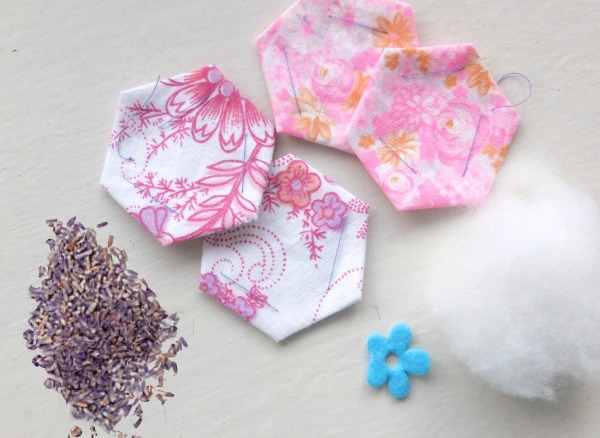
- Fabric scraps large enough to make 4 hexies
- Hexagon template (available here with making instructions)
- Matching thread and sewing needle
- Dark embroidery floss (stranded) and embroidery needle
- Erasable fabric marker
- Stuffing or cotton wool
- Dried lavender (optional)
- Felt flower embellishment
- General sewing supplies
How to:
Make 4 hexie shapes as directed in this post – Paper Pieced Hexies + Template
2 x light colour for face
2 x bright colour for ears
Ears
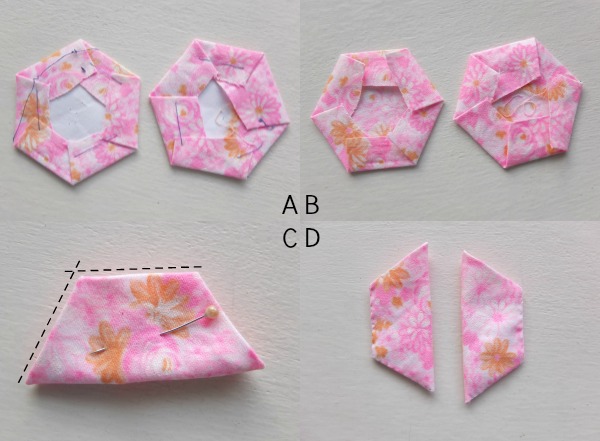
A. Press hexagon shapes with an iron to mark edges.
B. Remove papers.
C. Fold in half as shown and pin.
D. Whip stitch 2 edges shown on photo C. Set aside.
Face
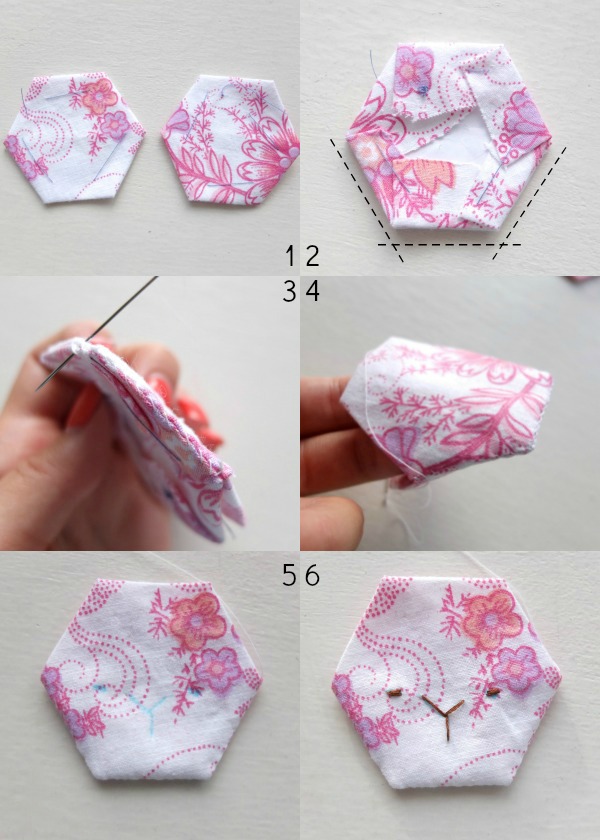
1. Press hexies but keep papers in.
2 & 3. With right sides together, whip stitch around the 3 sides shown joining the hexies together. The smaller the stitches the neater the final result.
4. Remove papers and turn right side out.
5. Draw on face with erasable marker. Make a little Y shape for the nose and 2 dots next to the top of the Y for eyes.
6. Embroider face with 3 strands of floss. See stitching guide below.

Start with left eye, make 3 small stitches, then nose, finishing with right eye and secure.
Final Assembly
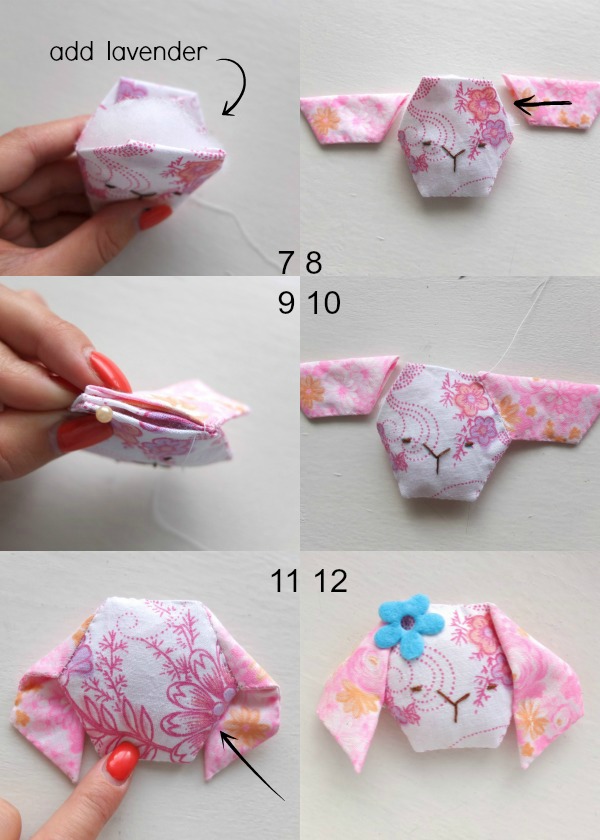
7. Stuff with small amount of stuffing, add lavender if desired.
8. Here is where the ears will join.
9. Flip the ear towards the back and join using whip stitch. Make sure you catch all the four layers.
10. Work around the top of the head and join the other ear.
11. Bend the ears forward and secure in place with a couple of small stitches. The best spot to do this is where the arrow is pointing.
12. Erase marker lines with water and sew on felt flower.
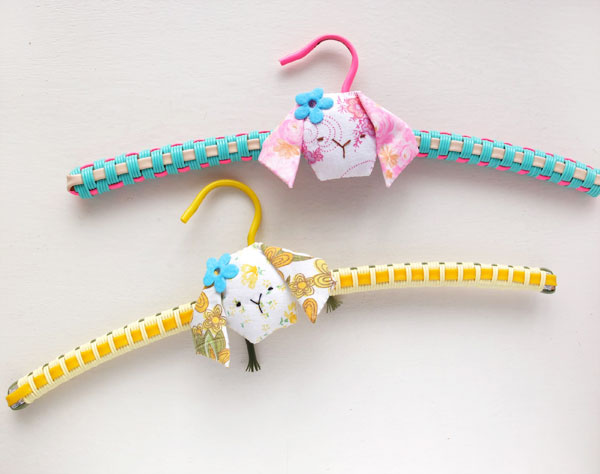
These cute mini can be attached to coat hangers, just add a ribbon or safety pin to the back. They will certainly brighten up your wardrobe.
Go and dig out those left over hexies and fabric scraps from quilting projects, and make a heap of these for family and friends. I bet you won’t stop at just one.


Perfect idea for Easter, I have lots of hexies.
There weren’t any pictures to view when I received your post today.
I’m a “visual learner”. Can this post be “re-sent” to me please with pics attached?? I’d sincerely appreciate it!
Thanks so much!
A Southern Gal from the USA!
Try clearing your browser cache. It should solve the problem. Also if you have another browser or mobile device, try to see if the pictures show there.
what adorable little bunnies..i love them. Thankyou for sharing xo
These are sooo cute.
I’m sure my little granddaughter would love a few of these at Easter time (actually I can see some on my own hangers as well!)
I better get out some of my vintage fabrics and get sewing.I was thinking maybe even some recycled little embroidery pieces for the ears could be nice.
These are adorable and might help me use up my spare hexies.
Thank-you so much for the cute bunny tutorial. I just cut out my hexies and cannot wait to start my bunny.
Have fun making your bunnies 🙂
So sweet! What a great little addition to an Easter basket! I’ll be featuring your idea on The Crafty Crow soon!
Hello! I LOVE these! Did you do the weaving on the hangers too? I haven’t found a lot of tutorials for the plastic lace weaving but I am dead keen to make some up x
I love these hangers and collect them. I don’t know much about their history, they are vintage. I will try to replicate the technique one day