Make a cute felt burger brooch that looks good enough to eat! Made from a few scraps of felt, this burger pin is a cool way to add personality to any outfit.

I’ve never met a single person that didn’t love a good hamburger. And what’s not to love? The beauty of the burger is that it can cater to any taste – Vegetarian, fancy gourmet or my favourite, the down and dirty drive-thru burger that hits the spot after a big night out!
You don’t need to be a hardcore burger fan to enjoy this cute little felt burger brooch – wear it on your lapel with pride! Make a few burger brooches because I guarantee your friends will want one as soon as they see yours!
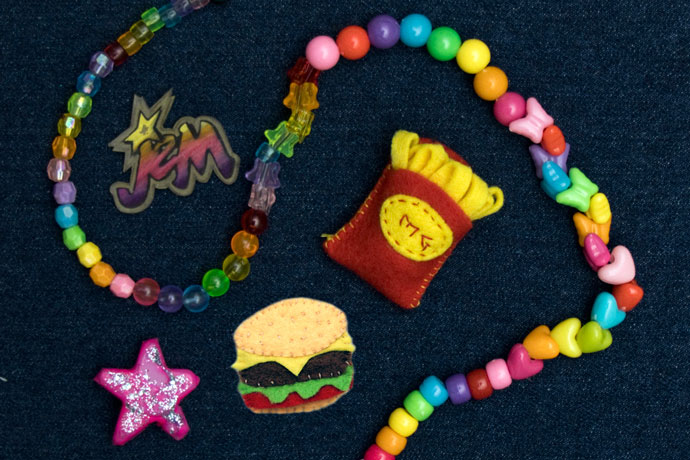
Pins, Badges, Brooches or Flair – What ever you want to call it, these little hamburgers are a super cool way to add some personality to any outfit.
Warning: Proceeding with this project may include the side effect of a sudden craving for a good hamburger and an overwhelming pull toward your nearest burger joint. If this should happen, make sure you are wearing your burger brooch before heading out.
Can’t get enough of Hamburgers? Make a Giant Hamburger Postcard

Why not supersize your burger to a combo meal and add a felt French Fries Brooch to your pin collection. Get the instructions to make a French Fries Brooch here.
How to Sew a Burger Brooch that Looks Good Enough to Eat

You will need:
- Felt scraps – beige, brown, green, red and yellow
- Cardboard scrap
- Thread – beige
- Safety pin
- Fabric marker pen (air erasable)
- Scissors: paper and fabric
Note:
When cutting the green felt ‘Lettuce’ piece, the wavy line can be a tricky bit of fine cutting. So just treat the ‘Lettuce’ template as a general guide when cutting the wavy edge.
How to:
1. Print template at 100% and cut out the pattern pieces.
2. Trace the template pattern outlines onto the scrap cardboard and felt materials, with the fabric marker (or regular pen if this is easier). Then cut out the cardboard and felt pieces.

3. Thread the needle and tie a knot at the thread ends. Layer the ‘Bun Bottom’ over a single ‘Silhouette’ piece. Sew across the top of the ‘Bun Bottom’, with a plain stitch.

4. Layer the ‘Lettuce’ piece directly over the ‘Tomato’ piece and place on the ‘Silhouette’ as per the template line art. Sew across the top edge of the ‘Lettuce-Tomato’ pieces, with a plain stitch.

5. Layer the ‘Pattie’ onto the ‘Silhouette’ piece, a little above the ‘Lettuce-Tomato’. Ensure the ‘Lettuce-Tomato’. Stitching is hidden. Sew across the lower edge of the ‘Pattie’ to the ‘Silhouette’ piece, with a vertical stitch.

6. Layer the ‘Cheese’ piece directly over the top of the ‘Pattie’ piece. Sew across the top of the ‘Cheese-Pattie’ pieces onto the ‘Silhouette’, with a plain stitch.

7. Line up the ‘Bun Top’ with the top edge of the ‘Silhouette’ piece. Sew the lower edge of the ‘Bun Top’ into the ‘Silhouette’ piece, with a vertical stitch.

8. An optional step: Decorate the ‘Top Bun’, by sewing randomly placed 1mm stitches. This decoration will look like sesame seeds. You have now completed the front of the burger brooch, so you can put it aside.

9. Take the second ‘Silhouette’ piece and flip it over (mirroring the front of the burger). Position the safety pin on the ‘Silhouette’ back piece, either in the middle or near the top. Sew the safety pin onto the ‘Silhouette’, with a vertical stitch.
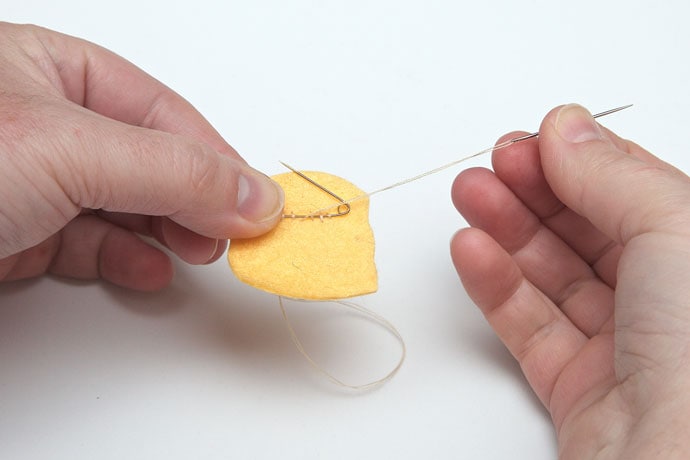
10. Right sides out, layer the front and back brooch pieces together, with the cardboard placed in between. Sew the front and back brooch pieces together along the edge, with a blanket stitch. Now the brooch is complete.


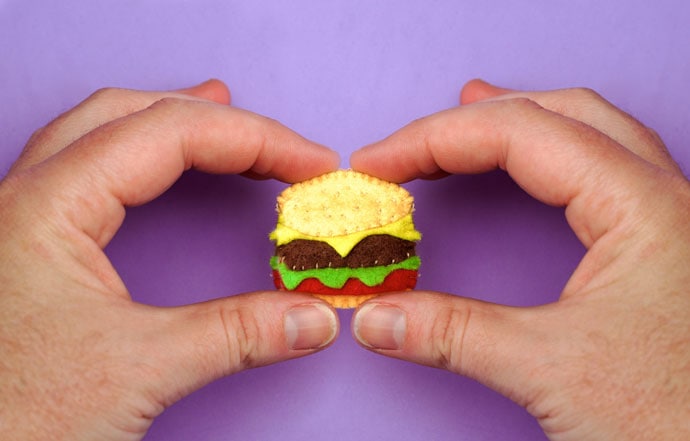
All done! How cute does it look?

Where will you wear your hamburger flair?


Very cool. Something I can get my 6 year old daughter to do! 😍
Hey Brigitte, thank you! Your daughter will love it.
Melissa, the little burger brooch made me giggle because it’s so whimsical and cute. Thanks for sharing!
Thank you, Priscilla! You just made my day.