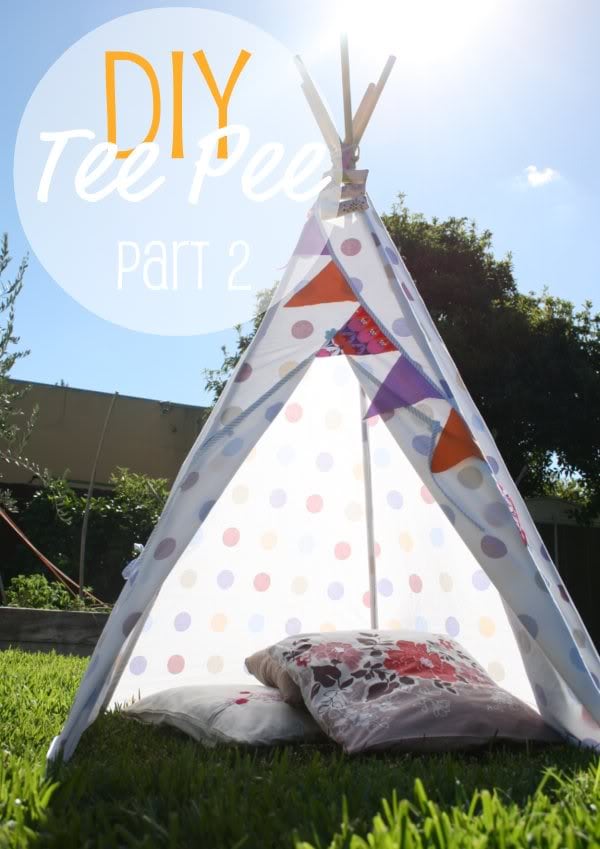
My sister asked me to help her make a Tee Pee for my niece Eva. It was entertaining to make and took us a couple of leisurely afternoons. This Tee Pee is a fun weekend project that can be used either indoors on a rainy day, or in the back yard when the sun is out. We’ve made it with an old bed sheet to save money on fabric. This is a very detailed tutorial so this project will stretch over two posts.
I know you are all super excited to get started on your Tee Pees. This part requires some basic straight line sewing skills. Don’t be intimidated by all the measurements and charts, there are lots of diagrams and pictures to guide you through every step.
Link for Part 1 – Making the frame
So here is Part 2 – Making the outer covering of the Tee Pee
Finished size: around 120cm wide floor space and about 160cm tall.
If you shorten the poles you will get a smaller result
For Part 2 you will need:
- 1x queen size bed sheet (flat) – Choose one that has plenty of life in it, you don’t want a super worn out one that will tear after a few uses.
- Sewing machine and general sewing supplies
- 3 meters 1″ wide bias tape for trims and ties
- measuring tape (with inches)
- soluble fabric marker or tailors chalk
- long ruler or piece of dowel
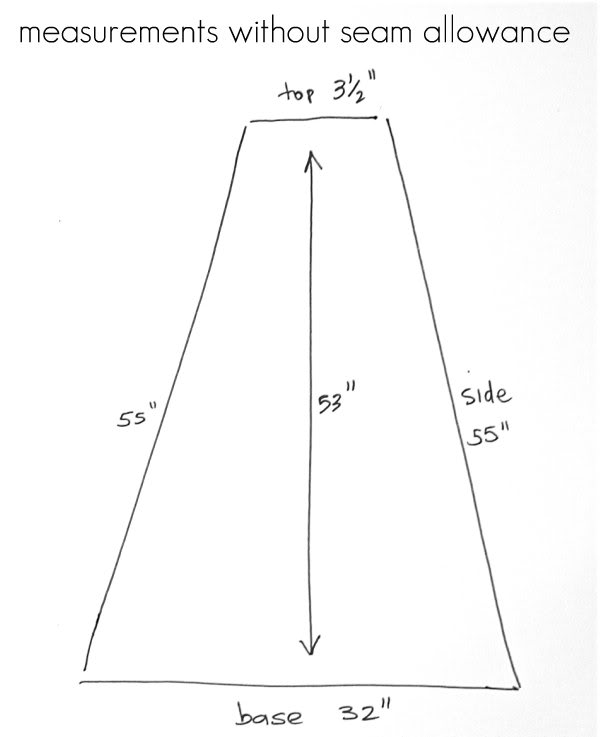
I have drawn and included measurements for the panels. Please note all measurements are in inches (sorry Aussies). And remember – MEASURE TWICE, CUT ONCE
The following measurements were calculated once the frame was made, so if you change the length of the poles, the fabric panels may need adjusting.

How to:
Study the cutting layout to become familiar with the best way to draft your pattern. Directional prints will need extra fabric as all the panels will have to fall in the same direction.
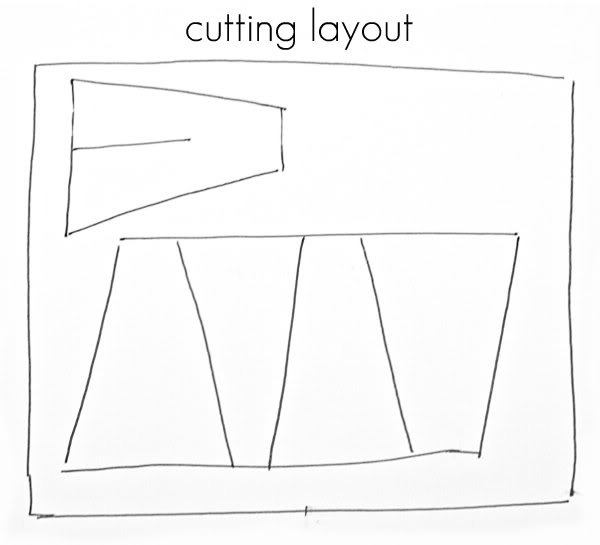
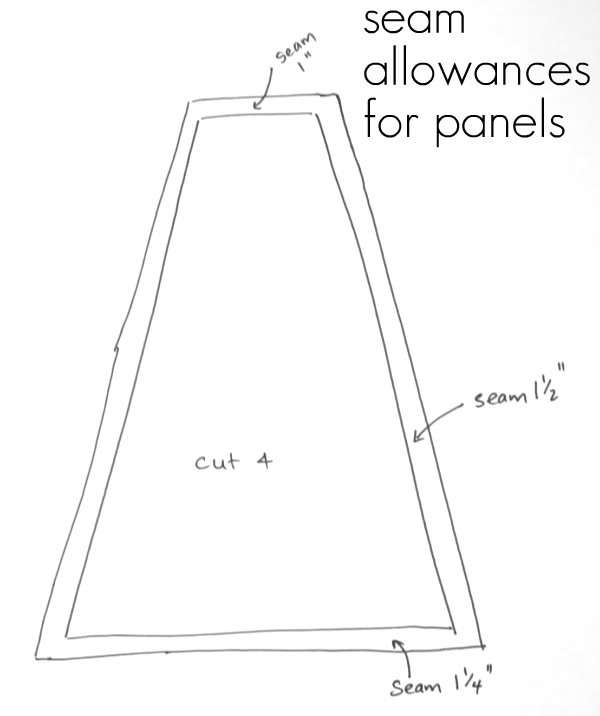
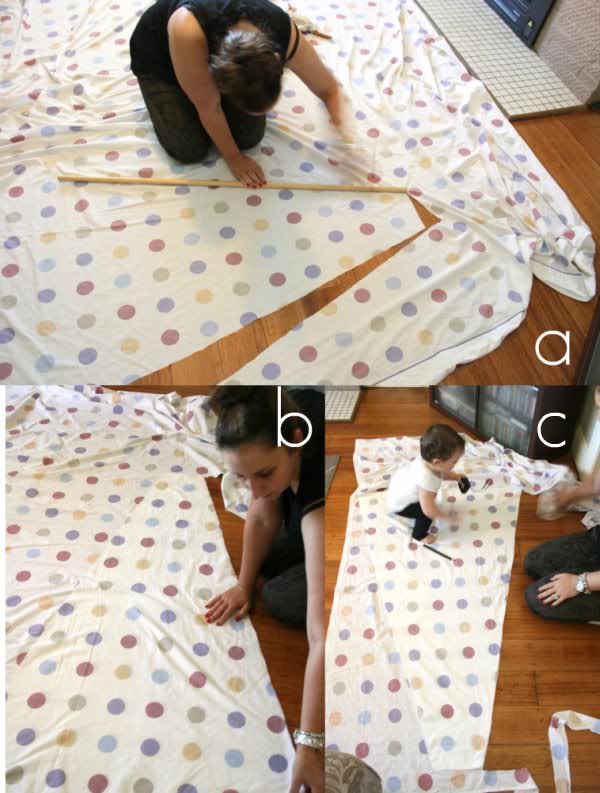
a) Using a tape measure and ruler mark out the first panel. Mark out the measurements without seam allowance then add seam allowances (to the outside). Start close to the edge of the sheet to ensure all panels will fit.
b) Cut out your first panel then use it as a template for subsequent panels using the cutting layout as a guide. For the door panel, cut a slit for the door.
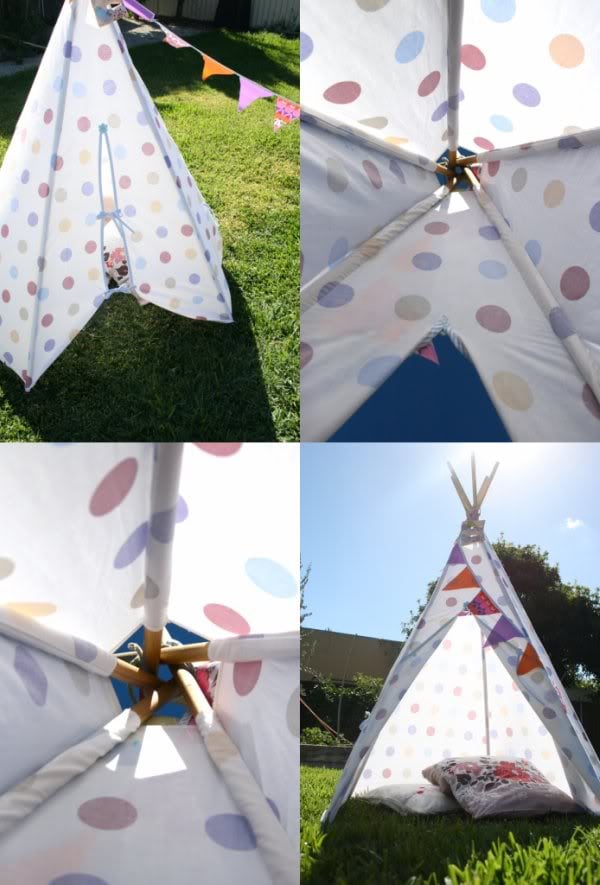
c) Here is our cute assistant. She was fascinated by the measuring tape.
d) Add bias tape/binding around the door opening, I added a cute button to the top of the door opening where the binding overlapped.
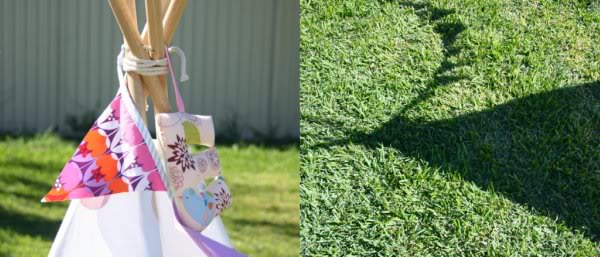
e) Make 6 x 12″ bias tape tie cords by sewing your bias in half. Pin and sew 4 ties to the door panel about 12″ apart so they are equally spaced from the top and the bottom. Reserve the 2 remaining ties for later.
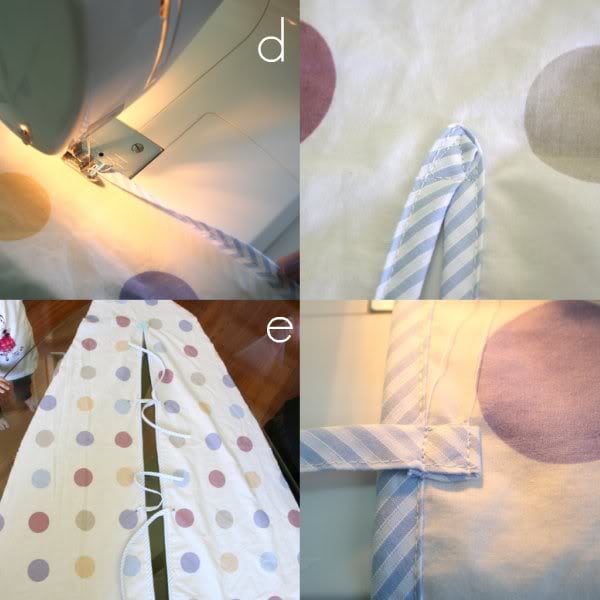
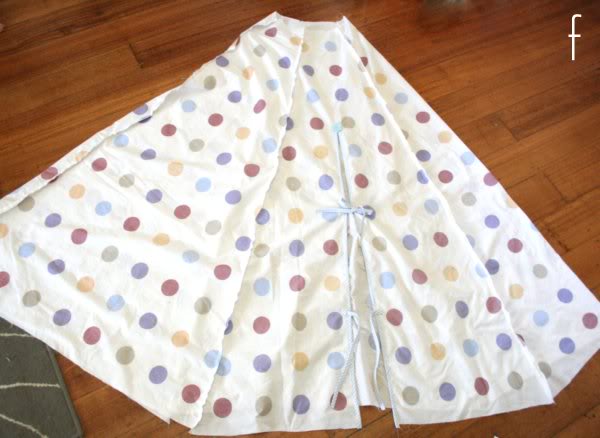
f) With WRONG sides of fabric together, sew together the long edges of the 5 panels. The seams should be on the outside of the cover at this stage (as pictured). Don’t worry you haven’t made a mistake.
g) Now we will hem the top opening edge. Roll a small edge over twice so there are no raw edges exposed towards what will be the inside of the tent and sew hem 1/2″ seam.
h) This part is crucial! Now we are making the tubes that the poles will feed through to keep everything together. Pay attention.
Now we want to sew a seam down the long sides of each long panel with the RIGHT sides of the fabric facing each other. The seam width should be about 1″ but depending on your dowel or your first seam you may have to make it just slightly wider or narrower. Try testing if the dowel fits snugly though one tube before you sew the rest. I had to make mine a little wider so some unpicking was involved.
The photo (h) shows you what the top of the cover should look like inside out.

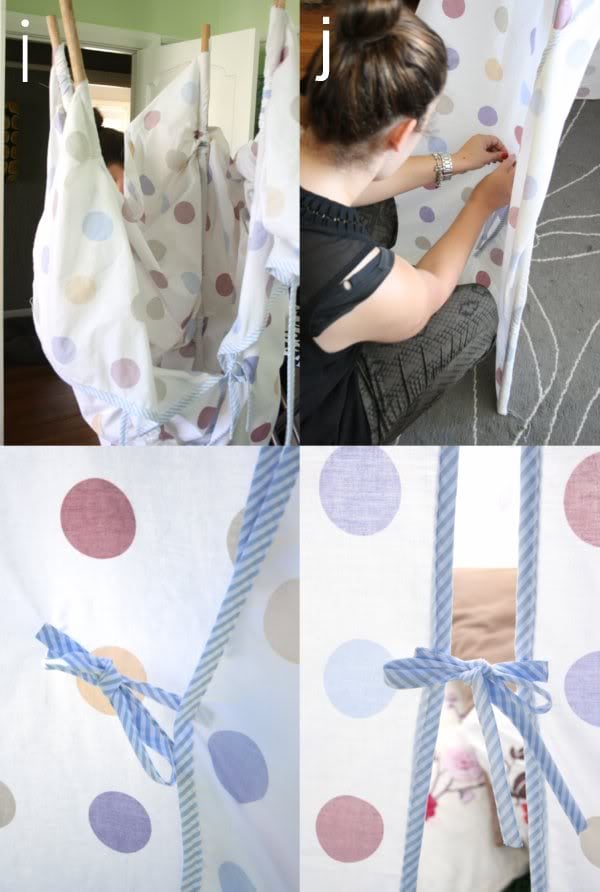
i) *** this photo is slightly deceptive as we accidentally missed photographing one step.*** Before feeding your frame through the cover, the bottom seam needs finishing. Hem as in (g) with a slightly wider seam allowance closing up the end of the tubes in the process. Poles should not stick out the bottom (see image j)
Feed frame in to guide tubes through top opening. Two people may be required as some man handling is called for.
j) Tie backs. Here we are using the two remaining ties that we reserved earlier. Pin them in your desired position. These tie onto the bottom door ties to hold the door open. Sew into position. Either take the cover off again to sew, or the way I did it, with some help maneuver the whole tee pee including poles around the sewing machine.
OPTIONAL – My sister later added/sewed on small loops for tent pegs at the base of each pole. By pegging the Tee Pee in place when outdoors, it prevents gusts of wind blowing it over. No need to use tent pegs indoors.
SET UP: The frame opens up just like an umbrella. Fill it with pillows and decorate with some bunting to personalize.
That’s it!! All done. I hope the directions were clear enough. It’s one of those projects that seem more logical as you are putting it together, so don’t let all the steps intimidate you.
Part 2 took my sister and I a leisurely afternoon with a 1yo under our feet. (It’s almost taken me longer to edit and write the blog post, lol)
Please feel free to leave any questions as a comment and I’ll try to respond as a reply as soon as practicable.
I’d love to see photos of your finished Tee Pee. Why not post them to the My Poppet facebook fan page?
Like this project? Sign up to the mailing list and get lots of fun stuff delivered to your inbox.


I have decided I will live in one of these.
I have no sewing machine and no sewing skills. Could I take a large sheet, cut a hole and drape it over the teepee?
Yes you could. You may need to stabilize the poles with some pegs at the base so they don’t collapse when bumped.
Thank you
Super cute.
Fantastic tutorial! I've had the fabric to make one of these for 5 months! I have 2 different patterns but none make as much sense as yours does. Thanks!
Can someone tell me how much room this will,take up
Hi Cintia, more than happy for you to put this on facebook, it was a fun tutorial! Thanks 🙂
Very beautiful. Thank you for the patern. Now I have to take my courage to do it ;o)
THIS IS GREAT! I have been wanting to make one for the longest time! Your tutorial is the best! Once I get some pictures I'll post a link! 🙂
I'm really confused on the measurements. Does the cut portion measure 32″ on the bottom? Or is that before the seam allowance is added? In other words am I marking the seam allowances inside or outside of the measurements in the first diagram?
Hi Liz. You add the seam allowance to the outside of the fist diagram. Thanks for pointing this out, I will clarify the instructions.
Have fun making your Tee Pee
x cinti
mmm. maybe US sheets, or just the ones you used are smaller? I'm not sure. We didn't un stitch any seams, but maybe this was a more generous sized sheet for a deeper mattress perhaps.
Glad to hear you are having another go.
Mine didn’t fit either! I was all the way too the edge too. Fortunately I bought the sheet set new so I had the fitted sheet to work with. It would have fit before the seem allowance, but not after.
hmmm…that's what i did, but then when i went to lay it out there was no way to fit the four panels side-by-side on my queen sheet. so i assumed i needed to put the seam allowance inside rather than outside (call me ms. impatient!) i wonder if i just got a bad sheet or maybe aussie sheets and american sheets are sized differently? or did you unstitch and use the top of the sheet where there is about a four-inch foldover? sorry for all the questions…
other than the sizing confusion the sewing process was a breeze. i finished mine pretty quickly, only to realize i couldn't make it fit since i opted to go with the smaller/incorrect version where i put the seam allowance inside vs. outside the original measurements. at least i got some practice! round two tomorrow-hopefully with more success!
Any idea what yardage of fabric you would need if you are not using a queen sheet? I am going to make one for my niece and use some outdoor fabric. I just want to be sure I have enough?
My calculation says 180 x 300 cm to fit all five parts:-)
Can anyone give me an idea of the size of finished teepee when it is set up? How much floor space does it take up, and how tall does it stand? Thanks in advance!!
I'm on holidays but will measure up as soon as I get home 🙂
Hi My sister just measured. It is about 120cm wide floor space and about 160cm tall.
If you shorten the poles you will get a smaller result
Hope that helps
Hi! I LOVE this tent, and so does my daughter and she has been asking me every 10 minutes for the last 2 days when I am going to make it for her. In my haste to make the tent I discovered that my metric calculations were way off and I didn't order enough fabric, however if I cut way back on the original seam allowances, I can just barely fit all five pieces onto my fabric. Is there a reason for the generous fabric allowances on the side or will I be okay with a standard 1cm between each piece?
Hi Brenda. In picture h you can see the wide seam becomes the tube to fit the frame rods through. If you are tight on fabric you can certainly use a smaller 1cm allowance but place your seam inside at step f ( ie sew right side of fabric together ) then add your tube guide using some extra fabric, doesn't need to match as it will be inside. Hope that helps 🙂
Ah, that makes much more sense now. I thought the seam allowances were for the first seam you sew when piecing it together, but the side seam allowances include that first seam, PLUS the guide tubes for the dowels. Thank you for the great idea to use another fabric for the tube guides! I need to stop reading/tutorials/calculating fabric needs/sewing in the middle of the night and do those things at an hour when my brain is fully functioning! I'm so glad I found your blog, btw!
Hi! Your work is fantastic and I'd love to create a tipi to my baby but could you please put the measurements in cm… It would be very nice! Thank you!
you can easily make the conversions yourself.
Just multiply inches by 2.54 to get cm
inches x 2.54 = cm
Question: is the 3 1/2 inch measurement for the top of the panel correct? It seems so small as I am measuring out the first panel. This is my very first sewing project and I just want to make sure I do it right!
Yes. You will need to add seam allowances to that
WOW WOW WOW!!!! You have just saved me a small forture!!! I've been looking for a pattern for so long and then found a new page on facebook who were selling their pattern for £30, or the finished Teepee for £135. I was going to pay it as i thought i wouldn't have the time to do it myself, but now i know i could do this in a day, with no kiddies is wonderful!!! Thank you so much, maybe i will have my dinning table and chairs and quilts back once i make this instead of them being my 4 childrens den!
Thank you! Can't wait to get started, my daughter is going to love this wee escape from her little sister 🙂
I’m whipping one up for my daughter for Christmas… i cant wait, i hope she loves it as much as i will 🙂
Hey! Firstly can i say…what a lovely blog 🙂 then i was hoping you could answers a few questions. when you come to sew each section together the first seam runs along the pole loop right and then you fold the fabric back and actually sew the loop..gosh hope that makes sense! Also, when do you hem each section i after you have completed the loops? Yes i am abit of a novice ahhh!!
Hi
This looks great but do you know if a king size or super king size duvet cover is big enough?
Thanks
Yes I think that should be fine. And remember you have both the front and back of the duvet cover available. If you are unsure just lay it out roughly before cutting.
Thanks so much for an awesome tutorial. I finally made one! I can’t seem to get my poles just right, resulting in some wonky side panels. Any tricks/tips?
Thanks!
I’m not sure Erin, maybe send me a picture so I can see what you mean?
Thank you so much for sharing!!!! I can’t wait to make this for my 2 children
Thanks for the second half of this teepee instruction. Now I have to go and find some really adorable material.
I have just finished making this. It was so easy to follow your instructions. It took me a couple of days to complete but I did it! It is big enough for me to sit in it too! I love it as does my little boy x thank you for the tutorial x
Great to hear, I hope you get many years of enjoyment from it.
I love this! It think it’s me being silly, but when I sew up the side panels (f), what should I allow for the seam allowance? I didn’t want to sew it all up and find out I’d got it wrong….I was thinking 1/2 inch but wanted to ask! So excited about making this, thanks so much for letting me know
yes only about 1cm (the width of you presser foot) a bit less than half an inch. Thanks for your question, didn’t think to specify at the time, sorry.
I was hoping you might be able to help me with seam allowances. How much should I allow for sewing up the sides of the panels (f). I was thinking 1/2 inch but wanted to ask before I started sewing and getting it wrong! So excited about making this! Thanks
I just finished making a teepee for my grandson for a Christmas present using 60″ wide pillow-ticking instead of a queen sheet (very few kid-type fabrics). Your directions & photos were clear and you saved me a ton of money compared to the store-bought ones. My one dilemma though is getting it to set up so the legs stay stretched and the fabric taut. I believe I’ve got the dowels tied correctly and tightly, but it’s pretty tippy and I can foresee it falling continuously. There must be something I’m doing wrong, since no one else has commented on that. Thanks for you suggestions.
If you are using it outside you can peg it into the ground by using tent pegs, just attach little loops to the base. For indoor use pop a few pillows in there to help keep the poles steady. I hope that helps.
Hi Cinti
Thank you so much – your tutorial was so easy to follow. I have never used a sewing machine in my life, so my Mum helped me out with the actual sewing (after I cut the fabric). And my husband made the frame out of PVC piping, rather than dowell. We set it up last night, getting ready for Christmas Day for my daughters, and it looks great.
Just one question – when erected the fabric is tight, however when it is folded down the fabric kind of slips down the poles. Is this normal? I suspect we’ve made the tubes for the poles slightly too big. Or it could be the material I choose (I didn’t use a sheet – I bought different fabric at a local fabric sale).
Any tips on ensuring the fabric stays tight on the poles when it is folded down?
Thanks again for sharing your work. I found it on google, and it made things so much easier.
Great to hear. Re the cover slipping down. I suspect either the tubes may be slightly loose or the PVC pipe is a little more slippery than wooden dowels.Maybe pop a rubber band between the fabric and the pole?
Hope that helps
Cheers Cintia
Reader question: Hi thank you for sharing your tee pee pattern i was looking at it was wondering would i be able to use a standard quilting cotton 44″ wide ?
A: yes you can get one panel in across the width but I’d make a template first and make sure to include seam allowances.
panels are about 56″ tall x5 so that’s a fair amount of fabric.
i’m mad at myself for not reading all the comments before starting making a teepee for my son’s first birthday tomorrow. i didn’t realize you are supposed to add the seam allowance. i thought that the pic showing the measurements was the size to cut my fabric. now i have to start over and re-cut the material for the panels and pray i have enough of the fabric i used for the door so i can just add on to the piece i have cut already.
You can still save it. Either add some narrow strips down the sides for extra seam allowance or slice each panel down the middle and add a rectangular long piece to widen the whole panel. The angles should still work. I did have a diagram with seam allowances in the tute.
I’m having issues with the images not loading on the site with the measurements, any chance you could send me them?
Try clearing your cache, that usually fixes that problem.
At the risk of repeating what others have said, I just have to thank you for writing such clear, straightforward instructions.
There are more than a few tutorials for things on the web which have led me to tear out my hair, or wish feverently that I had paid for plans. Yet you offer this gem freely. Thank you for your care and sharing.
I’m only going to use this outside so I’m wondering if I should add a few inches to the poles and not seal the bottom so I can stick them into the ground. You mentioned that a breeze might knock this over and offered the solution of adding pegs.
Do you have any opinion about how many inches of length I should add to the bottom of the poles and whether that might make it difficult to set up the teepee?
Thanks for the great tutorial! I would like mine to be a little taller and then wider at the base. What do you suggest as how to adjust the measurements?
You will need longer poles. to make it wider, tie them loosely at the top and arrange them to the desired width of base. measure it and draft your own template for the side panels. You may need someone to help you.
Hi I have read your tutorial about the teepee making which is fantastic. Thank you for sharing it. I have been very fortunate and my talented step mum has made one of these for our daughters first birthday and its wonderful. You have both inspired me to make one for my niece. I do have one question . . . how do you stop the fabric slipping/sliding down from the top? Do you tie/stitch it to the rope drilled into the poles? Thanks :o)
Hi, our tubes where the poles were inserted were quite snug so I think they just stay with friction from the fabric. If you have slipping trouble. try a little nail or tack into the top of the pole through the fabric.
Hope that sorts it.
Thanks for the idea, I found you on Pinterest. I made a few adjustments; But it looks fab & my 9 year old is thrilled 🙂
Great to hear!
I sewed ribbons and tied them to stop the slippage
Good thinking.
Hello
I am in the middle of making your wonderful teepee. It’s going well but I’d like a little clarification before I get my stitch cutter out.
Step f) when attaching the long edges, WRONG SIDES together should the stitch line be the full seam allowance of 1.5 inches?
OR just a half inch and then the other inch is taken when you stitch a hem RIGHT SIDES together for the pole tubes?
I hope my question makes sense
Thank you
Hi Katie, sorry for the delay. The second one. The first seam is narrow about 1/2″ then the rest of the allowance is taken when you stitch the tube poles.
hope that’s clarified
cheers Cintia
So I read and reread your instructions over and over again to make sure that I had everything right. But I realized only after cutting and sewing all five panels together that I had only measeured for the panel without the seam allowance. It was very confusing as to why in the world you would even need to add measurements for that! Why not just give us the panel measurments with the seam allowance already added! Its late and I just freaking messed up my kids Christmas present. I hope that I can somehow salvage it. It may end up as a tall skinny teepee! Freak. Please if you have any ideas on how I can make this work please let me know.
There are a few ways to salvage it. If you have extra fabric cut a panel the same as you already have get another pole and make it six sided instead of 5. It will make it wider. Then you only need to unpick and Resew one panel
Just made this in 2 days with 1 & 2 year olds under my feet, what a awsome and quick way to make a fun tent, i made my measurements larger than normal to make a bigger and slightly taller tee pee. Even going to make the bunting out of the extra fabric left over… you could save more money by using garden bamboo at a long length as dowel is the most expensive item. Volia!! Awsome tutorial
Thanks Kaz. I’d love to see a photo.
Hello! I am having trouble figuring out the pole size. When I convert it into cm, the poles seem pretty small but in the picture they look much bigger. Is there something I’m missing? When I convert it to cm it says it is 1.8 cm. Is this really correct?
Hi. Part 1 of the instructions states pole measurement at 180cm (1.8m)
Hi
Need help badly
I have been living your tutorial the entire weekend.
Finished everything today but in the end had trouble opening the teepee
I couldn’t find dowel rods and so I used 1×2 wood log 6 ft long
I am not sure what I should do to make it open n open nicely
I even untangledthe logs in an attempt to fix it n open it n then tangle them again but I think I am in a bigger mess
Sorry about my late reply. if you can send a photo maybe I can see what the problem is
great, can’t wait to see it.
Hi Cintia!
I’m very excited to be making this for my almost 5-year old’s birthday next weekend. I’m a little stuck though: At the top of the slit, how do you sew on the bias binding? Do you use two pieces that meet at the top or do you try to bend a continuous piece around a 180 degree corner?
Thanks so much.
Stef
sorry for the late reply, I’ve been avoiding my computer this month.
With the internal corner you open up the slit so it is a straight line, sew the binding and then bend it back. ie. one continuous piece.
Hi, I’m trying to draw the the first diagram pattern and the measurements are not adding up. What am I doing wrong?
First I draw the bottom line then the top line 52″ above and to draw the slanted lines at the desired lengths (55″) to meet the top line, the top line is much shorter than 3 1/2″.
Obviously i’m doing it wrong, can someone please star me in the right direction…. Thanks in advance 🙂
you need to draw the bottom line, find the middle (16″ along) – draw a line straight up from the middle at 90 deg angle to mark the placement of your top line.
Then (this is important) mark the top 3.5″ line placed centrally and lastly the lines down each side. This will set the correct angle.
If you are marking the sides first you are arbitrarily choosing and angle and the top measurement will vary.
Hope that helps
hi!! Love this tutorial. I’ve made 2 so far. Only trouble I have is hemming the bottom. Any tips? Especially around the pole sections.
Thank you!!!!
Are you putting the poles in before or after hemming?
Hi
From where did u get the dowels ?
Just from a hardware store with a lumber section.
Hi there. I saved your tee pee instructions in my favourites. I went back to look at it today and found that none of the pictures from the tutorial are visible and that I need to pay for third party hosting. Has something changed from the original post or am I doing something wrong? Please help as I need the pictures to do this project.
I’m sorry, a website that was hosting my images changed it’s policy without notifying me, I’ll be fixing all the missing images as soon as possible. Hang tight!
I’ve been reviewing this tutorial and am excited to get started! I have a question about the bottom hemming though. If you made the tube for the pole and then hemmed…wouldn’t the hem prevent the pole from going all the way in? Or did you hem but skip the pole tubes sections so the pole can be seated in the little pockets? I hope that made sense…
The poles slide in from the top. The hem at the bottom stops the fabric cover from sliding up the poles over time.
Thank you for the follow up! I’m sorry I’m having a hard time visualizing. Once you slide the poles in from the top and they are in the bottom of the pocket isn’t there excess fabric from the hem? I’m just going to make up numbers but if you had a 3 inch tube that you then hemmed an inch there would only be 2 inches of tube to slide into and a 1 inch tag of fabric at the end. Unless I’m totally misunderstanding how you close that tube.
the fabric hem is very narrow (about 1/2″ seam) so there won’t be be much fabric left as a tag. The seam will sit flat under the pole when it is standing.
Ok! Gotcha! Thank you very much. I really appreciate that you have remained responsive on a post from 2012. 😀
It’s no problem at all. I still blog almost every day so answering questions is no big deal. Thanks for reading.
Hi, I am doing well so far. But a little stuck as to how to hem the bottom.
Does it matter which side the pole tube is when you sew round the bottom. Should they all fall to the same side as you go round ??
Hi Vicky, It doesn’t really matter, but it’s probably easier if they all face the same way as you go round.
Hi!!
I’m very excited to get started on this tonight (when kiddos in bed!)
I’m thinking I will need it a little wider than the 120cm…..if I use 6 poles instead of 5 (same height as your ones 180cm) do I simply just add another panel whilst keeping all the measurements the same? Will that work? Or will adding another pole change all the dimensions such a height and width etc…. I can’t for the life of me work it out!! Or do I stick to 5 poles and make the panels wider and the height shorter?
Sorry for so many questions!!!
You can definitely add another panel – it will make the whole tent wider and shorter. If you want to keep the height with 6 poles, you’ll have to re-draft the panel pattern to make it slightly narrower.
The best way to work it out is to built the frame as indicated in part 1 and work out how high and wide you want the finished size to be. The you can measure the width between each pole and that should be the bottom width for each panel.
Have fun!
Wow that’s a very swift reply!! Thankyou so much!
Hello!!
Me again!
Last question now I hope…….
Is it better to set the poles up first and secure them and then feed the fabric onto the poles? Or can I untie all the poles, feed them through and then tie them together?
Also with the door…it doesn’t seem to close together very well..when their open it seems to spread the teepee slightly wider, so if you want to close them you have to put a bit of effort into pulling them together if that makes sense?
Re: the poles. We did it the first way but in hindsight untying them would have been easier.
Re: the door. Yes I can see how that can happen. The frame won’t spread as much on carpet or grass. I suppose you could put a strap across the bottom of the door panel so it doesn’t spread as much when open.
Hi I’m in the middle of making this for my nieces birthday and I’m really confused about the bias tape. I’m not sure if 3m is the size or brand because when I google it all that come is actual tape from 3m company.
Sorry for the confusion. It’s 3 meters of bias tape that is required (about 10ft).
Is there a certain width it needs to be?
1 inch wide is ideal. I have amended supply list to reflect this. Thanks for pointing out that this info was missing.