
Hello again, Michelle here…
Well, today is the day and we can finally get stuck into our crochet-along. There’s a lot to talk about so I won’t waste space here waffling on. Here is Part 1 if you missed it.
OK then, let’s get started!
Terms Used
US terms used throughout (I’ve shown UK/AUS terms in brackets in the following abbreviations table however, I haven’t shown them throughout the instructions as I think it just gets all too confusing with too many bracketed abbreviations.
For those that prefer Aussie/UK terms, substitute all sc’s with a dc and all dc’s with a treble)
Abbreviations:
ch chain
sc (dc) single crochet (UK/AUS double crochet)
dc (trbl) double crochet (UK/AUS treble)
sk skip
sl st slip stitch
sp space
yo yarn over
Special Stitches and Techniques
In learning new crochet stitches and techniques, you’ll find there are often several different ways of doing the same thing all over the Internet. It can all become quite confusing!
For this pattern I am trying to keep all techniques easy to master but encourage you to explore and experiment further until you find what works best for you.
All the special stitches and techniques below will be referred to in bold in the instructions for each round.
Magic Circle
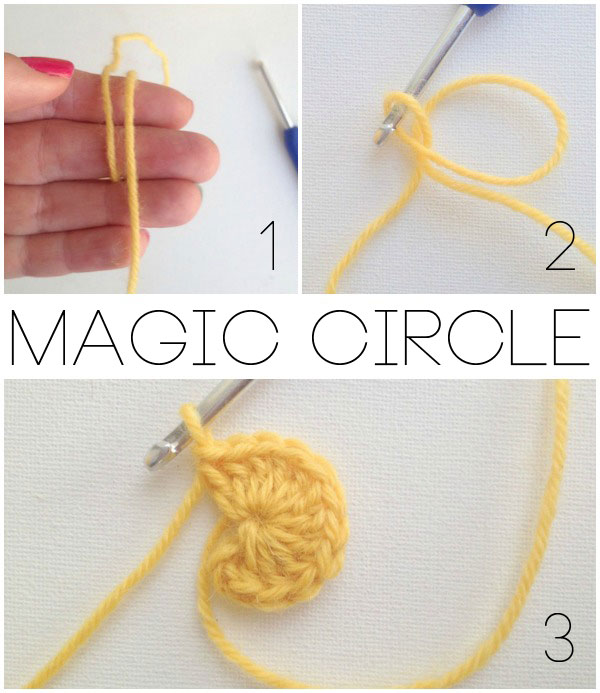
- Wrap yarn around two fingers with working yarn on left and tail end on right. Hold in place with your thumb.
- Still holding onto both loops, slide your hook under the tail end loop, grab the working yarn and pull up a loop. You are now ready to make your stitches according to pattern.
- Once you’ve worked the required number of stitches into the ring, pull the tail end to draw the ring closed.
Invisible Join
This is a nifty technique to add to your bag of crochet tricks! The traditional slip stitch finish leaves a yucky, messy, sticky-outy bit when fastening off after a round but this technique gives a lovely neat finish to your work and is practically invisible.
We’ll be using this invisible join to finish off each round if you are making the multi-coloured cushion but as it is only suitable to use if you are fastening off a round to change colours or finishing your project it won’t be necessary to use at the end of each round if you will be making the one colour version.
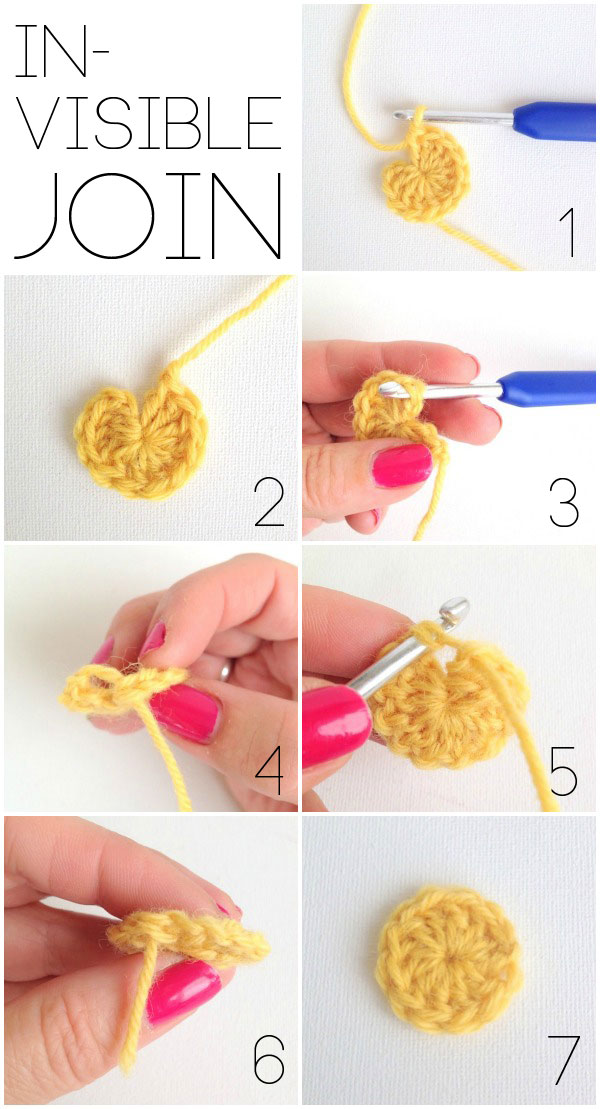
- When you complete the last stitch in the round, cut yarn leaving a 5cm tail.
- Pull the yarn tail back through the loop of the last stitch.
- Insert hook from back to front of the first stitch in the round.
- Pull the yarn tail through to the back of your work with hook.
- Turn your work so that the wrong side is facing you. Insert hook from bottom to top through the loop of the last stitch (where you cut the yarn).
- Pull the yarn tail back through this stitch. Weave in the tail ends.
- And there you have an invisible finish!
Standing Stitches
This is a great method to use if you are starting a new round/row joining in a new colour and is not to be confused with a chainless start. (see below)
Starting this way instead of the standard chain stitches gives a neater finish to your work as it replicates a stitch rather than looking like….well…chain stitches.
There are a couple of different ways of doing this method, one variation starts with a slip knot and the other starts without a slip knot on your hook.
I’ll explain the method starting with a slip knot here as the other method is a little fiddlier to master.
Don’t worry about the slip stitch which will be visible once you’ve completed your stitch, this will be hidden behind your work and you can crochet over the tail in the next round (or sew end in if you prefer).
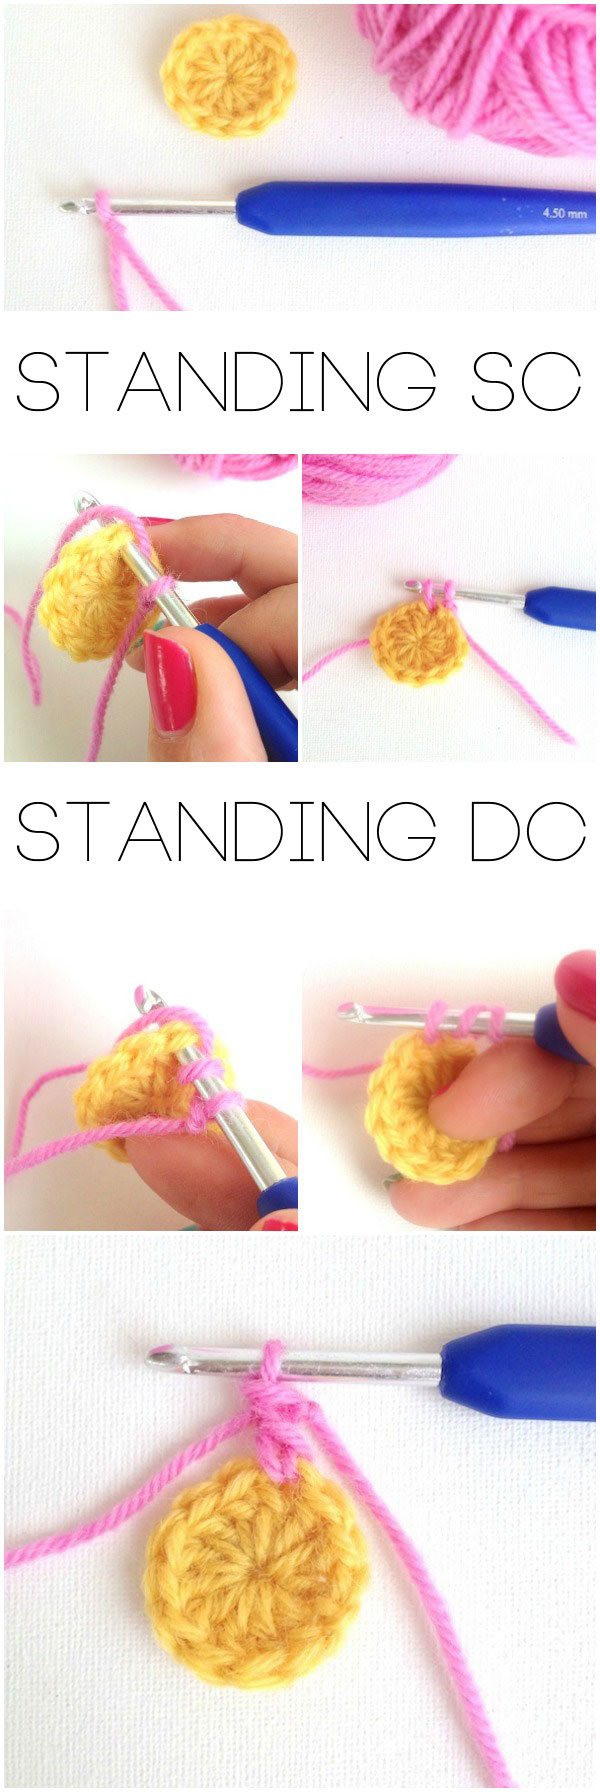
- Join yarn to hook with a slip knot.
- Then either make a Standing SC or Standing DC as follows…
Standing SC:
- Insert hook into stitch
- Yarn over and pull through (2 loops on hook)
- Yarn over and through both loops. Sc stitch made.
Standing DC:
- Yarn over
- Insert hook into stitch
- Yarn over and pull through (3 loops on hook)
- Yarn over and pull through 2 loops (2 loops on hook)
- Yarn over and pull through remaining 2 loops. Stitch made.
Chainless Start
Similar to the standing dc method in that you are substituting it for the standard beginning of a row with ch 3. This method is used if you’re using just one colour.
It’s awkward to explain how to in words but this video is a good guide.
Double Cluster Stitch
In a nutshell you will be starting a new dc in the same stitch before finishing the previous dc then joining them both together.
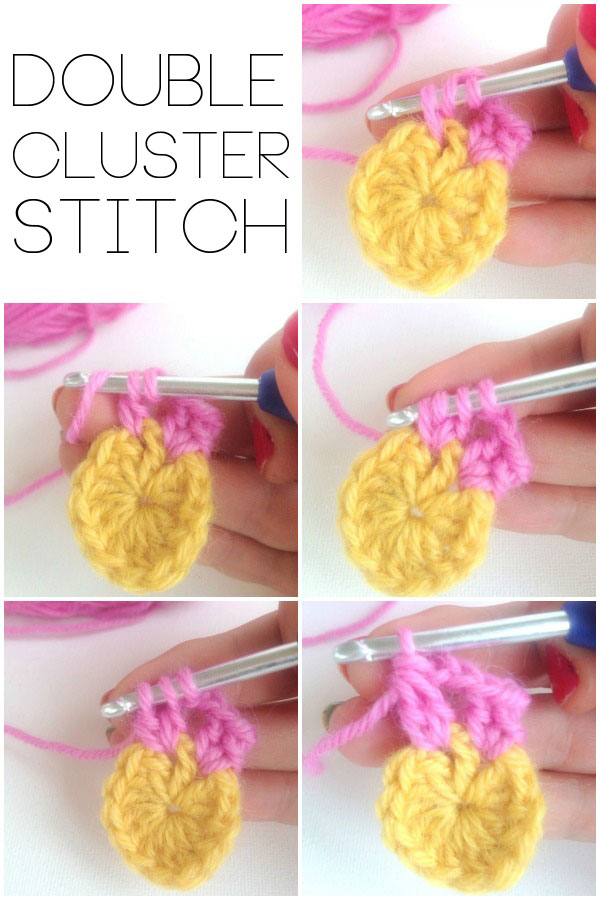
Note: The first double cluster is slightly different than the subsequent stitches and will not be joined at the top as the rest will be.
-
- Begin with a standing dc and then make another dc in the same space. First cluster made.
Subsequent DC Cluster Stitches:
-
- Yarn over and insert hook into next space, yarn over again and pull up loop.
- Yarn over again and pull through 2 loops (2 loops on hook) o Yarn over and insert hook into same stitch.
- Yarn over again and pull up a loop (4 loops on hook)
- Yarn over and pull through 2 loops (3 loops on hook)
- Yarn over and pull through all 3 loops.
- DC Cluster stitch made.
Ok, here we go folks! Hooks at the ready …
Round 1:
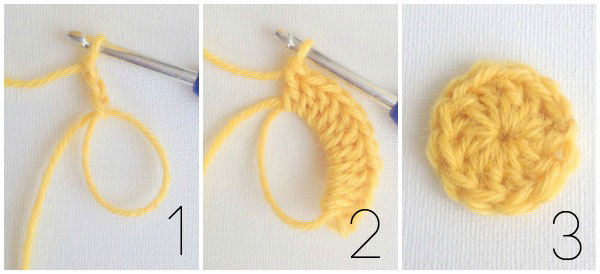
Multi Colour Version
- Using Colour A make a magic circle,
- ch 3 (counts as first dc) fig. 1
- 11 dc into ring fig. 2
- Fasten off with invisible join into top of first dc (12 dc) fig. 3
Single Colour Version
- Make a magic circle
- ch 3 (counts as first dc) fig. 1
- 11 dc into ring fig. 2
- Finish with a sl st into top of first dc (12 dc) fig. 3
Round 2:
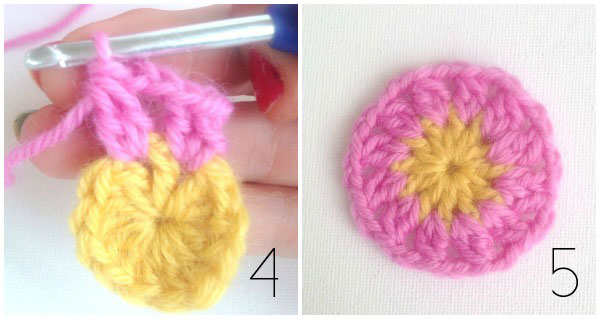
Multi Colour Version
- Using Colour B make a standing dc in between any two dc’s of previous row
- Make 1 more dc in same space
- *ch 2, make double cluster stitch in spaces between the dc’s of previous row fig. 4
- repeat from * 10 more times, ch 2
- Fasten off with invisible join into top of first dc (12 2 dc clusters) fig. 5
Single Colour Version
- sl st over to a space between any two dc’s of previous row
- Chainless start or ch 3 (counts as first dc)
- Make 1 more dc in same space
- *ch 2, make double cluster stitch in spaces between the dc’s of previous row fig. 4
- repeat from * 10 more times, ch 2
- Finish with a sl st into top of first dc (12 2 dc clusters) fig. 5
Round 3:
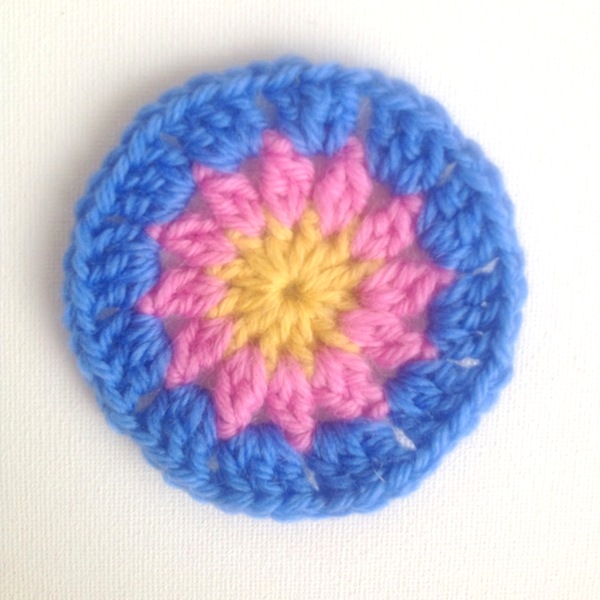
Multi Colour Version
- Using Colour C Join yarn in any chain space between clusters with a standing dc, 2 dc in same space, ch 1
- 3dc, ch1 in each space to end
- Finish with invisible join into top of first dc (12 x 3 dc clusters)
Single Colour Version
- sl st over to next chain space between clusters
- chainless start or ch 3 (counts as first dc), 2dc in same space, ch 1
- 3dc, ch1 in each space to end
- Finish with a sl st into top of first dc (12 x 3 dc clusters)
Round 4:

Multi Colour Version
- Using Colour A join yarn in any chain space with a standing sc
- *ch 4, sc in next space between clusters fig. 6
- Repeat from * to end
- joining last ch 4 with a sl st into top of first sc (12 ch loops) fig. 7
Single Colour Version
- sl st over to next chain space
- Sc into space
- *ch 4, sc in next space between clusters fig. 6
- Repeat from * to end joining last ch 4 with a sl st into top of first sc (12 ch loops) fig. 7
Round 5:
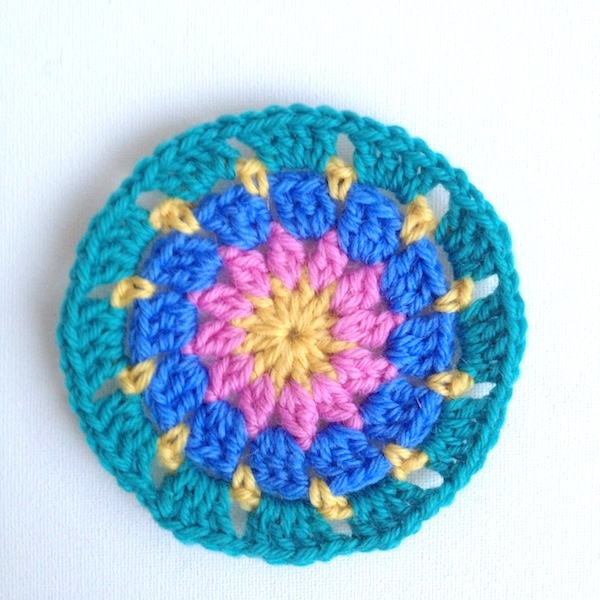
Multi Colour Version
- Using Colour D in any chain loop space make a standing dc, 3 dc in same space, ch 1
- *4 dc, ch 1 in next chain loop space
- Repeat from * to end
- Fasten off with invisible join into top of first dc (12 x 4 dc clusters)
Single Colour Version
- sl st over to next chain space
- chainless start or ch 3 (counts as first dc), 3 dc in same space, ch 1
- 4 dc, ch 1 in next chain loop space
- Repeat from * to end
- Finish with a sl st into top of first dc (12 x 4 dc clusters)
Round 6:
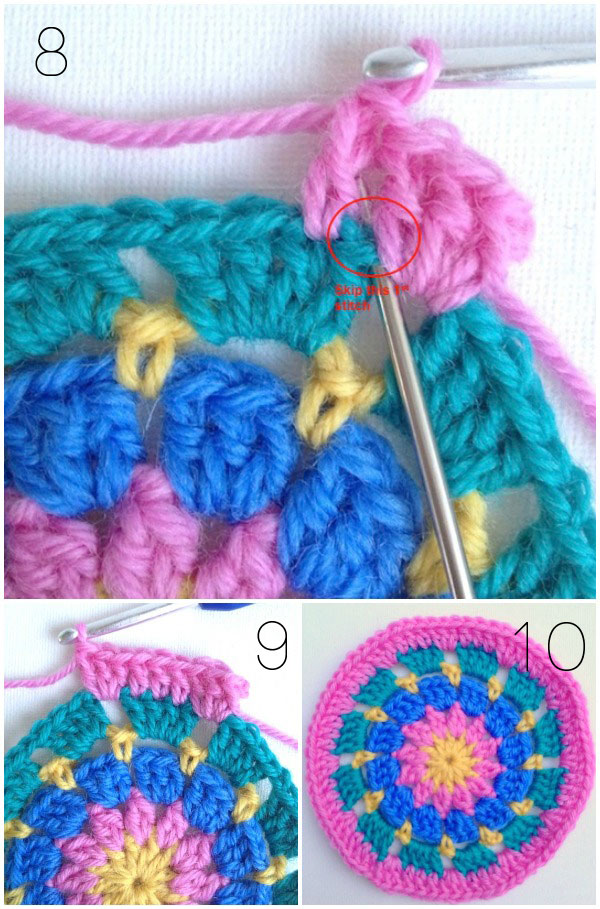
Multi Colour Version
- Using Colour B in any ch space make standing dc, 2 dc in same space
- *skip first dc of cluster from previous row (this stitch can be hard to see. I’ve circled it in fig. 8), 3 dc across cluster, 3 dc in chain space fig. 9
- Repeat from * to end.
- Fasten off with invisible join into top of first dc (72 dc) fig. 10
Single Colour Version
- sl st over to next chain space
- chainless start or ch 3 (counts as first dc), 2 dc in same space
- skip first dc of cluster from previous row (this stitch can be hard to see. I’ve circled it in fig. 8), 3 dc across cluster, 3 dc in chain space fig. 9
- Repeat from * to end.
- Finish with a sl st into top of first dc (72 dc) fig. 10
Round 7:
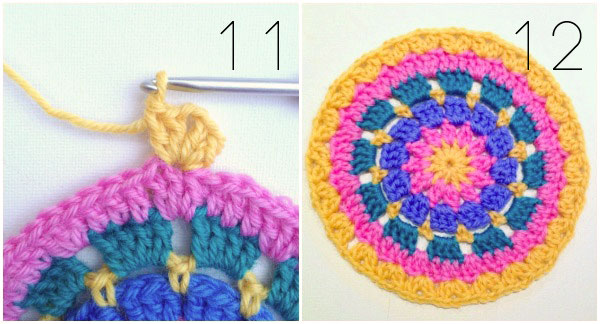
Multi Colour Version
- Using Colour A make a standing dc in any dc from previous round, make 1 more dc in same space, *ch 2, make 2 dc cluster stitch in same space fig. 11
- *skip 2 stitches, 2 dc cluster st, ch2, 2 dc cluster st in next space.
- Repeat from * to end.
- Fasten off with invisible join into top of first dc fig.12
Single Colour Version
- chainless start or ch 3 (counts as first dc) into top of previous dc, make 1 more dc in same space, *ch 2, make 2 dc cluster stitch in same space fig. 11
- o *skip 2 stitches, 2 dc cluster st, ch2, 2 dc cluster st in next space.
- Repeat from * to end.
- Finish with a sl st into top of first dc fig.12
And that’s it for this time. If you have any questions please pop over to the Ravelry group and ask away. I check in every morning and evening so hopefully you won’t have to wait too long for an answer.
See you in a fortnight when we will be finishing off the front of our Carnivale Cushions.
Part 1: Gather supplies
Part 2 : Cushion front – first half
Part 3: Cushion front – second half
Part 4: Cushion back and blocking
Part 5: Finishing off
Happy hooking
Michelle x
 About Michelle Robinson
Michelle is the face behind Poppy & Bliss. Her passion is crochet and her style is modern, vibrant and fun.
She teaches workshops in various styles of crochet, designs modern crochet patterns, occasionally remembers she has a blog at Poppy & Bliss but shares most of her work on Instagram


oh – pinned. I love this! My list of crochet projects to start is sooo long. Once I finish the blanket I’m working on now, I’ll get cracking on everything else. Yes. Everything! Including this!!!
Ah thanks Michelle for so beautiful project! Just finished this part and I love the result so much!
Olga~
Just saw it on fb, looks great!
This cushion looks fantastic! Thanks for sharing such a great tutorial – I love all the bright colours.
Thank you Michelle for this CAL.
I have completed this part and am very happy with the result.
LOVE your Carnivale Cushion Crochet tutorial. However, I have so many crochet projects “in the works,” that I have no time to crochet along. I’m working on 3 shawls, 2 afghans, several neck cowls, scarves & necklaces as I often create my own designs. Your directions are spot on as ell as excellent photos. I like the bright colors of yarn for the cushion. THANKS for sharing. Sarah in Minneapolis
So nice!!! Please part 3,4,5 all…thank you. I love this!!!!!
Thanks for teaching me new things:) I usually join the same old way and you showed me how to do the same things in a different way. Teaching an old dog new tricks so to speak! I needed a new round cushion too! Thanks for sharing!
Amazing technique, who knew that after 40 years of crocheting is learn something new!
Thank you
I could fill a book with the stuff I don’t know lol! Always good to learn a new technique.
This is a great tutorial it is so easy to follow. Thank you soooo much for making it such a detailed one .
It is fab Cushion and such a detailed tutorial.love it!!!
I love your pattern so much so I made one and dedicated it to my grandma. She used to make a slew of pillows when we were little girls. I posted a photo of it in my Ravelry page. Thank you for sharing.
Thanks for giving it a try. I love the sentiment of dedicating it to your grandma.