This week I’m sharing an extract from Snail Mail by Michelle Mackintosh, published by Hardie Grant Books
If you have an afternoon free, why not make your own paper? It’s a wonderful way to personalise your post, and is endlessly customisable. You can decorate your paper with stamps, pressed flowers, confetti or gold sparkles, or make paper laced with seeds, so the recipient of your letter can plant it in the garden.
Wherever your creativity leads you, this is a perfect project to get your snail mail looking like no-one else’s. You’ll never buy paper from the store again!
You will need:
- 2 x picture frames Choose frames that are the size you want your paper to be – just make sure that the frames are the same size and can sit together.
- Flyscreen mesh You can buy this at any hardware store.
- Tacks or staples
- Waterproof duct tape
- A blender If you plan on making a lot of paper, buy a used blender. Making paper won’t break your good blender, but it can get messy … paper plus water equals gluey goo!
- Microfibre cloths or tea towels, sponges and newspaper
- Scrap paper You can literally use any paper, depending on what effect you want.
- A tray This can be an old cat litter tray (preferably one that Whiskers isn’t using). You can even use the sink or a plastic out-tray as long as your frame can fit and be submerged in it.
SCRAP PAPERS YOU CAN USE
* newspaper
* cards
* catalogues
* paper bags
* egg cartons
* tissue paper
* magazines
* non-waxy cardboard
* old book pages
OPTIONAL EXTRAS
* stamps
* seeds
* flower petals
* confetti
* gold or silver sparkles
* anything else pretty!
If you’d like to stitch your paper like the example shown, you’ll need a sewing machine.
How to:
MAKING YOUR FRAME
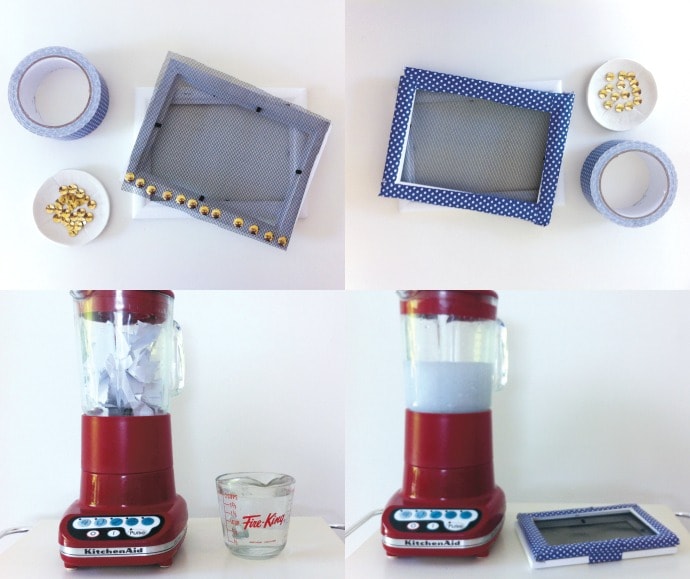
1. Remove the glass and backing from one frame and cut a piece of mesh a little larger than the entire frame. This will ensure you have enough mesh to stretch and fasten over the opening. Stretch the mesh over the frame and fasten it with staples or tacks. Ensure it is stretched tight across the opening.
Cover the edges of the mesh with duct tape, taking care not to let the tape overlap the opening.
2. Stretch the mesh over the frame and fasten it with staples or tacks. Ensure it is stretched tight across the opening. Cover the edges of the mesh with duct tape, taking care not to let the tape overlap the opening.
MAKING YOUR PAPER
3. Tear up the scrap paper and place in the blender with enough water to cover completely. You can add extras at this point. For a flecked look, try kitchen spices, herbs, grass or flower petals. Don’t add extras that you want to remain whole, like pressed flowers or leaf skeletons. These will be added later.
4. Blend the paper and water mixture. You can blend for a short time for chunkier paper, or for a longer time for a finer paper.
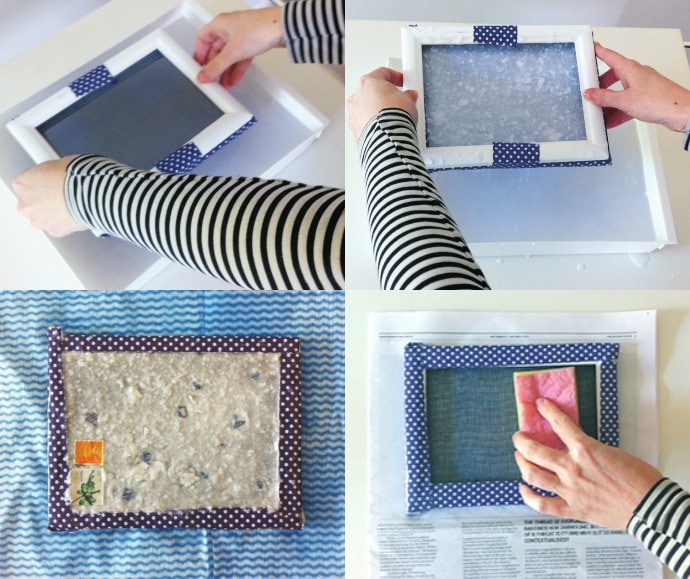
5. Fill the tray with enough water to submerge the frame fully. Pour the blended paper pulp into the tray and mix to disperse it evenly in the water. Make sure that the meshless side of the frame is on top. Lower the frame into the water with a side-to-side motion, as if you are panning for gold, until the mesh is covered with paper. Gently shake the frame from side to side in the water to even the
surface out. The meshless side of the frame will keep the pulp in place.
6. Lift the frame from the water, making sure the pulp side is facing up. Let the excess water drain through the frame before removing the meshless side of the frame.
7. Place the frame, pulp side up, on microfibre towels or tea towels (anything absorbent will do, really) to drain for half an hour. At this point, you can add any reserved ‘whole’ extras. Try gently pushing on some pressed flowers or leaf skeletons – whatever takes your fancy.
8. Place the frame, pulp side down, on some newspaper. Dab a sponge on the back of the mesh to soak up any excess water. Allow to dry on the newspaper for an hour or so. Carefully lift the frame and slowly
peel off the pulp, which should now resemble a wet sheet of paper. Be very gentle, as it can tear at this stage. Once the sheet of paper is free, leave it to dry on newspaper overnight.
Tip: If the paper is buckled, place it under some heavy books once it is dry.

Voilà! You have your very own handmade paper, which will make your letters to others just that little bit more special!

Re-published with permission by Hardie Grant Books, edited for web formatting.