
Emma loves playing with pretend food, so I thought I would add some felted fruit to her collection. She loved when I surprise her with little gifts, what kids doesn’t? Although I’m sure she’d prefer a My Little Pony if she knew they existed. Today I’ll show you how I made this kiwi fruit, and also how to use carding brushes to blend roving colours.
If you aren’t familiar with the technique of needle felting check out this post – Needle Felting Basics
You will need:
Wool Roving – green, brown, white & black (also called wool fiber)
Felting needles
Foam Pad
Carding Brushes (optional)

How to:
- To make the basic shape, take a small ball of green roving and start needling to form a half egg shape. Add layers of roving and keep needling until you are happy with your shape.
- To make the skin, take a layer of brown roving and needle it in around the outside of the kiwi shape. Add several thin layers to make an even coating.
- For the seeds lay just a few fibers in a star shape on the top and needle this in.
- Finally add a small amount of white to the center to finish off the top of your kiwi fruit.
- Go over the whole surface till the wool is firmly felted and you can not peel it off.
- Periodically roll between warmed hands to keep the shape even and remove needle marks.
- Finally to tidy up any stray fibers, give the kiwi a ‘surface needle’ (rub the needle across the surface).
- You’re done!

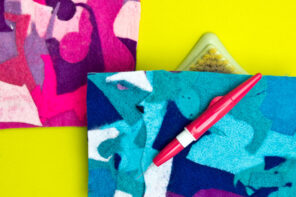
How to blend wool with a Carding Brush:
I didn’t quite have the right shade of brown for the skin of the kiwi so I blended it myself using a set of carding brushes.
Carding brushes can be a little difficult and expensive to get hold of, but a couple of cat/dog brushes have been known to do the job quite well. (sometimes called slickers)
Carding brushes have fine angled wires that pull the fibers apart and align them. They are used to clean, process and blend wool or fleece.
- To blend, pull a fine layer of each colour over the teeth.
- Drag the paddles over each other a few times until you are happy that the colours have mixed evenly
- Pull your blended fiber off your brushes and your are done!


I hope you enjoyed this little project, next week I’ll show you how to make a cute little strawberry and a pear.

If you enjoyed this project you may also want to make a Needle Felted Rattle Ball or a Needle Felted Heart Garland
Enjoy!
This is so cute! One of these days I will learn how to felt. 🙂
Oh thanks. Felting is super fun. Will check out your blog for sure 🙂
i am interested how to felting i dont know where to start or with what i got a ball of wool felt an tool not sure its correct the town i live in no one know what i am talking about any directions and guidance
would help
thank you carol
This post has some helpful information, I also found youtube videos helpful when starting out. You may need to get your supplies online. There are some good stockist on etsy. I have bought needles on there. Most wool shops that cater to spinners will have wool roving that can be used for felting.
Have fun felting
x cinti