The crochet world is abuzz with a fun new technique called ‘planned pooling’ which when done correctly creates really striking argyle pattern effects in the finished crochet fabric.
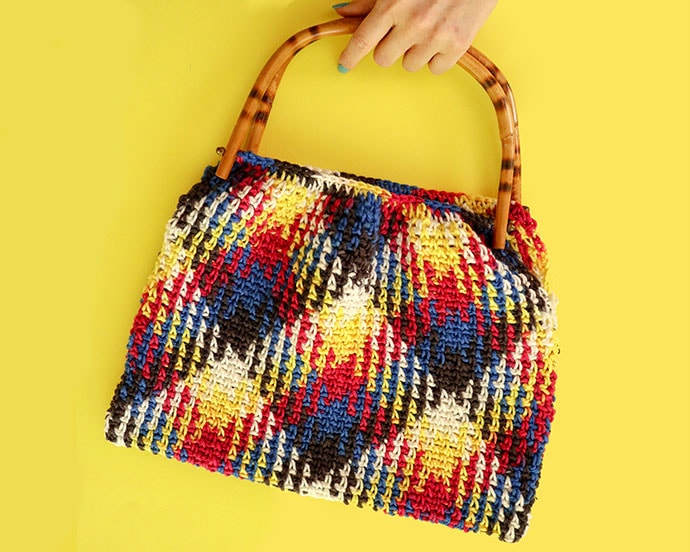
I’ve used a brand new pooling yarn to create a fun and easy crochet bag pattern with cute bamboo handles, and have included lots of tip for getting the best results from your planned pooling projects.

Brought to you by American Yarns
What is Planned Pooling?
The planned pooling effect is created by working variegated yarn, with consistent short length colour changes, over a set amount of stitches. By carefully planning where each colour stitch will sit in each row, an argyle pattern can be created.
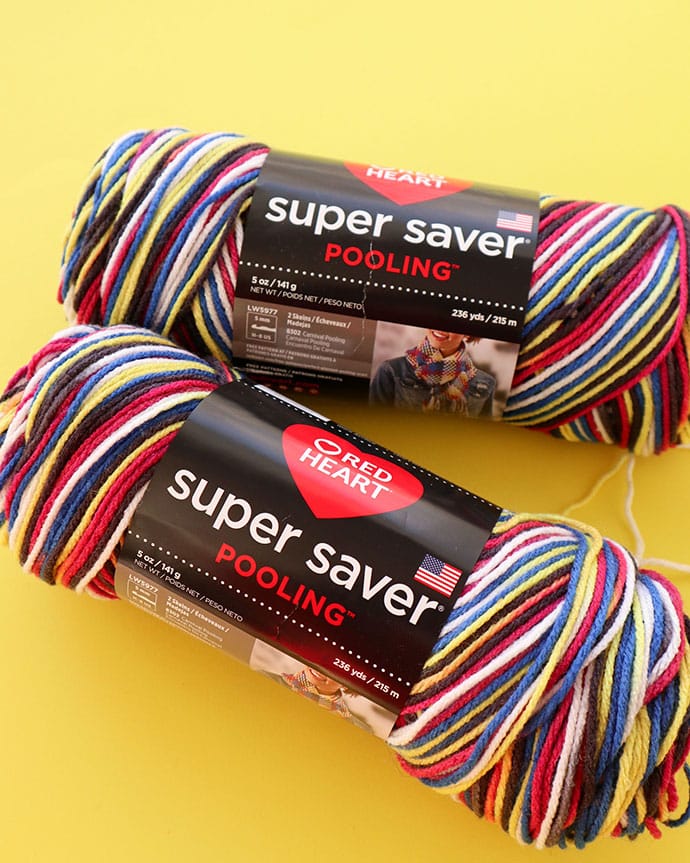
Any yarn that fits the above requirement can be used to create a planned pooling effect, but the results aren’t always consistent. Yarn companies have taken note of this recent trend and Red Heart has released a new yarn especially engineered so that color repeats are evenly dyed to make planned pooling almost foolproof.
Now available in Australia from American Yarns, Red Heart Super Saver Pooling is available in 6 colour ways.

About Red Heart Super Saver Pooling Yarn
Super Saver Pooling is a 10ply 100% acrylic yarn especially designed for planned pooling projects. The colours change quite abruptly and each colour length is designed to create 3 stitches (sc+ch) in moss stitch with a 5mm crochet hook.
Super Saver Pooling is nice to work with, springy and doesn’t feel overly synthetic. It’s dye lotted, so keep that in mind when ordering multiple balls for a bigger project.
In my opinion this yarn not particularly attractive to look at in its ball form as the contrasting short colour changes seem quite garish. To be honest, I don’t think this yarn has much shelf appeal, and I’d probably walk right past it in a store if I didn’t know its full potential.
But just like the ugly duckling that turned into a swan, this yarn, if you have the patience to learn the somewhat tricky technique of planned pooling, can create a real showstopper crochet project.
I chose the colourway CARNIVAL for this project.

Planned Pooling – The good, the bad and the frustrating!
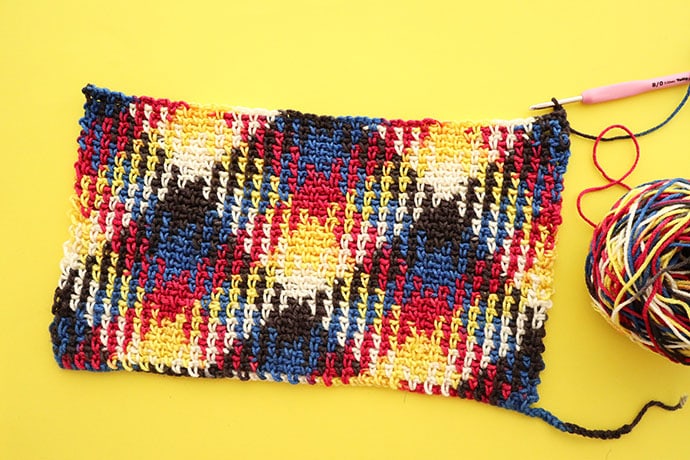
I’m not going to lie, it took me a fair bit of practice to get this technique to work properly. I probably ripped out my sample swatch about 6-8 times before I worked out how to read the pattern in the stitches, and adjust accordingly to get good results.

One of my first unsuccessful planned pooling attempts. Pattern starts to go awry in the 4th row and is a total fail about 8 rows in.
Initially, I found my failures incredibly frustrating and actually put the yarn away for a couple of weeks because I was sick and tired of ripping out and starting over repeatedly.
But because I had this yarn review and a pattern to create, I stuck with it and with a bit of patience I cracked the elusive planned pooling code with fabulous results.
Just like riding a bike, once you work out how to do it, planned pooling is quite simple.
It’s a great feeling to see the argyle pattern successfully develop before your eyes, as if by magic. Once I got the knack, I was hooked!
This technique is not for beginners, but if you are a fairly confident crocheter or want to challenge yourself, I’d recommend giving planned pooling a try.
I’ll be sharing some tips and tricks below for a successful planned pooling crochet project.
Planned Pooling in summary – The learning curve can be tricky, but the process is fun with very attractive results.
Limitations of Planned Pooling Crochet
To achieve a successful argyle effect there are some restrictions on the project design.
- The piece must be worked flat, back and forth (not in the round)
- The width of the piece can’t change throughout the project and needs to be either square or rectangular
- The width of the piece is determined by full pattern repeats ie. can only be as wide as 1,2,3+ repeats, not half or 1.5 repeat.
- Not every stitch style will work with planned pooling – most commonly used is Moss stitch, which is a repeating pattern of (US) single crochet + chain stitches.
With the above limitations in mind I wanted to create a practical project that showed off the argyle design and wasn’t a garment (because we are heading into Summer here in Australia). So rather than another scarf or blanket I thought a cute handbag with bamboo handles would be fun.
Before you get started on the bag you’ll need to learn the basics of planned pooling.
Getting Started with Planned Pooling
I’d recommend starting with a sample swatch to get the technique mastered before you move onto the crochet bag project. It’s also important to work out your hook size as the ideal gauge is 3 st per colour. I found a 5mm hook adequate.
Firstly you’ll need to know how to crochet the Moss stitch pattern. I’ve given basic instructions below. I’ll be using US terms in this tutorial and pattern to keep it consistent with the language in the video if you need to refer back to it for trouble shooting.
WATCH THIS FIRST
This video by Marly Bird was very helpful and will explain everything you need to know about planned pooling as well as demonstrating the moss stitch. Watch it over and over until you feel confident.
The only variation I made from the video was to crochet into the base chain rather than around it.
Basic Moss stitch pattern – US terms
Start by working any even number of chain stitches (base chain).

Row 1: Work a single crochet (sc) stitch into the fourth chain from the hook, 1 ch, skip one base chain, sc stitch into the next chain. Repeat till end.
Row 2: Turn. Chain 2, sc in to the first chain 1 space skipping the single crochet stitch, ch. Repeat sc, ch pattern only working the sc into the chain spaces below till end.
Continue with the same pattern for every row.
How to get the Planned Pooling Argyle pattern to work – Tips and Tricks
So you’ve made a few swatches and are still finding that your pattern goes awry? Here’s how to fix it.
Most of the following tips are gleaned from the video above but I thought it would be helpful to break them down below.
Establishing the pattern
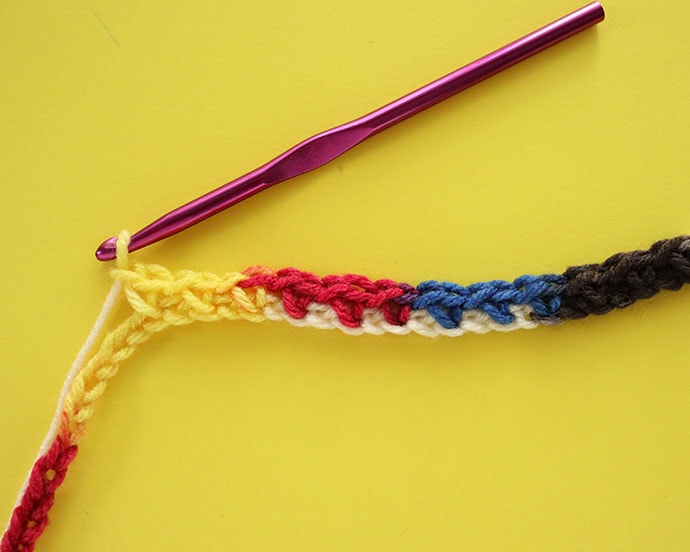
Start with a chain longer than your finished width will be. As a guide, chain through all the colours once for a single repeat, or 1.5 times for 2 repeats. It doesn’t matter if it’s longer than the finished width, we will undo the remaining chain at the end.
Moss stitch (sc, ch) through as many colour sequences as required. If the yarn has 5 colours that’s once sequence. If you are creating a wider project (like the bag below) crochet though 2 sequences (5 colours twice). You can make a project as wide as you like as long as you keep each sequence intact.
When you get to the last colour, undo one stitch. Turn work and start next row.

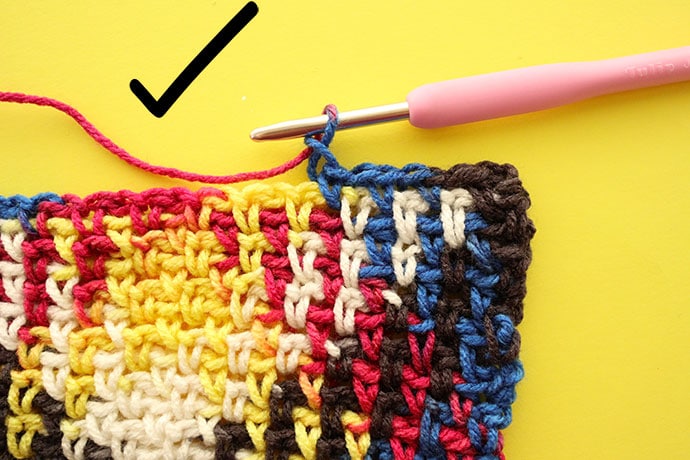
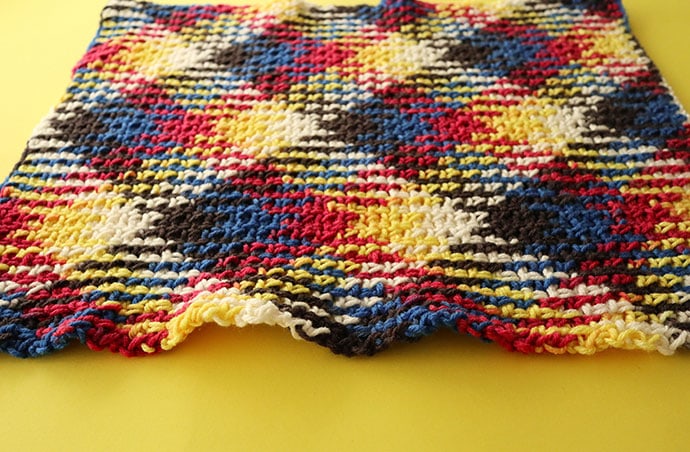
The key to creating a consistent argyle pattern is to make sure the stitch colours are consistently off-set by just one stitch in every second row.
By the 3rd row you’ll determine if the pattern shifts right or left. Whichever way it shifts you’ll need to keep it consistent throughout.
You can see in the image below what the next colour sequence will be. The row two below your working row is used as a guide. See how the stitch colours shift over by one.
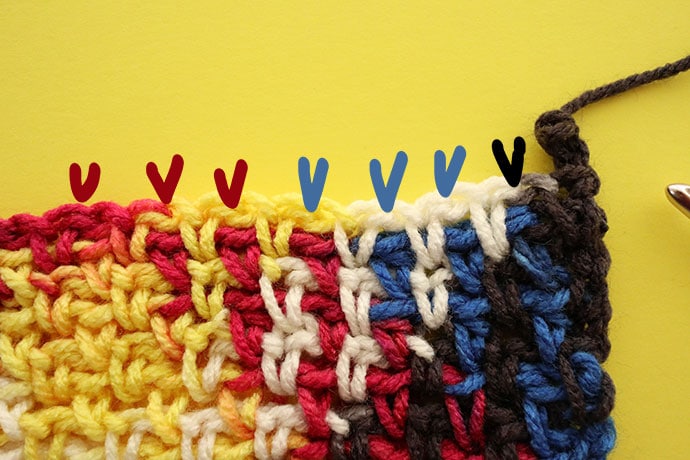
If worked correctly, you’ll get consistent diagonal colour banding though your work to create a pattern.
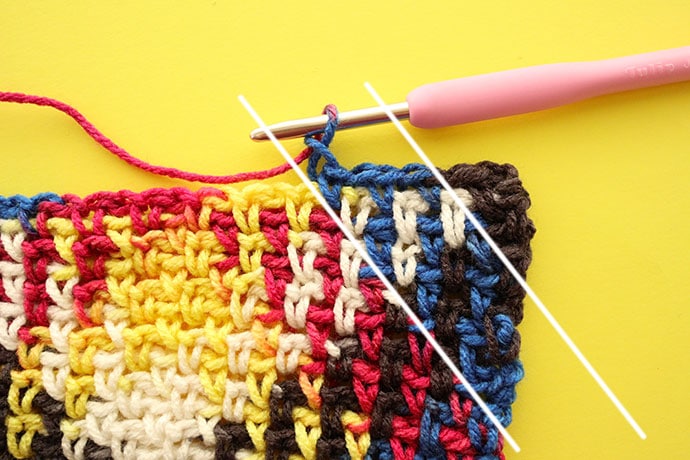
But you’ll find problems with the pattern going out of whack mainly occur when you turn your work because the ch 2 turning stitch doesn’t use up as much yarn.
What happens is this. See below how there is too much black yarn and the pattern (blue yarn) has shifted over 2 spaces instead of one. Once this happens you are off track and things get messy quickly.
How do I fix it?
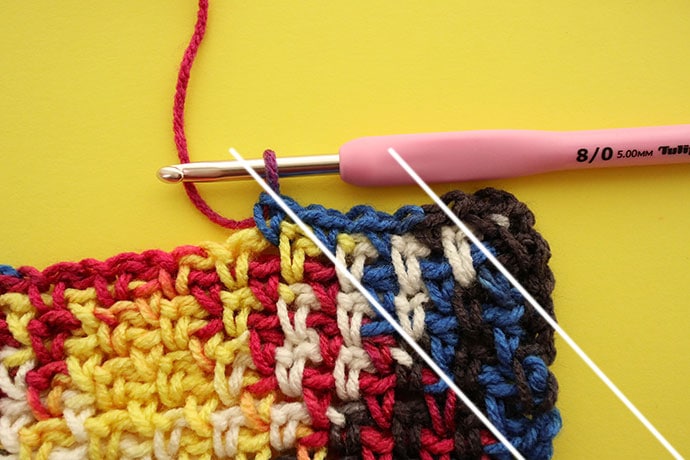
The key is to use up the spare yarn by ‘eating it up’ with bigger stitches.
What I’ve done here is unraveled back to the first black stitch in the row below, instead of the regular sc, I’ve made a hdc (half double crochet) stitch.
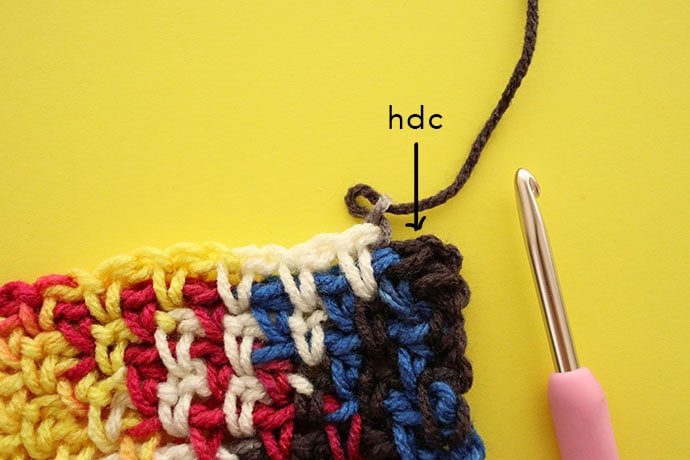
Next row, ch2 and turn. Now another hdc. See that I’ve used up enough yarn that it’s ready to go onto the blue stitches. Problem solved.

I hope that makes sense.

There is no specific pattern as to when adding hdc stitches are required. It’s a judgement call. The main thing to remember is that the taller stitches make bigger chain gaps so on the next row above you’ll need to crochet into the stitch below (rather than the chain gap) to avoid a hole.
You won’t notice it in the finished work. I’ve pointed out where I’ve done this in the image above.
There is a catch to adding all those taller stitches at the edges. You’ll get waves at the sides of your piece because those taller stitches add extra length ever so slightly. Depending on the project this may or may not be a problem.
In my bag pattern those edges are seamed so the waves don’t show. If you are making a scarf, you’ll need to lightly block the garment to settle the edges.
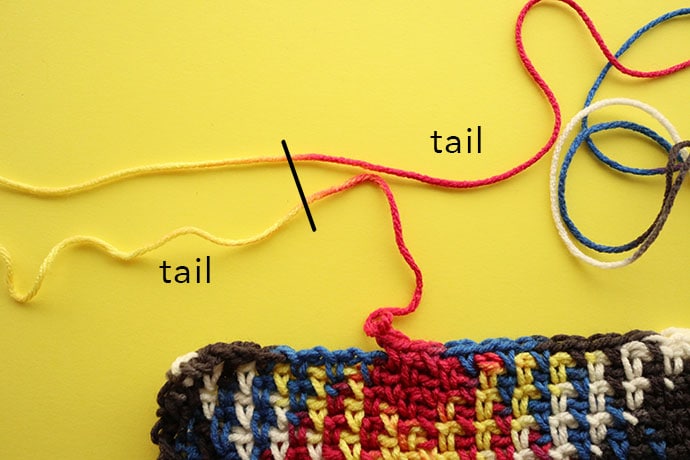
Joining yarn balls
When you need to change balls of yarn it’s very important that you continue the colour sequence after the join.
You may need to pull out quite a bit of yarn until the colours match up perfectly. Tie a knot where the colours change to be sure the colour length stays consistent.
Just remember:
Unlike normal crochet where the aim is to keep consistent tension throughout the work, planned pooling requires you to constantly adjust your tension to ensure that you keep the stitch per colour ratio consistent.
Sometimes that meant, making stitches tighter, and other times it required loosening or even adding hdc to make the number of stitches work.
Once I worked out that key element, it all came together.
Now that you know everything there is to know about crocheting planned pooling successfully – LET’S MAKE A BAG!
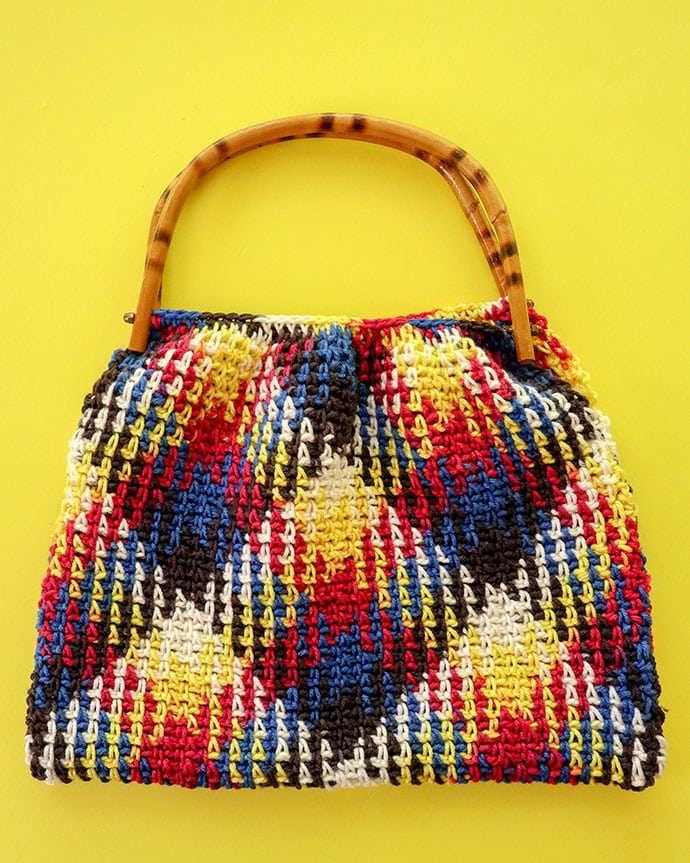
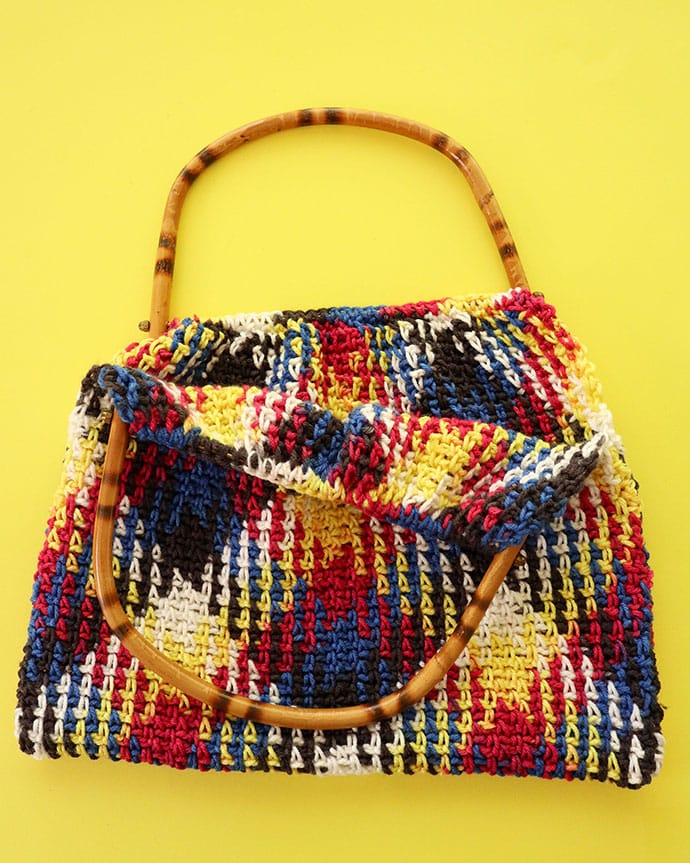
HOW TO MAKE A CROCHET BAG WITH BAMBOO HANDLES
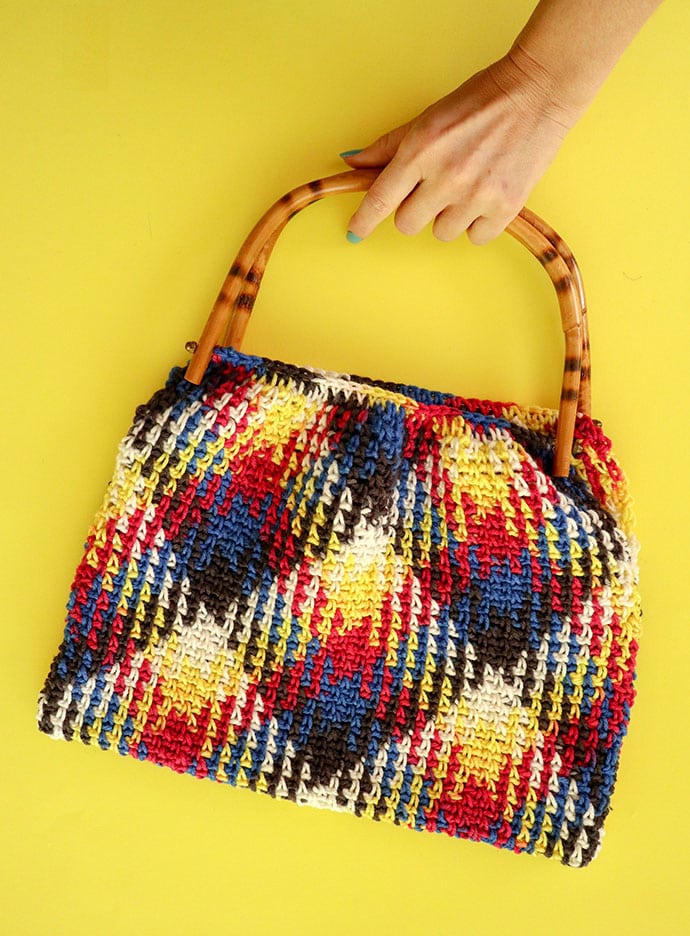
I love a bag with bamboo handles, they have a real vintage vibe to them that just screams ‘Granny Chic’ (it’s the hot new fashion trend that I can get behind).
The handles I’ve used for this bag are actually vintage from a thrift store find, and repurposed from this retro bag project I made a few years ago. If you can’t find vintage bamboo handles, similar ones are available online. I’ll list some sources below.
You will need:
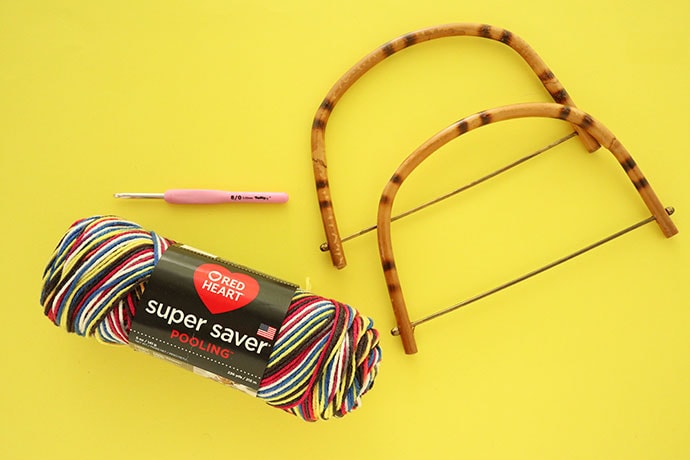
- 1 pair 25cm D shaped Bamboo handles or similar
- 1.5 balls Red Heart Super Saver Pooling
- 5mm crochet hook (8/O)
- Wool needle
- scissors
- measuring tape
Suppliers of suitable Bamboo bag handles:
ETSY (affiliate links):
Bag Finished Size (may vary): 36cm/14″ wide, 28cm/11″ tall (without handle), 40cm/16″ tall (with handle)
How to:
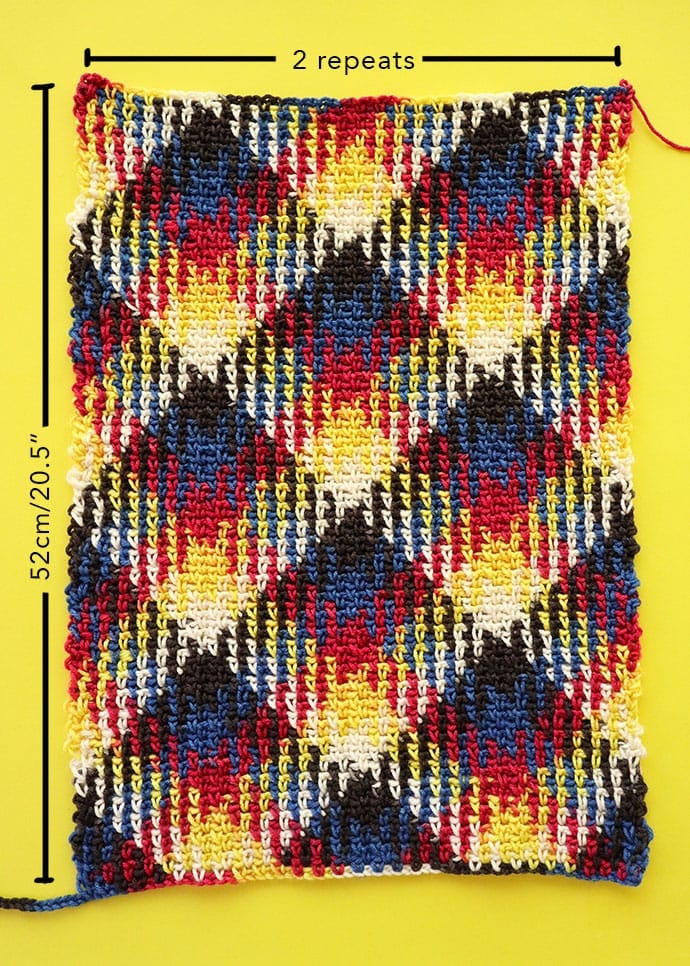
1. Following the planned pooling crochet instructions in the tutorial above, crochet a moss stitch rectangle that is 2 pattern repeats wide and about 52cm/20.5″ tall. Depending on the size of your handles or your desired size of bag, you can adjust the length as required.
2. Undo the excess starting base chain and weave in any remaining yarn ends.
3. Decide on which side of the crochet will be the outside (right side) of the bag, and fold the rectangle in half with the right side in.
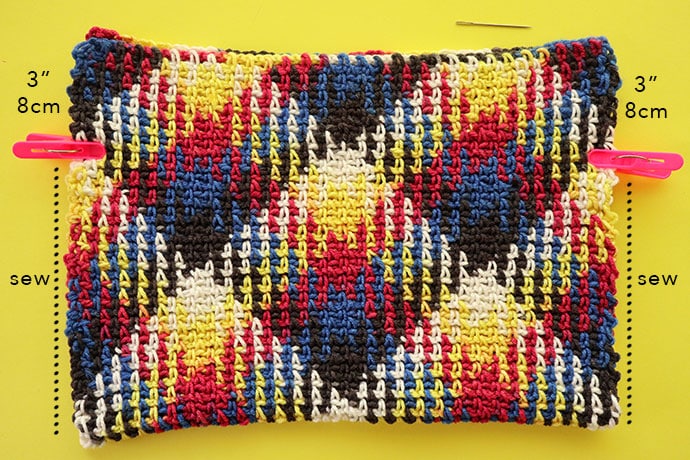
4. Sew up the sides leaving the top 8cm/3″ un-sewn.

5. Turn right side out.

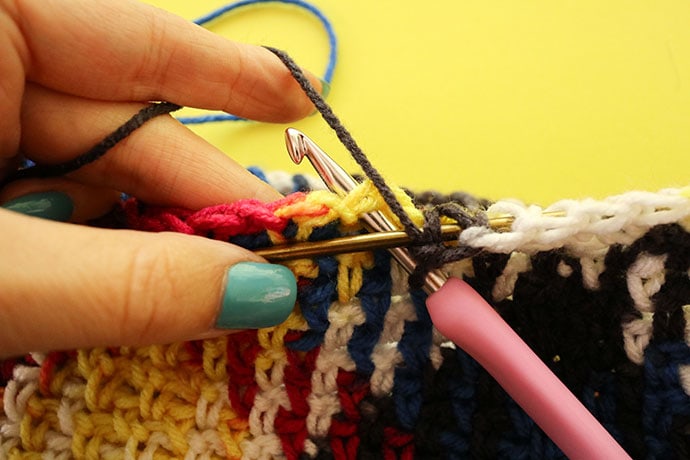
6. Attach the bag handle by single crocheting over and around the bottom bar of the handle. Only crochet into each sc stitch below (not the chain stitches). About 30 stitches. Fasten off securely and repeat with second handle.
A note on Bag Handles:
The handles I’ve used here have a thin removable metal rod. I had the option to crochet around the rod or weave the metal rod through the stitches. Another option would have been to sew the handles onto the crochet.
It’s hard to find this exact type of handle with the metal rod, but there are many D shaped handles with a thicker non-removable wooden or bamboo rod. The same attachment technique I’ve pictured will work with a thicker rod or even a bamboo ring.

Once the handles are attached the bag is ready for use.
The crochet is nice and stretchy so this bag can accommodate a lot of stuff. I imagine it to be just like Mary Poppin’s bag that fits anything and everything.
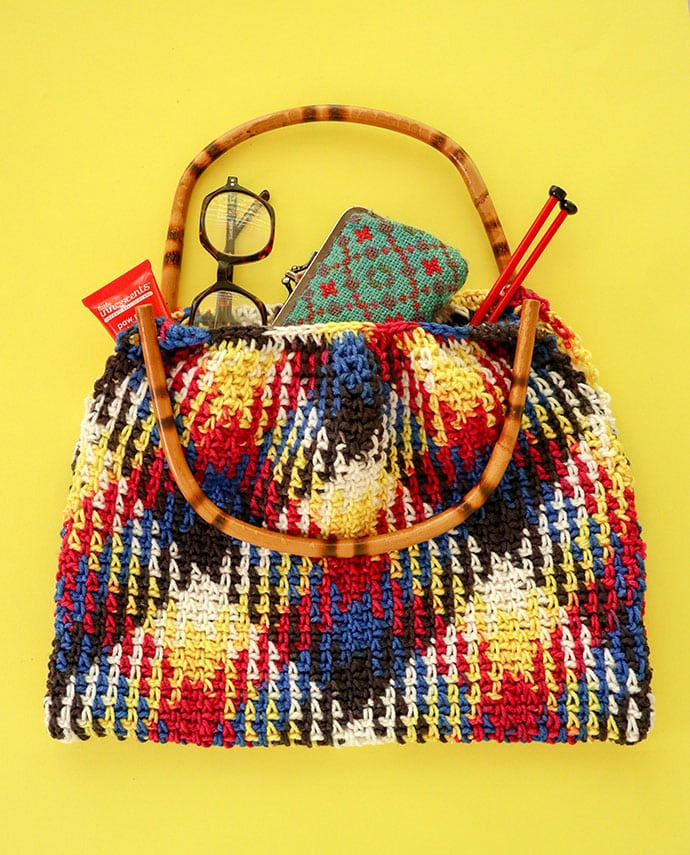
Pens and hair pins may work their way out through the crochet, so I’d recommend a small fabric pouch to hold items that may escape.
Red Heart Super Saver Pooling Yarn is available at www.americanyarns.com.au
LOVE IT? PIN IT!


I’m sorry it was so frustrating to start with, but the result is spectacular! It’s a gorgeous bag! Thanks for sharing.
Like any good challenge, success is always sweeter if it’s hard earned.
This is an amazing bag! I really want to try my hand at planned pooling but I can’t find any appropriate yarn here in Greece.
I’m not sure if American Yarns ships to Greece, but you can try planned pooling with any yarn that has regular colour changes. As long as the dye lengths are consistent it should work.
I discovered the Marly Bird video last year and made the panel for the poncho that is on the video – I did then complete the poncho for my daughter. This is extremely challenging (or should I say frustrating!) but when you’ve got it, it really is a delight to see. I’m not sure that this will take off, I haven’t seen a lot of it in the UK, but the planned pooling wool is easily available here at Wool Warehouse (who I know ship to other countries) and Black Sheep Wools. I’m currently working on a bag using the same technique.
Yes it does take a lot of determination to successfully finish a project. I found it very satisfying once I’d ‘cracked it’.