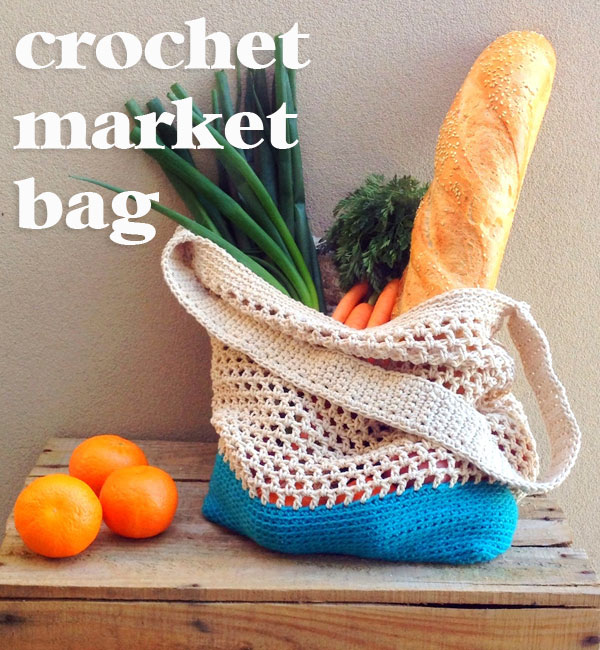
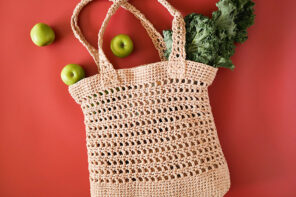
This easy to make Crochet Market Bag is a modern take on the old fashioned string shopping bag. It looks great with it’s color-blocked design and is super practical too.
This post contains affiliate links
A reusable shopping bag is a must have item now, with most stores no longer supplying bags, or charging extra for them. With this crochet market bag, you can ditch the plastic bags all together.
Pop it in your handbag on your next trip to the shops, it’s roomy enough to carry your groceries home and the solid base will stop your carrots falling out the bottom.
You may also enjoy:
- Reusable Produce Bag Crochet Pattern
- Simple cotton Dishcloth & Scrubbie Crochet Patterns
- Scrap Yarn Crochet Basket
Crochet Market bag Pattern and Instructions
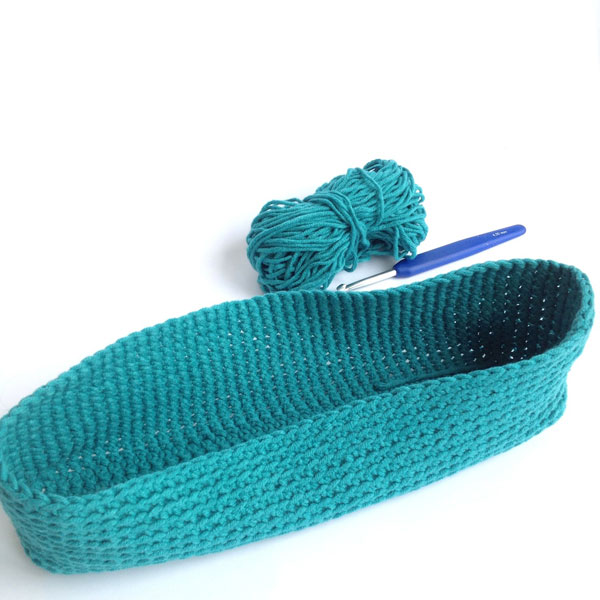
Made with cotton yarn and cotton kitchen string, this crochet bag is super robust and when it gets dirty, just throw it in the washing machine.
The base takes a little longer to crochet due to the small tight stitches, but once you get to the netting section, you’ll find the rest of the bag really works up quite quickly.
If you can’t get hold of kitchen string, usually available at variety stores and even supermarkets, try using 8ply (DK) cotton yarn.
You can choose to use contrasting colours for each separate section, or make the whole bag in one solid colour.
This crochet pattern is easy to follow and has additional step-by-step photos to help explain any tricky bits for beginner crocheters.
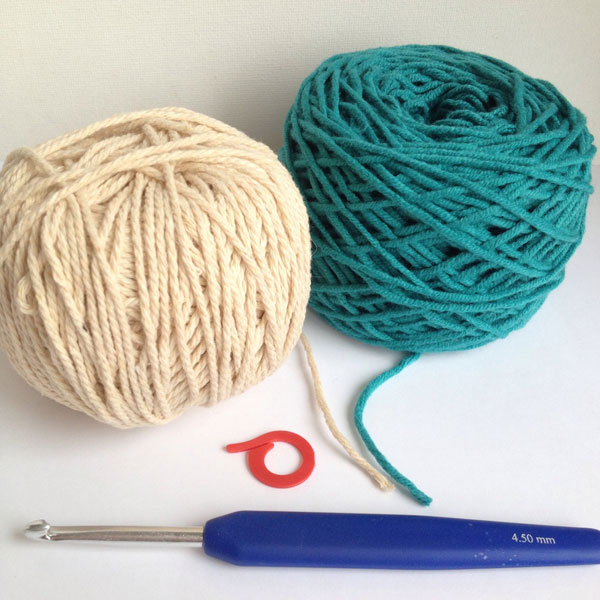
You will need:
- 2.5 balls kitchen string for the bag body
- 1 x 50g ball 8ply/DK cotton yarn in contrast colour for the base and handles
- 4.5 mm crochet hook
- Open Stitch marker
US Terms Used Abbreviations:
st: stitch
sl st: slip stitch
sk: skip
ch: chain
sc: single crochet (UK double crochet)
blo: back loop only
dc: double crochet (UK treble)
How to Crochet a Market Tote Bag
Making the Base:
Using your contrast colour, chain 41
Row 1: sc into 2nd chain from hook, sc 39, ch 1, turn
Rows2–10: sc 40, ch 1, turn. Stop at the last sc on the last row and don’t ch 1 or turn.
Now we are going to stitch around all sides of the base to prepare forming the sides of the bag base
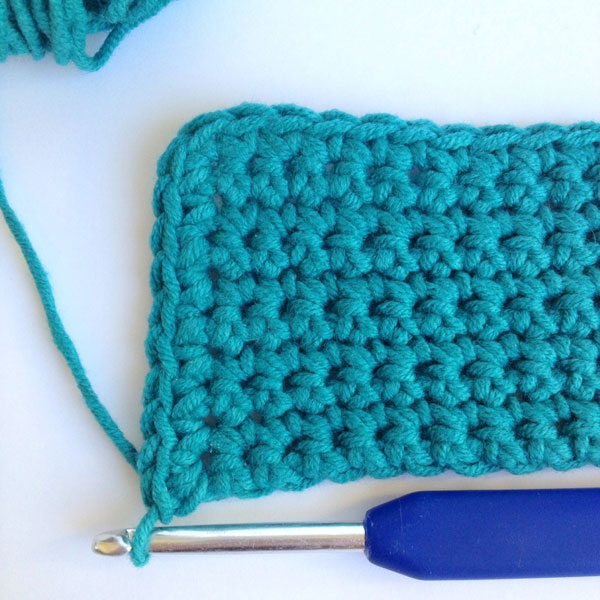
• Without turning, sc back into same space as last stitch worked.
• Working along the left side of the base, sc 7 (one into each row space), 2 sc into last space.

• sc 39 along bottom of foundation chain, 2 sc into last st
• sc 9 back up along the right hand side of the base (100 sts)
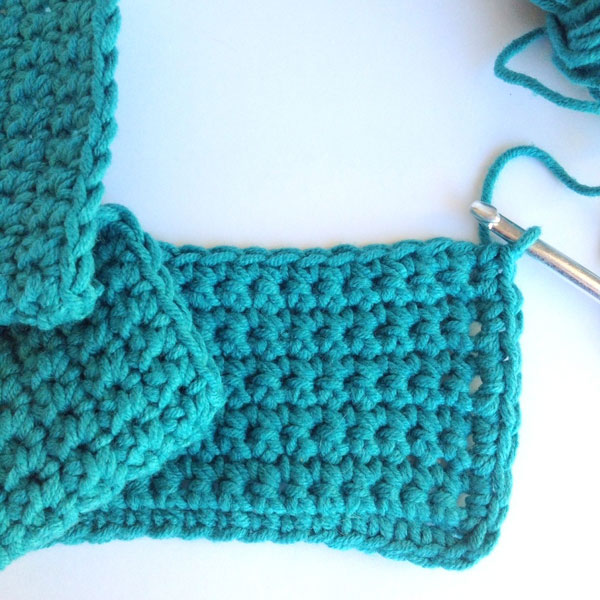
We’ll be working in the round from here
• Placing a marker into first stitch, sc into back loop only (blo) to end. Continue this way for another 12 rows
• Join with a sl st. Break off yarn
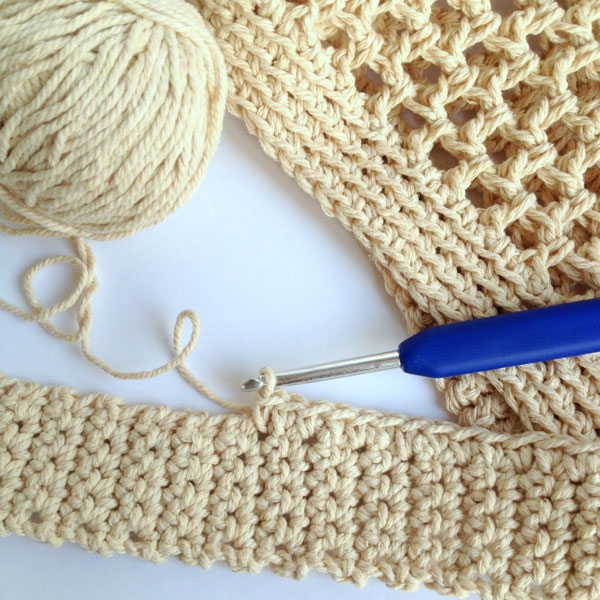
Making the Bag Body:
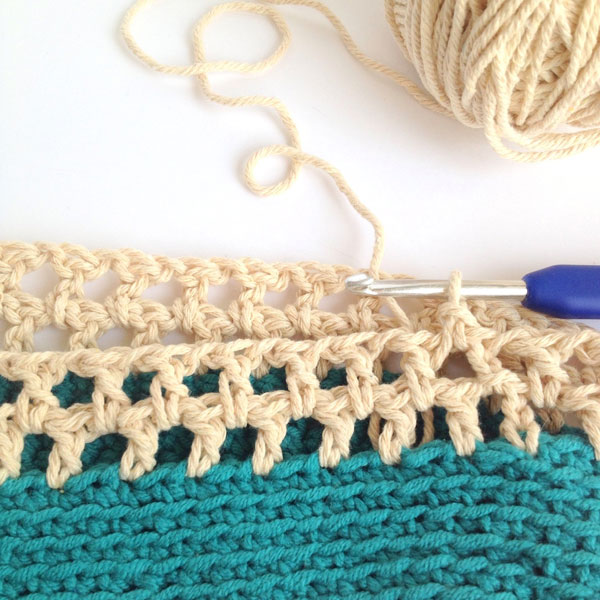
Row 1: Join in string yarn and ch 4 (counts as first dc and ch 1), sk 1 st, *dc 1, ch 1, sk 1. Repeat from * to end. Sl st into top of first ch 3.
Row 2: Sl st into next ch space of previous row. Ch 4, * dc into next ch space, ch 1 Repeat from * to end
Rows 3 – 20: Work as for Row 2
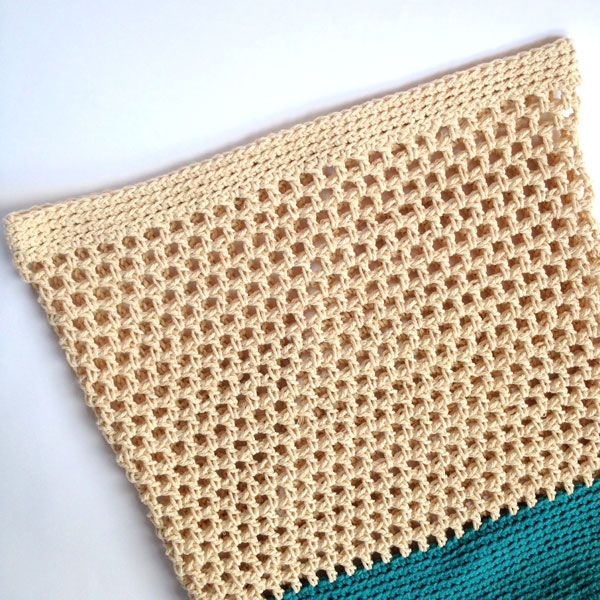
Row 21: Placing a marker into first st, sc into each ch sp and stitch from previous row. Join with a sl st.
Rows 22–25:Ch 1, sc in blo to end. In final row, join with a sl st into first sc. Break off yarn.
Making a Crochet Strap
Lay your bag out flat and determine bag sides, place a marker in the side stitches. Count 2 stitches back from side stitch, join in yarn, * sc 5, ch 1, turn. Repeat from * until strap is long enough.
I’ve made mine 100 rows (aprox. 59 cm) but you can adjust to your preferred length.
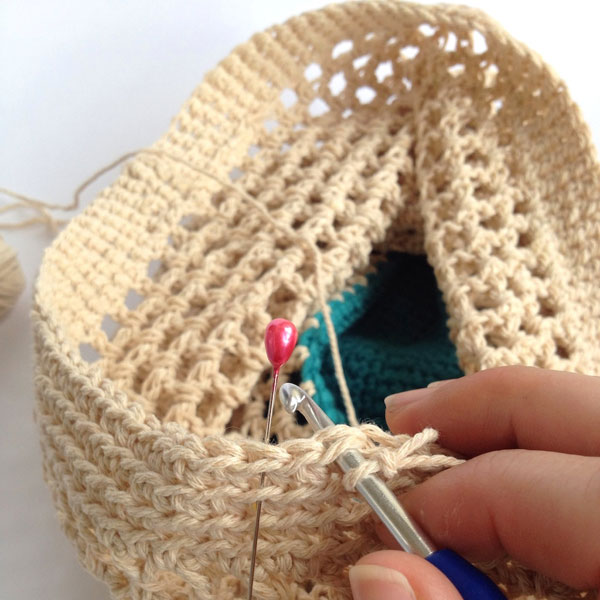
Making sure you don’t twist your strap, line it up on the other side of the bag and with right sides facing together, sl st strap to bag. Weave in ends and you’re done.
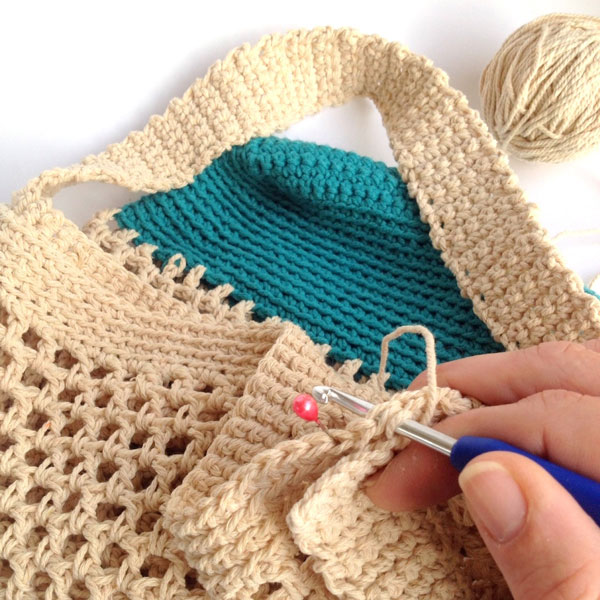
Optional: I’ve sc along the sides of my strap to neaten them up and also make them less likely to stretch but you can skip this step if you prefer.
I hope you’ve enjoyed making this project. Now it’s time to go out and show off your new crochet shopping tote bag.
 This crochet pattern designed by Michelle Robinson
Michelle is the face behind Poppy & Bliss. Her passion is crochet and her style is modern, vibrant and fun.
She teaches workshops in various styles of crochet, designs modern crochet patterns, occasionally remembers she has a blog at Poppy & Bliss.


I love this! It might just be the incentive I need to finally teach myself how to crochet. 🙂
This looks good and simple to make!
I have this pattern bookmarked!
Xx
I really like this pattern. I have been looking for one like this. I used to make round ones, but the bottom would always turn out too small and everything would still fall out.
Once I start my summer crochet again I’ll try this one!
what is kitchen string?
It’s string that is made of un-dyed cotton. Usually used for tying up joints of meat and other random things that need cooking and tying.
Hi! Loved the bag, will begin tomorrow. Thank you so much for the pattern. I have two questions, though: what’s its measument?! Maybe its there but I cant find it. Also, is there a gauge? Im from Brazil and I will use yarn I already have. Thank you!
I’m sorry, the original pattern designer didn’t include a measurement. You may find some further information in the notes section of the people who have made and shared this project on ravelry https://www.ravelry.com/patterns/library/market-bag-24/people
Tato taška se mi moc líbí, co nejdřív ji chci uháčkovat. Děkuji moc za návod!
Translated from Czech – I really like this bag, I want to crochet it as soon as possible. Thank you so much for the tutorial!
Thanks so much. Enjoy making your crochet shopping bag
How many chain spaces are there supposed to be starting row 3?
Row 3 of base, or row 3 of netting section?
Thank you for answering my question, but I figured out what I was doing wrong. Nice to have someone actually reply to a question.
Hi there. Thanks for sharing your pattern. Did you use kitchen string or a cream yarn for the handles? Thanks
It was kitchen string for the handles too.
I’m confused! When you say sc 7 in each row, does that mean 7 sc in each sc?
This is for the base right after row 10.
Hi Jane. sc 7 means one sc per stitch into the row below. So one sc per each sc stitch.
Hello! I am from Brazil and trying to figure out how to do it.. I am learning to crochet for the past days, so in English is a little more complicated for me!
When you start to work in the round shape, do you blend the two opposite sides just like I do when I am going to start to do a round crochet from the beginning?
Thank you very much!
You go around in a spiral, is that what you mean?
I just finished the bag myself. It is my official second crochet project ever so it looks a bit wonky. I like it though. My problem is that the strap seems that it will break at the base when the bag has a few items in it. I’m thinking maybe I need to reinforce the part where the strap meets the bag? Or am I doing something wrong? Any suggestions? Thanks
Go you! Practice makes perfect, you should see some of my early crochet, it was far from perfect. Yes you may need to reinforce the straps, just use the same yarn and weave in (or sew) a few extra stitches to make the join stronger.
In future make the tension where the straps join a little tighter, that should help that problem.
The kitchen string?? Purchased in the craft store in the yarn department? Thanks! I’m super excited to try this.
Hi, Cintia. I’m now crocheting this market bag, and this is a very fun pattern to work with. Thanks a lot for posting this pattern. ^_^ I have question for you, since in my country here now we have a new established policy to reduce the use of plastic bag, may I repost this pattern in Indonesian language in my blog with a link to the original pattern in your site? Thank you again. ^_^
Thanks a great idea. Yes please do.
Oh my goodness! I love the look of this bag. Now it’s about finding the time to make it …
Hi! Approximately how many feet of kitchen string is there in one of your balls? I’m trying to buy some online and it says it’s about 220 feet for this particular one that I have found.
I’d say probably about the same (80-100m/yards) approx. Get 3 just to be sure.
If I’m trying to use up my stash of Sugar n Cream, and not buy kitchen twine, how much do I need? I’m trying to plot out colors.
Thanks.
Just a guess, but I assume one ball of twine is about the same as one ball of yarn (in length), so all up 4 balls of yarn should do it.
Thanks for the pattern! I just finished this bag! It worked up fast and easy!! I used one color and it looks great!
I thought my base looked fine as wasn’t finished it all yet when I posted before but realized I don’t understand how the sides of the base are formed. I appreciate any help to figure this out. Thank you.
Maxine
once you stop increases the sides will start to curl up and then when you go around and around your sides will get taller.
Thank you so much for your reply. Where are the increases in the pattern ? Is it when you start on the bag itself ?
sorry I meant, once you start working in the round, the sides will build up by themselves,
So you have made the rectangle base, and now just start crocheting around and around the rectangle and the sides will grow up.
I would like to know when doing the netting part on row 3 after chaining 4 do you dc into the space that you did the slip stitch into or the next space ? Sorry for all my questions . But I do like your pattern. Thank you.
You stitch into the next space.
Thank you very much for your replies. I’m still stuck on the beginning of the rows after first row is done. That works out fine but then I’m not sure where 1st dc goes into after chain 4 . You said to sc into next chain space but I’m unsure if you mean to the space on the left to chain 4 or next one over.
Into the big hole directly underneath it.
Love this bag! Thank you for sharing pattern.
Fabulous pattern … Onto my second one now using the same colors as Michelle did. Love it ! Thanks so much !
Is it always 7 SC and 2 SC in same stitch, on one side followed by 39 SC and 2 SC in same stitch, and then 9 SC? In other words, am I aways doing 7 SC and 2 SC in same stitch on the left end and 9 SC on the right end? Thanks!
The 7+2 and then the 9 is just to square off the base (to make a rectangle), after that you are working in the round – so you just do a sc (single crochet) around and around with no increases (only one into every stitch). This will build up the sides.
Do that for 12 rows (or as many as you need) to make the blue base.
Hope that helps
Do you always do 7 SC on left end and 9 SC on right end?
Just finishing my first of what will be many bags. I used a solid for the bottom and a variegated for rhe mesh which worked up to be a spiral pattern and finished off with a border and handle in white. Lovely pattern! My question is “when/ how to do the sc on the sides of the handle? After attaching to the other side?” Please explain. Thanks in advance.
Hi Deb, The sc can be added to reinforce the handle (so it limits stretching) – You can add this once all the handles are attached.
I’d probably sugggest – add your handles (both sides attached, then do an extra round of sc all around the bag and on the outside of both handles, then break off yarn and sc on the inside loop of each handle. Does that make sense?
I’m having an issue where the joining of rows is creating a diagonal stripe up my work. Is there anything I can do to hide the joining line?
Unfortunately working in the round can cause a spiral join. Some peoples crochet style gives less noticeable seams. I did some research, and maybe this video may help https://knitandcrocheteverafter.com/tutorials/single-crochet-tutorials/invisible-straight-seam-in-single-crochet-when-working-in-the-round/
It’s for single crochet but you may be able to adapt the technique.
Is there a gauge we should be careful to obtain, or what is the finished size of this bag? I only ask because I tend to crochet too tightly.
There is no exact gauge specified. Maybe go up a hook size if you know your tension is tight.
I was just curious, did you have any idea what the brand labels had been for the yarn? I want to get something similar but I don’t want to get something that’s too expensive or not sturdy enough to be a market bag if I can’t find the kitchen string, which isn’t something I’ve ever heard of and I’ve been knitting for almost 8+ years ; w ;
Kitchen string is string that is made of un-dyed cotton. Usually used for tying up joints of meat and other random things that need cooking and tying. You can substitute with cotton yarn of similar weight – varies from sport to DK (5ply-8ply)
Any DK cotton will do for the base. Sugar n cream is heavier than DK but will do in a pinch.
I love this bag! Very simple, but still so pretty, and color-blocked at that! Thanks for the pattern! 🙂 Lisa
Hi don’t know what I’m doing wrong but can’t get past the first bit on the base. Sc 7 times into the row space, I just end up with a big frill. What am i doing wrong. As you can guess I’m not too experienced. Thanks.
Hi Judy, the sc 7 don’t all go into one space. You need to put one stitch into each of the 7 consecutive spaces. Hope that helps.
I used nylon twine that they use for outside – florescent green lol. It is so strong and I use them every time I shop for groceries. Sometime I walk 7 blocks with lots in these bags but they fit cross body and don’t stretch very much and hold a fair bit of weight. Thank you Cintia this is the best of the 8 different types of bags I’ve made so far…later on I’ll make prettier ones, but I love them and the pattern works well and quickly
Thanks Jackie. Your neon bag sounds cool!
I LOVE this idea so there’s less wear and tear. ? And possibly wash friendly and dries more quickly? Especially at the moment when we want to wash those pesky germs off more easily?
8ply yarn for base? Should I double yarn strands if I have 4ply cotton?
Yes, doubled up yarn will work fine.
Hi! I’m excited to get started on this bag! But I am having the hardest time finding a 8ply DK cotton yarn what brand did you use or do you know of any brands that could be used.
Not sure what country you are in. In Australia Lincraft has an 8ply cotton yarn. Paintbox yarn also has a DK weight available. Otherwise you can just double up 2 strands on 4ply (fingering weight) cotton yarn.
When working the base up, do I sc in back loop only for all 12 rounds? or was that just a note to finish the previous round?
Thanks BTW – this is super cute!
sc into to back loop for all rounds.
Hi 🙂
Do you know how many metres/grams of the kitchen string you used? There’s heaps of sized different balls online and I dont want to over/under buy <3
From an earlier comment – about 2.5 – 3 balls of string required assuming each ball has 80-100m/yards approx. Get 3 just to be sure.
I’m a beginner at crochet. Do you have any tutorials on You Tube to make this beautiful market bag? I’d like to make some for gifts.
I don’t have any videos about this project in particular but you can easily find various videos explaining each of the stitches.
Hi, if i want to make the bag a little bigger, would I just make my original foundation chain longer? Thank you 🙂
Yes, increase the foundation chain to make the bag wider. Add extra rows to make the bag taller. Have fun crocheting.
Thank you for the pattern! I used red acrylic yarn for the base and handles and used white acrylic for the body. Turned out beautiful