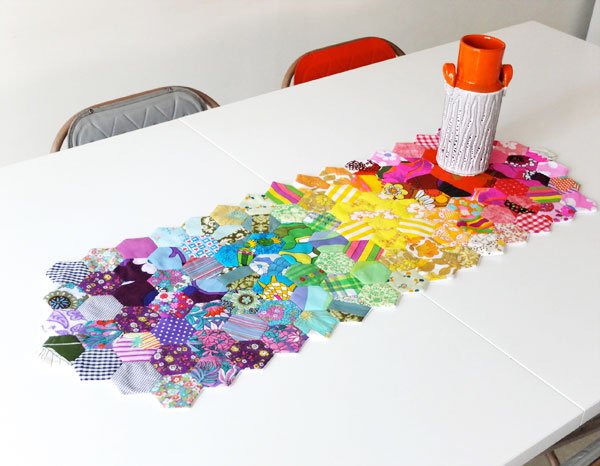
I’ve used an ingenious but easy construction technique to assemble this rainbow hued Patchwork Hexagon Table Runner.

After making hundreds of Paper Pieced Hexagons, and sewing them all together, I thought a table runner was a nice project that would to show them off to their full potential and that I could see and enjoy every day.
Hexagon project edges can be tricky to work with, I didn’t like the idea of squaring off the sides, as I’d lose the beauty if the zig zag edges. Binding all those corners wasn’t an option, so it took me some thought to devise my construction method.
I like to imagine all the steps in my mind, truth be told, I wasn’t even sure it would really work until the final stages when it all came together perfectly.
I’ve share some tips to keep your hexagons organized as well as a few methods of stitching them together.
You could also make coasters and place mats with the same method.
I hope you enjoy this project, it was over a month in the making!
You may also like:
You will need:
- Lots of paper pieced hexagons (see How to make paper pieced hexies)
- Sticky contact paper (adhesive vinyl)
- Needle
- Thread
- Cotton quilt wadding
- Backing fabric
- Water solouble marker
- Ribbon or woven braid (20cm/7″)
- Sewing machine and general sewing supplies
- Time 🙂
How to make a Hexagon Table Runner:
I’m going to share with you my secret trick to keeping all my hexies organized and in perfect order.
Stick them on to contact paper!
It’s not essential, but because this project was going to be portable, I wanted to make sure my carefully arranged colour scheme didn’t get mucked up.
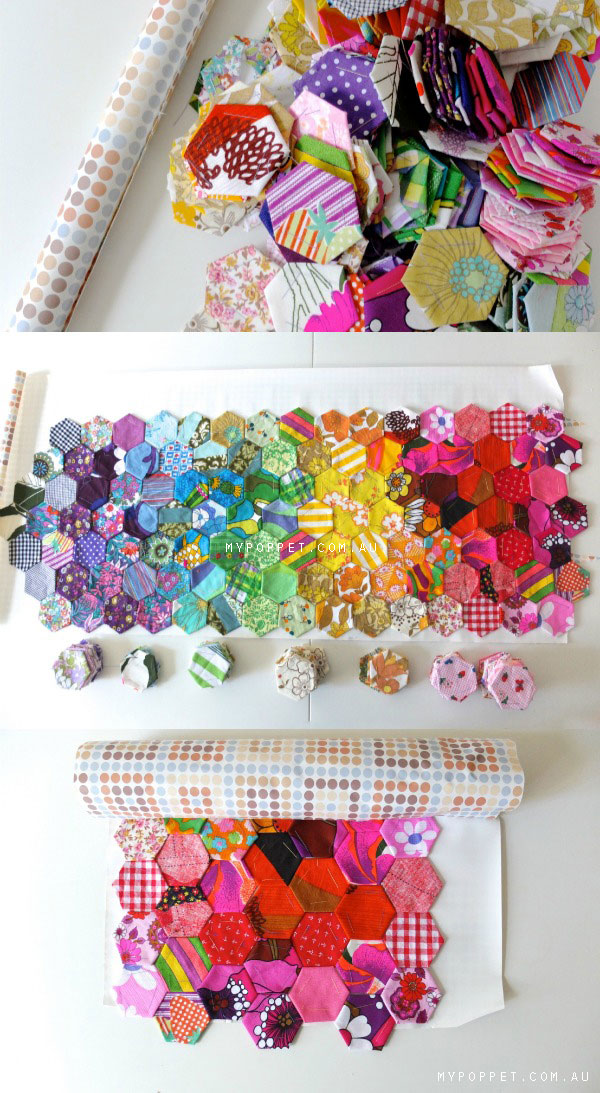
Arrange you hexies, any pattern that appeals to you is good. The more hexies, the bigger the runner. I’ve used 117, 7 wide and 15ish long
Stick them to your contact paper lightly.
The contact won’t stick super strongly to the fabric but may tear your paper so your papers may not be reusable
How to Join Paper Pieced Hexagons for Patchwork
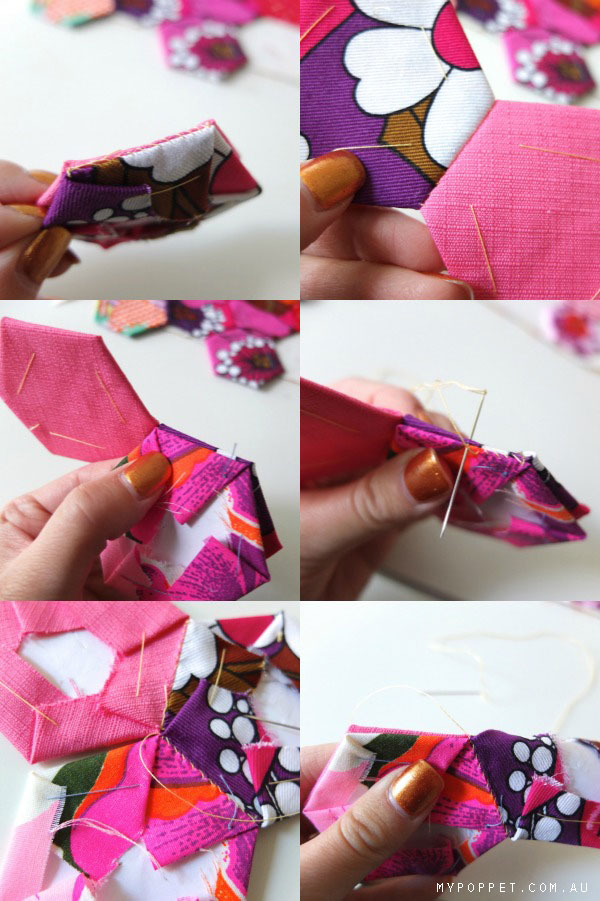
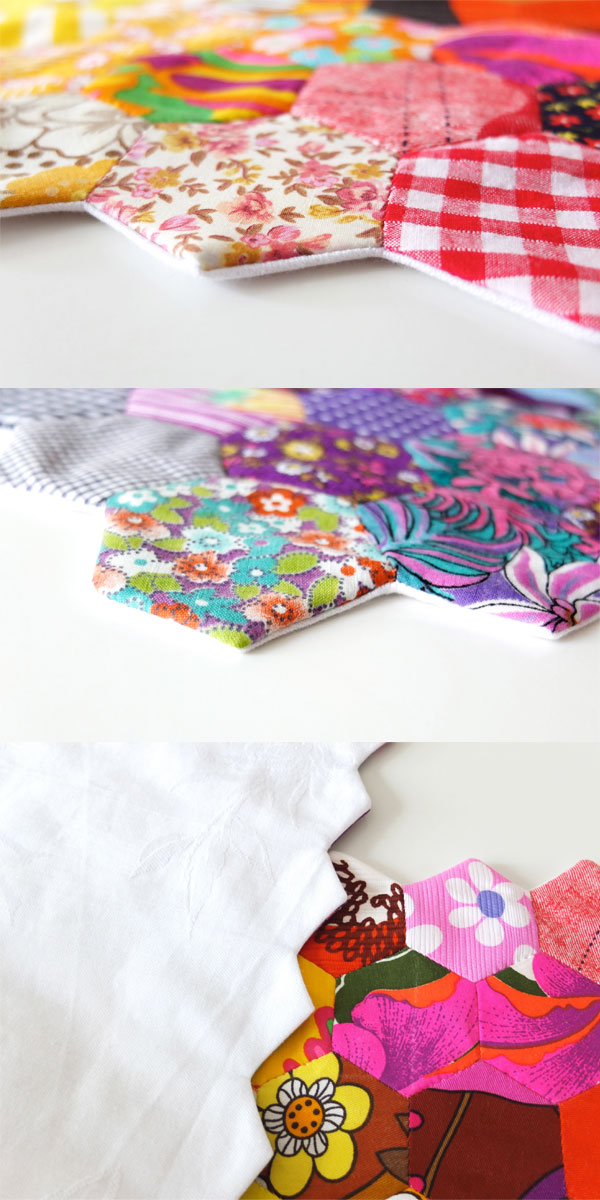
I used two styles of joining stitches. I’ve shared both techniques. Ideally you would want to match your thread colour, I’ve used contrasting thread to make it easier to see.
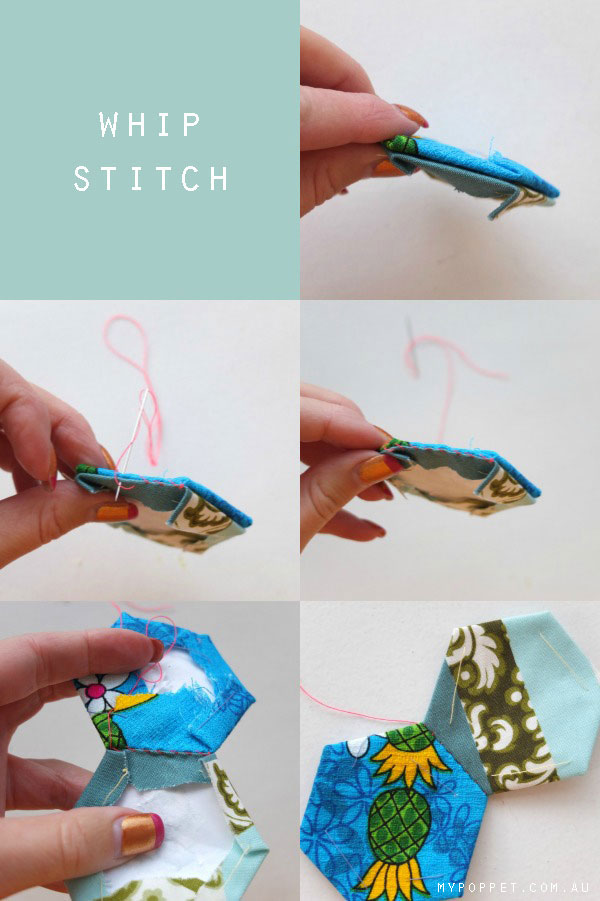
Whip stitch is the most traditional style of joining.
1. With right sides of hexies facing and edges lined up, start by securing a couple of firm stitches (or knot) in the corner.
2. Whip stitch (sort of around like a spiral) all the way. The closer and smaller the stitches the more inconspicuous from the front. Just catch the edges and not the paper inside.
3. Finish with a a couple of stitches in the corner to secure.
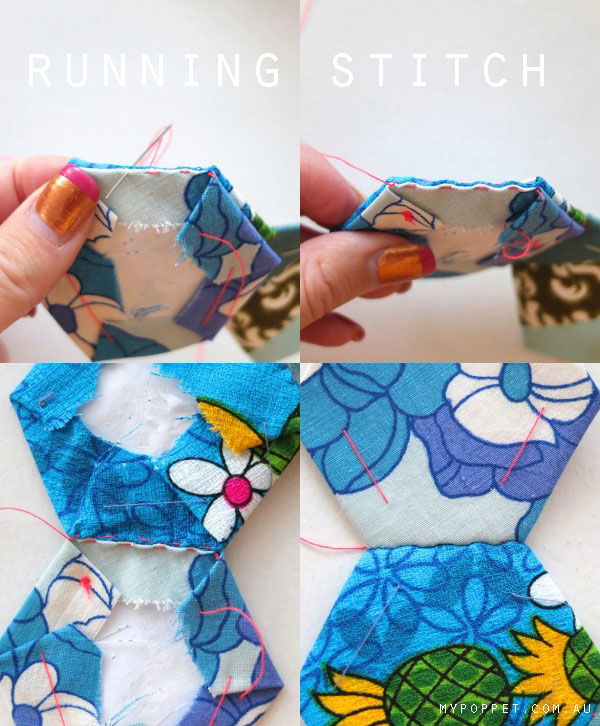
Running stitch is a new method I tried out after I saw Mollie from Wild Olive try it here.
1. With right sides of hexies facing and edges lined up, start by securing a couple of firm stitches (or knot) in the corner.
2. Work a small running stitch close to edge, avoid catching paper.
3. Finish with a couple of whip stitches in the corner to secure.
So my verdict:
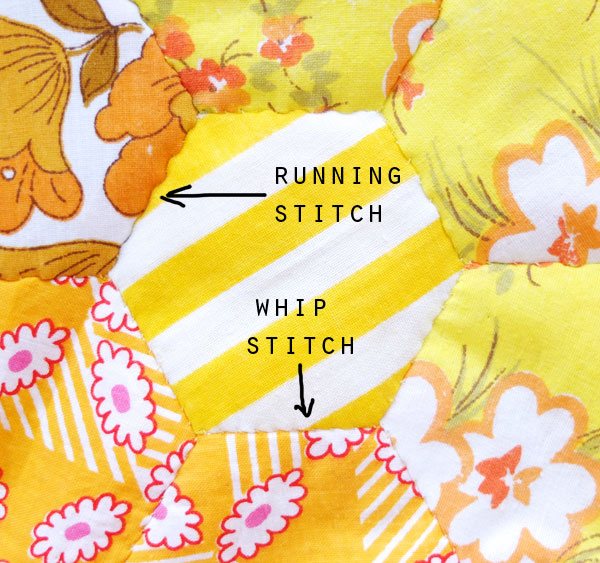
As you can see from this photo above both stitches give a slightly different finish.
Running stitch works quicker but gives a wavy join, which I didn’t love.
Whip stitch takes a little longer as stitches need to be close together, but gives a crisper finish.
I used a combination of both depending on my mood.
Now you will need to join all the hexies together, I didn’t have any particular system, but tried to work it so I didn’t have to cut my thread with every seam.
You can see from the picture above, when it’s time to join the 3rd hexie, to avoid a gap at the Y join, add a couple of firm stitches where the corners meet.
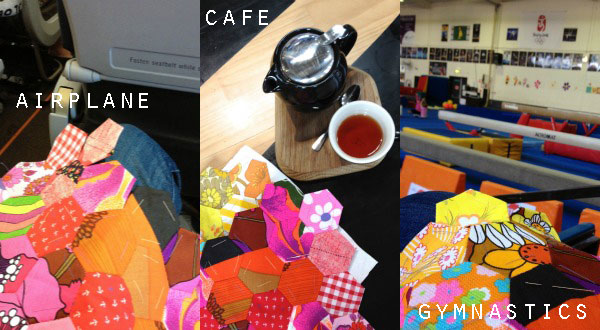
Next comes the fun but time consuming part. Stitch, stitch stitch. I took this project everywhere. On a plane, to cafes, whilst waiting for Emma to do her swimming and gymnastics. Eventually the top was done!
Removing the Papers
Once you have finished it’s time to take the papers out. My favourite part.
1. Find the little knot and pull the thread, the paper should come out easily.
2. Remove all the papers except for the ones around the edges of the table runner.
Assembling the Table Runner
This part looks more complicated than it really is. With my foolproof technique you are guaranteed to get a very neat finish.
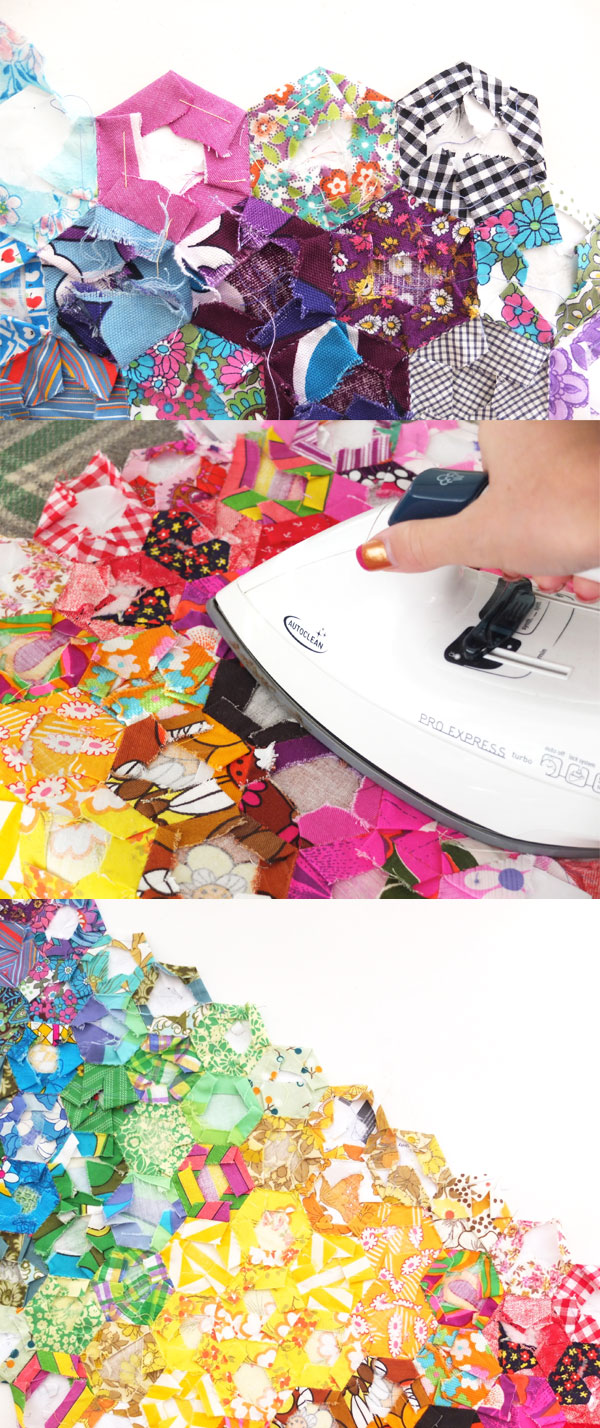
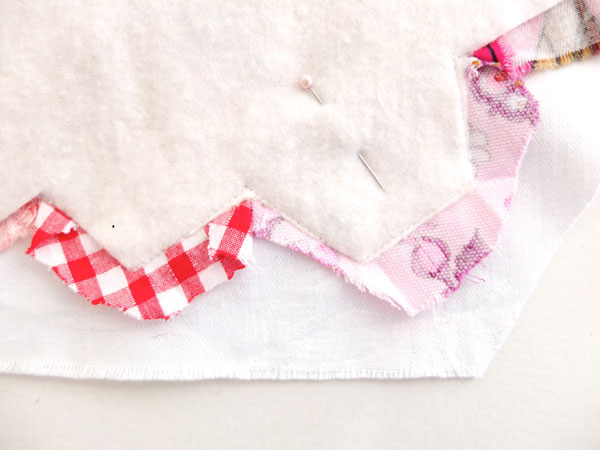
1. Iron the back of the patchwork to flatten all the seams and to make sure the little ‘petals’ of fabric are sitting nice and flat. Take extra care in the outer edges to get a nice neat and crisp edge.
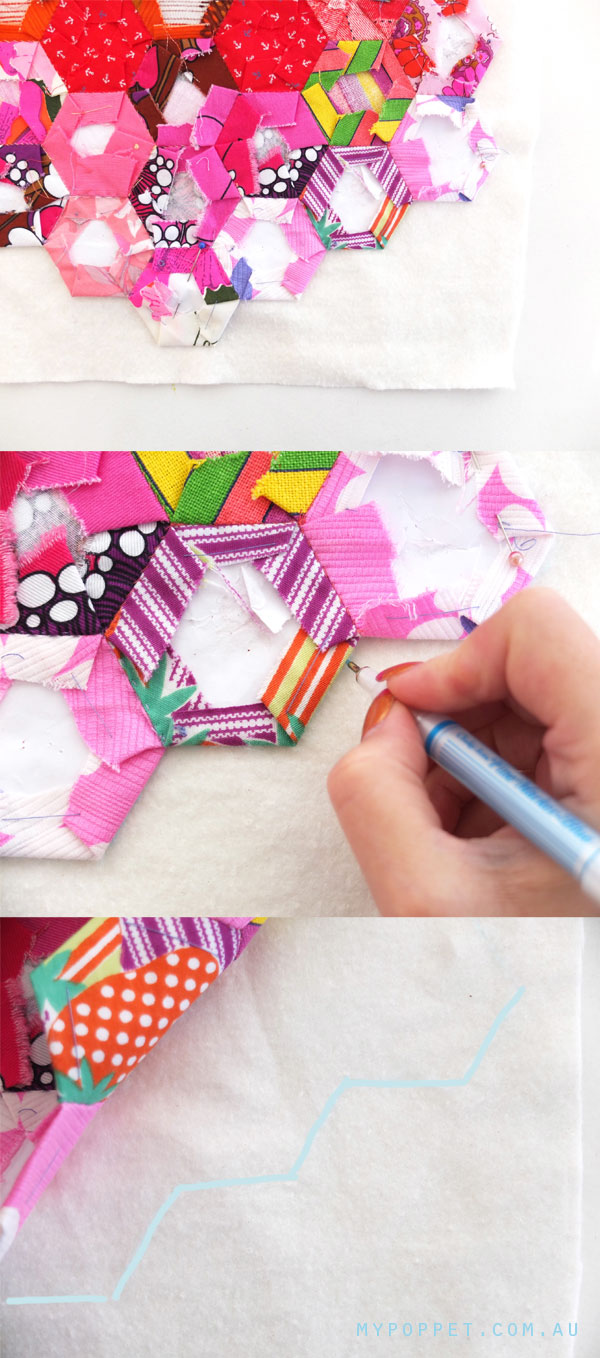
2. Lay and pin patchwork top over layer of wadding.
3. Carefully mark around edge, as closely as possible with soluble marker.
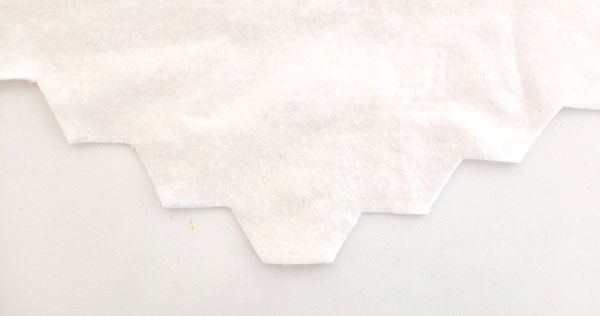
4. Cut wadding along marked line. (You may need to mark which end of wadding matches each end, will help you later).
This next part is a little counter intuitive but bare with me…
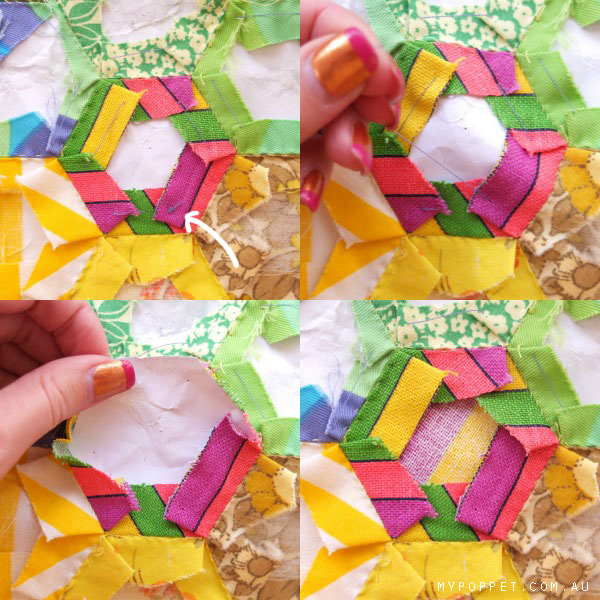
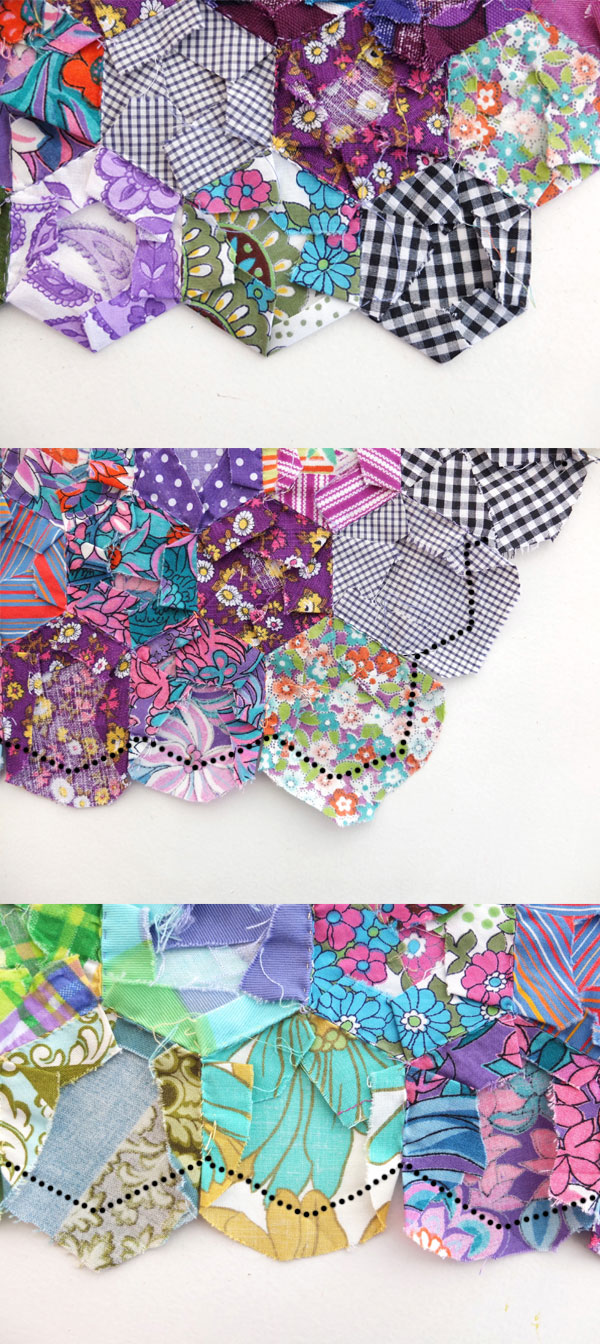
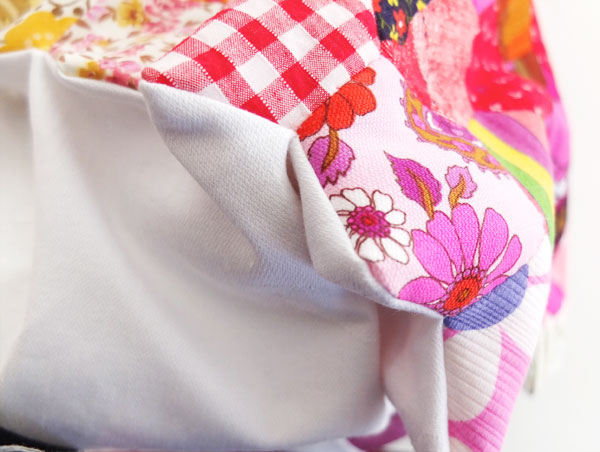
5. Remove the papers from the outer hexagons.
6. Iron out the fabric on the edges of the outer hexagons, leaving the fabric joined by seams flat.
I’ve marked with a dotted line where the original hexagon shape was. Don’t mark the fabric, this is just to make the picture clearer.
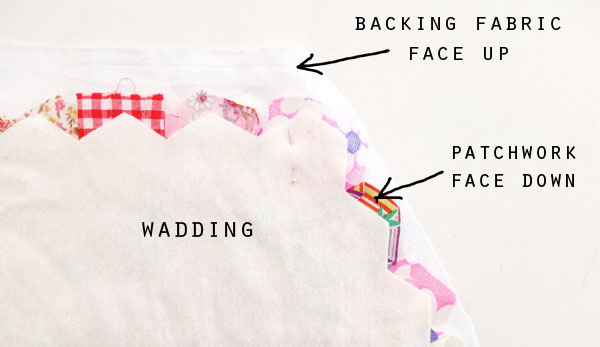
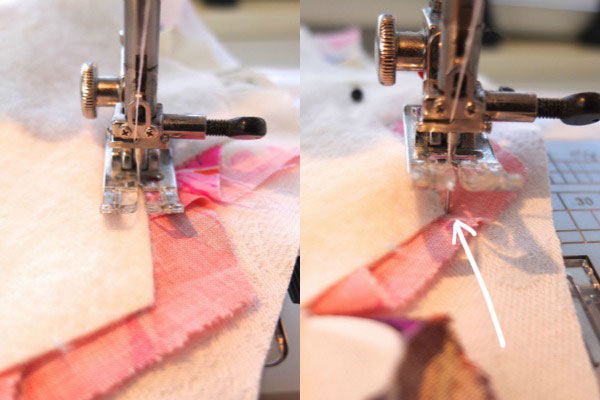
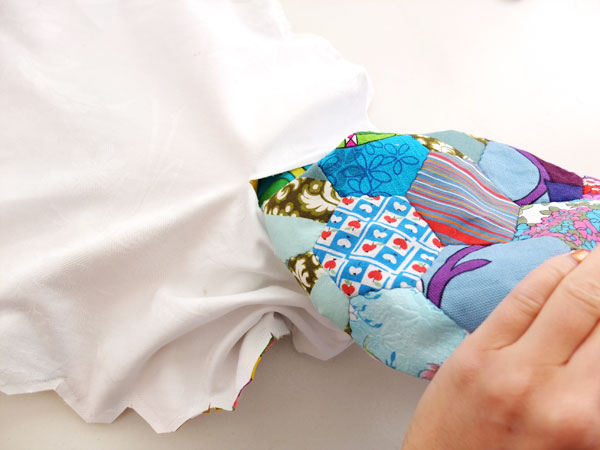
7. Assemble as follows. Backing fabric facing up, patchwork layer facing down, wadding (with edges lining up to where edges of hexagons were) on top.
8. Carefully sew around the wadding, following the corners accurately. Sew all the way around till you get back to the point where you started.
9. Sew seam right on the edge or just touching.
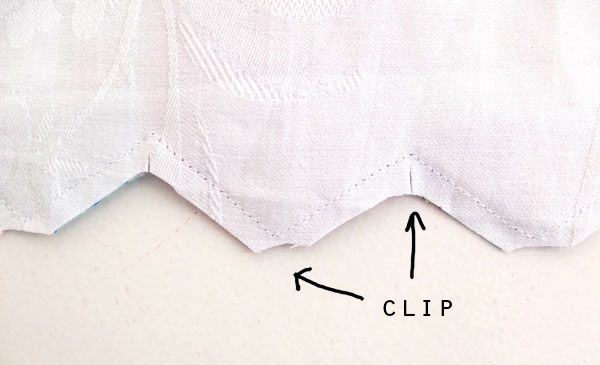
10. Keep needle in down position when turning corners to get a sharp point.
11. Trim away excess fabric, clip points and snip internal angles.
Here is my secret trick- shh!
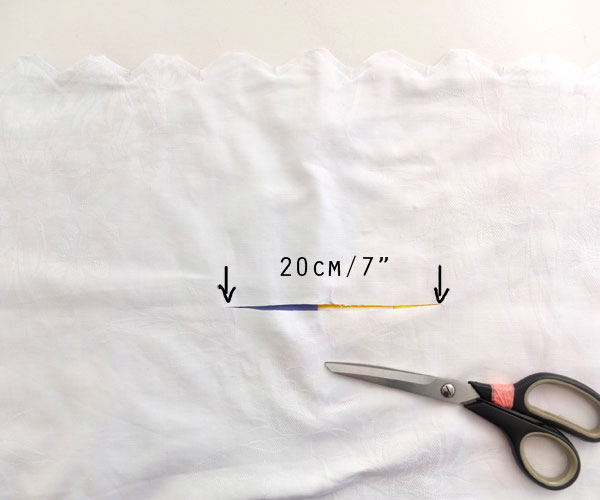
12. Carefully cut a long slit in the backing fabric about 20cm/7″ long. Try to center it as much as possible.
13. Turn inside out, pulling the patchwork top thought the hole.
14. Push points out gently with tip of scissors.
15. Press with iron taking extra care on corners and edges.
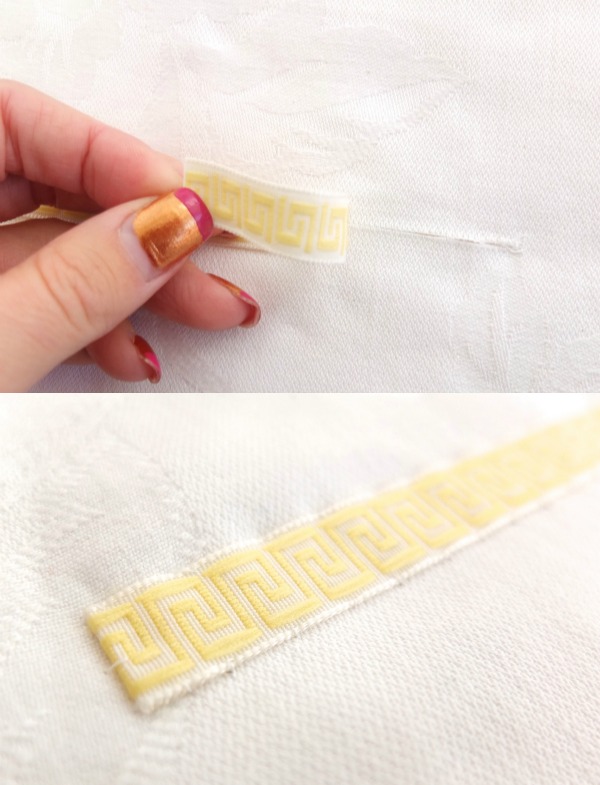
16. Close opening by hand stitching a length of ribbon or bias tape over hole.
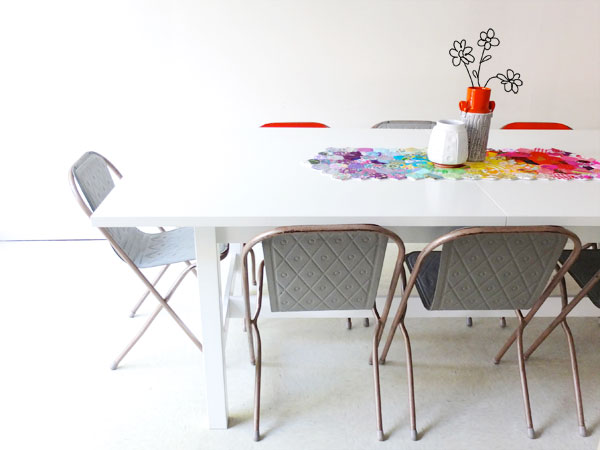
And that’s all there is to it. What do you think?
I quite like it, although initially I was worried that it would look like Rainbow Brite had thrown up on my table! But now I think it’s a nice pop of colour, especially in my very dark kitchen area over winter.
I decided not to quilt it, but may add some stitching to it later. We’ll see. I’ll just enjoy all the colours and patterns for now, and hopefully it will encourage me to keep the table clear of junk.


Thank you for this next step/s. Your runner looks so beautiful and crisp. I’m completely impressed. Am keen to make a full-blown quilt, but know my head will explode first.
I don’t think I’d have the patience for a whole quilt so a runner was a nice compromise
Cinti – here it is 5 1/2 years later and I’m just seeing this (from Pinterest)! I started glue-basting hexies on a long bus trip this summer and I can’t stop. I love your brain-child and will have to try this as soon as I can get myself to the next step. I also love, love, love your reason for keeping your table clear of crap. Need to be thinking of that here too! Thanks!
Have fun stitching your hexies. It’s a great summer project.
Thank you for explaining how to unfold the outer edges when you sew the layers together. I don’t think I would have ever figured that out on my own!
I like your use of the ribbon to hide the slit in the backing material. I think I’ll use a ribbon with lettering like “This Took Me Forever” bc I expect it will take me almost that long. LOL!
splendid tut!!! so detailed!!!
thank you so much!!!!
xxxx Ale
Agree. Fantastic tutorial and SO inspired to finish my little project. If that colourful masterpiece isn’t incentive to keep your table clear not sure what will 😉 best wishes, Carina.
I love your method…..contact paper is genius and necessary…… Thanks for sharing…..I am just starting one…..I hope it comes out as neat as yours….my hexies are large so I am nervous as I usually use smaller ones….
I am hooked on hexes too. Love the table runner
This is absolutely gorgeous and your detailed tutorial is much appreciated. Thank you!
This is beautiful… there’s something about rainbow colours that make me smile!! I am definitely pinning this to my Quilt & Sew board. Thanks for a terrific tutorial too!
Wow – this looks amazing. I wish I had the patience, the time and the skill to give this a go. You should be so proud of this.
Doesn’t take too much skill, but it helps if you always have it in your handbag to take advantage of all that time you have to wait around for appointments and such.
Well I might have to pin this and wait until my kids grow up a bit and I can find that spare time. 🙂
Wow, you make it look so simple. I’ve only just started my first two basic quilts, maybe this is a next patch-workey project that I could attempt! Love it.
yay, have fun with your quilts, you may want to check out my triangle quiltalong series to help demystify some of the tricky quilting lingo. https://mypoppet.com.au/2013/02/triangle-quiltalong-cutting.html
includes tons of helpful hints for any quilt style.
x cinti
Thanks for a great tutorial Cinti 🙂
I’m just looking at all those hexies and saying to myself.. ooh! I’ve got that print, and that one… Oooh! I need that print!
Such is the life of a vintage sheet addict!!!
Why do you and some others baste through to the top of the fabric? Isn’t that just an added step later on?
Great tutorial’m
Yes I suppose. It’s the way I have always done it, although it does allow you to be less accurate with cutting earlier on so saves time that way. And both basting all the way through and removing thread is pretty quick. I’ve never tried the other way, but will for next project to compare.
Let me know which way you like best!!!
That’s amazing! I love the colours and the hexagons! Just great, well done!
This is a great tutorial for a really pretty hexie table runner. Thank you!
Great tutorial! Thanks so much. Your runner is beautiful.
I am wondering if you could use patterned backing fabric-just have lots in the stash that’s all!
Of course you can. Use whatever you like 🙂 I just used white because it was a remnant of the perfect size.
It’s awesome. I am impressed by work and will definitely try it but I would like to try it in other shape.
Love the tutorial and fought it trough until the end!!
Thank you!
Would like to show it to you how you inspired ne.
Great pictures!
Have a nice one 🙂
would love to see what you made 🙂
just email it to me [email protected] – I’m creating a reader project gallery 🙂
I wanted to make a scenery so I decided on hexagons easy to change and move around my board. i started doing a few by hand and the sizes were off. then then i found your blog thank you so so very much now I can get started.
I LOVE IT! Just one question… Why did you hand sew the hexies, and not machine sew them?
with this paper pieced method, hand sewing is really the only way to get accurate shapes, but you can sew hexagons with machine. Just need to cut them really accurately, not use papers and use this method of joining https://tallgrassprairiestudio.blogspot.com.au/2012/02/sewing-hexagons-by-machine-without.html It can be quite tricky to get the joins perfect especially for a beginner.
…well I am somehow a beginner and after one third I was tired of hand sewing it…so I tried the machine (even WITH the papers) and it came out very well and even better than the hand sewed pieces…
So I think machine sewing is better, but everyone has to try what works best…
oh great, I’d love to know how you did it with the papers so I can give it a try.
Cheers Cintia
Thank you so much!
Gorgeous rainbow effect, now you need some PLACEMATS to match!!!
Looks like a hexie project I might be able to actually complete. Really like how you add batting and the slit for turning. I think a simple row of hexies appliqued over the slit would look great or maybe green bias tape and one pieced hexie shape like from a grandmother’s flower garden for flower on each end–you could end up with reversible table runner.
oh the flower on the back sounds lovely 🙂
Your table topper is beautiful. I really like your idea of keeping everything rolled up on the contact paper…genius! I just finished the body of a small hexie project (pics on my blog) and am adding a border of contrasting hexies before deciding on how to finish it. Your method turned out beautifully 🙂
Smiles, DianeM
Oh your quilt looks wonderful. I’m glad the method worked for you. Thanks for sharing
🙂
Hello,
this backside of the tablerunner is really really great.
I’m doing EPP since a few month, want to make a quilt, and even thought:”hmm, how will I make the backside?”
Now I have the solution ;o)))
Thanks a lot, your blog is great!
Babs, from Vienna, Europe
If you are making a quilt you could have a seam down the back panel and neatly stitch it closed.
This is beautiful! I’m inspired to work with hexes now…but maybe on a smaller project? Seems like a lot of time/work! Love the tips and tricks you shared…thanks!
Yes a table runner this big is time consuming, you could start with some coasters or a placemat.
I was working on my first hexie project last night and got a perfect layout then didn’t know how to save it. Contact paper is brilliant! Thanks for the idea.
You’re welcome, so many great uses for contact 🙂
Miss Cintia,
Thank you so much for posting this tutorial. The project is just lovely and your detailed images and explanation are perfect! Thank you for taking the time to do such a thorough job. Your work is beautiful.
I’ve been interested in tackling a hexagon piecing project and this is very inspiring. And now I know exactly how to do it!
Happy Holidays,
KatieLynne in Astoria, Oregon, where water abounds, every view is a postcard, and the nights are quiet…except for the seals!
It’s also a good one to start with as a quilt can be a bit daunting for the first time.
I’ve been working on a grandmother’s flower garden hexagonal quilt for a LONG time—3 years? The directions in the book I’m using direct me to applique what I have now to a large piece of white fabric and then cut out what is not needed on the back (after appliqueing). I’m afraid I won’t get the appliqueing done properly. Any ideas how I should stretch out the white fabric so I can easily applique the “flower garden” onto it? I’m afraid of puckers. Should I set up my portable quilt frame? That would stretch out the white fabric, wouldn’t it? Any other ideas?
A quilt frame would be good if you baste the hexagons on, also another alternative could be using a basting/applique spray to temporarily stick it on flat. Similar to spray basting a large quilt.
This was great! My favorite part is the last step with making the slit in the middle. I hate finishing projects “pillow style” because the last edge never looks as sharp as the others, so this was pretty ingenious, thanks for the tips!
Thanks, I thought it was quite clever too.
I’m finishing up making the hexies, and I hope I’ll be able to finish the actual quilt before my next child is born (May). Thanks for the beautiful inspiration!
Thanks for this very informative tutorial. It’s just what I’ve been needing to get me started on my own hexagon table runner.
I cut out template hexagons from a cover of a plastic duo-tang – one that is bigger and many-many are 1- size smaller ones. I use these flexible templates instead of paper. The bigger one is used as a guide to cut out hexagons from fabric (in my case it is usually old clothing to be recycled in craft projects) and the smaller ones are used for making the actually hexagon. Once several layers of hexes are joined together, I remove them (they all have cut out whole in the middle which I use with my scissors to pull the template out) and then use in the out rows of the project. In my case there is no need for keeping hexagons arranged anywhere — I join them as I go. And no need for extra cutting paper — I just use those duo-tang templates over and over.
I discover your blog and your beautiful table runner! Congratulations, they are both perfect!
I have wanted to do patchwork and discovered your web site, now i can’t wait to get going, the table runner looks great, hexagons appeal most as its portable and you can do it anywhere. Thank you for many wonderful ideas.
I love the way you finished your tablerunner…very clever!I have a load of hexies and I think my first project will be a tablerunner instead of a full blown quilt which I had originally planned to do.I love your blog….thanks
Thank you, yes a table runner is more manageable than a full quilt.
I have never worked with hexies but may give this a try using black & white’s.
Love your style of tutorials.. thanks for taking the mystery out of hexi piecing and backing too! Love your table topper! Thanks for the template 🙂 Kathi
Really love what you’ve done to turn the hexies into a table runner.
Love your table runner.I have made a lot of large bright hexagon flowers. Had planned another quilt but now can’t wait to make them into a runner.
A much more manageable project I think.
Do you leave the paper in your outer hexagons forever? Thanks for the tutorial!
No, you remove the papers once they are sewn together.
really useful tutorial. I’ve sewn lot of EPP hexies together and didn’t know how to edge. was advised to straighten edges off but love this idea. exactly what I needed. thank you 🙂
Plan on doing this type of runner and maybe mats to go on table,thank you for your time to share it,hugs from Australia
Thanks Betty, place mats would look lovely. Maybe some hand quilting would make them more durable when washing.
Thanks so much for tips and tutorial..can’t wait to try out!
Thanks Angie. Have fun making your hexies!
Thank you SO MUCH! I’m new to quilting and am making a hexagon table-runner but I absolutely couldn’t figure out how to do the backing. You have saved me MANY headaches (and saved my roommate a couple of meltdowns)!
Excellent, have fun with your hexie making.
do you take each Hexie off the contact paper one at a time to sew then together. I’m not to clear about that step
Yes, the contact paper is just to keep the colour pattern in order.
I am so appreciative of your tutorial. It is EXACTLY what I needed. I have lost sleep trying to reinvent tour wheel. Thanks so much for sharing.
oh my goodness, I am so inspired! Never thought I would do hexies, but you have thrown open the door with your instructions and photos. LOVE the shortcuts you take!
Could you hand sew the backing and wadding instead of using a machine? If so, would the instructions change or remain the same? Thanks, I love this tutorial.
Sure could. A small running stitch could replace machine sewn stitches. The instructions would remain the same.
Hi
I have made a hexagon table topper but wasn’t sure how to finish it off and I came on your website
could you help me to pick the right wadding as there are so many about 2oz 4oz etc
I just used what I had on hand. It depends on how puffy you want it. I’d recommend a lighter weight one.
Okay thanks for that – just one more question as I am new to this should I use polyester, cotton or bit of both or does it not really matter
Great tutorial on finishing up the project, Cintia! I have started making hexes and I love the ability to take them anywhere! I don’t really have an attention span for a whole quilt to be honest, so I was searching for smaller quicker projects and that looks just gorgeous! Thanks for a thorough instruction!
Thank you, that’s a great tut. I use a whip stitch for my hexies and was glad to see how the seam looked with the running stitch, too. I’ve heard that some like to use a ladder stitch also. This way to finish hexies is a wonderful idea and I know I’ll give it a try.
I have arthritis in my hands is it possible to machine stitch hexs together
This video shows a method for machine stitching EPP hexies together. It’s worth a try https://youtu.be/UZ35Y7RtZ4M
thank-you so much it will help me a lot
Thank you for the thorough tutorial of the hexie project! Definitely want to try it, the end result looks so great.
Thanks so much for this tutorial. I’ve done a small hexie shape for the top of a chest of drawers and I wanted to keep the zig zag edge. I’ve been going over and over in my head trying to think of the best way to finish the back as I haven’t done anything like this before. I’m going to try this way as I think it’s exactly what I want.
Glad to have helped.
Thanks I have been trying to figure out how to finish the ends of my table runner,I did use half hexes for the sides of my runner,many thanks Lyn
Thank you for your great tutorial!! I’m new to the EPP world and have been looking for fun ideas to make. This is a perfect idea for my buffet table.
Fantastic tutorial, so kind to share. I ADORE this, hexies at the ready!
Thank you for sharing how you did the edges naturally and not cutting the edge straight. That is one of things that attracted me to do hexies. I’m making a quilt and I’m wondering how to do the edge. I thought get everything sandwich together and hand sew a row of hexies all around the edges. I wouldn’t have to fight it to turn it inside out. My next worries is how to quilt it. Thank you for your great tutorial.
Thank you so much. glad I found your finishing instructions. I have a top that was begun in 2014 maybe finished in 2017 has been adorning my quilting area just waiting for layering and finishing. You have provided what I needed!
Il runner è molto bello, anch’io amo gli esagoni ma preferisco il vecchio metodo di cucitura anche se richiede più tempo. Però dove hai tagliato per girare il lavoro invece di un nastro avrei messo l’etichetta…. Che ne dici? Ti piace come idea? comunque complimenti credo ne farò uno. Buon lavoro……
Translation:
The runner is very nice, I love hexagons too, but I prefer the old method of sewing even if it takes longer. But where did you cut to turn the work instead of a tape I would have put the label … What do you say? Do you like it as an idea? anyway congratulations I think I’ll make one. Good job……
Yes a label would be nice. I didn’t have one at the time so a ribbon was sufficient.
Thanks for the tutorial and inspiration. Maybe now I’ll get the topper completed that I’ve been looking at for several years.
Thank you for this well explained guide! The photos are great. I have Christmas fabric ends and this will be a great way to be creative (while isolating).
Thank you for this terrific tutorial. I just finished a Christmas table runner for my mom. My very first EPP! It came out to about 16” x 45”. I think I need to quilt it in some way but can’t decide. Did you end up doing anything to yours? Maybe I will just “fix” it randomly at points.
No I didn’t end up quilting it, but I think random stitch points to fix it is a great idea to stop the quilt batting shifting with use and washing.
I’m working on a “flower” epp called Geranium and I’m going to have some leftover (not chosen for the quilt) flowers. This is the perfect way to use them and I love keeping the irregular border.
Very concise instructions and photos. Thank you for sharing!