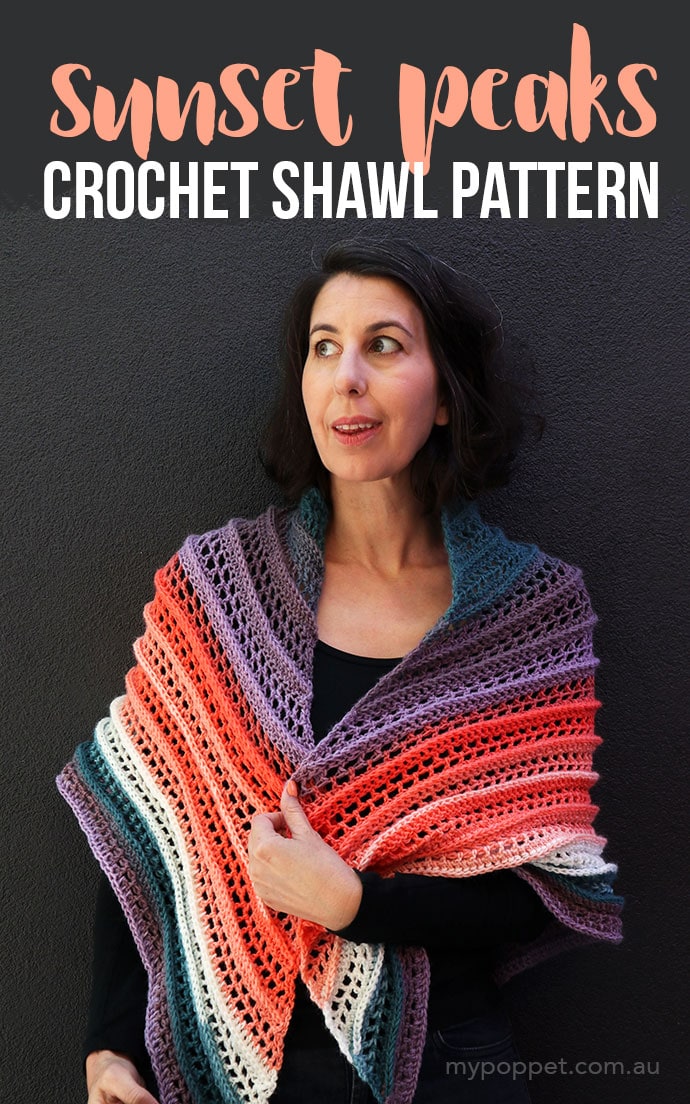
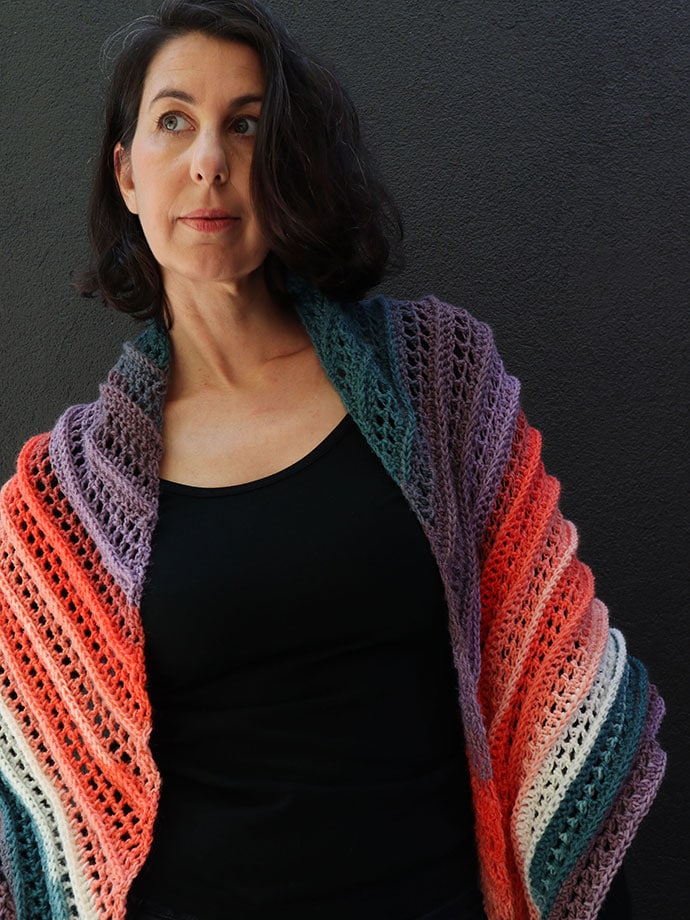
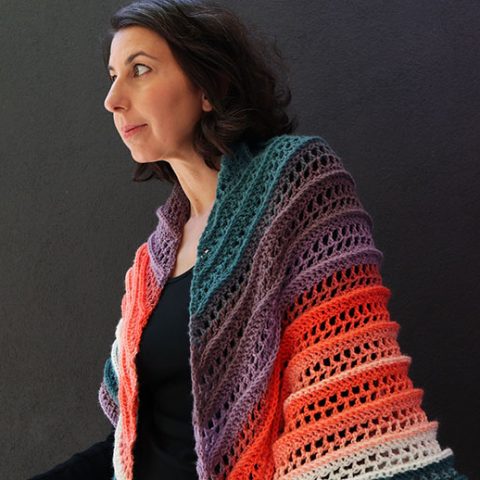
As soon as I saw the lovely gradient colour changes of Lion Brand’s Mandala yarn cake, I knew I had to crochet a shawl with it to show off the gradual color shifts.
I experimented with a few shapes and stitches while designing this crochet shawl pattern, and finally settled on a simple design that let the yarn do all the talking.
Brought to you by American Yarns
The yarn ‘colour’ I’ve used is called Pegasus with apricots, violets and teals that all blend together reminding me of a sunset on a warm summer’s evening.
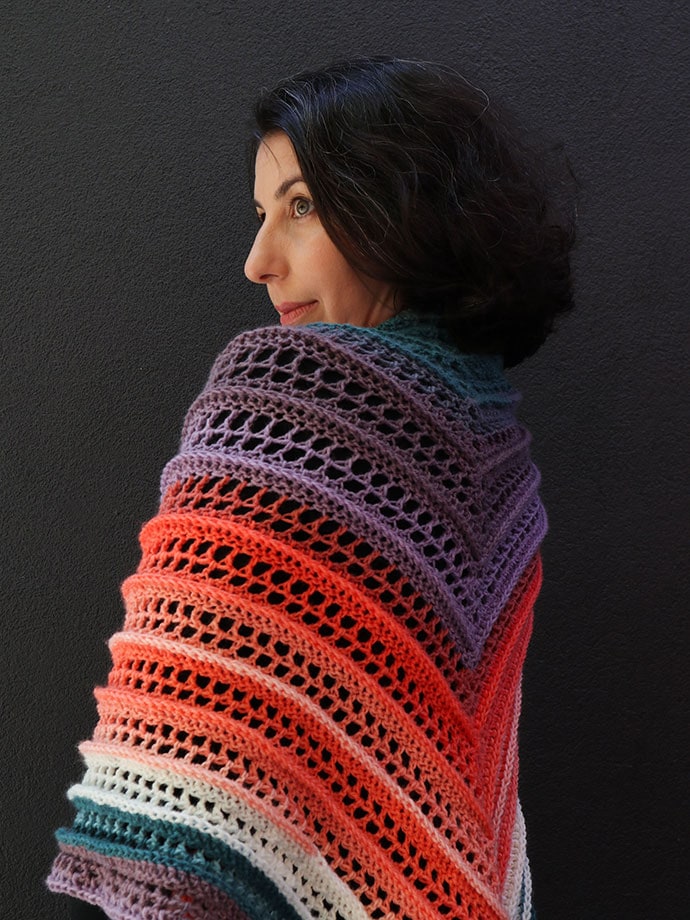
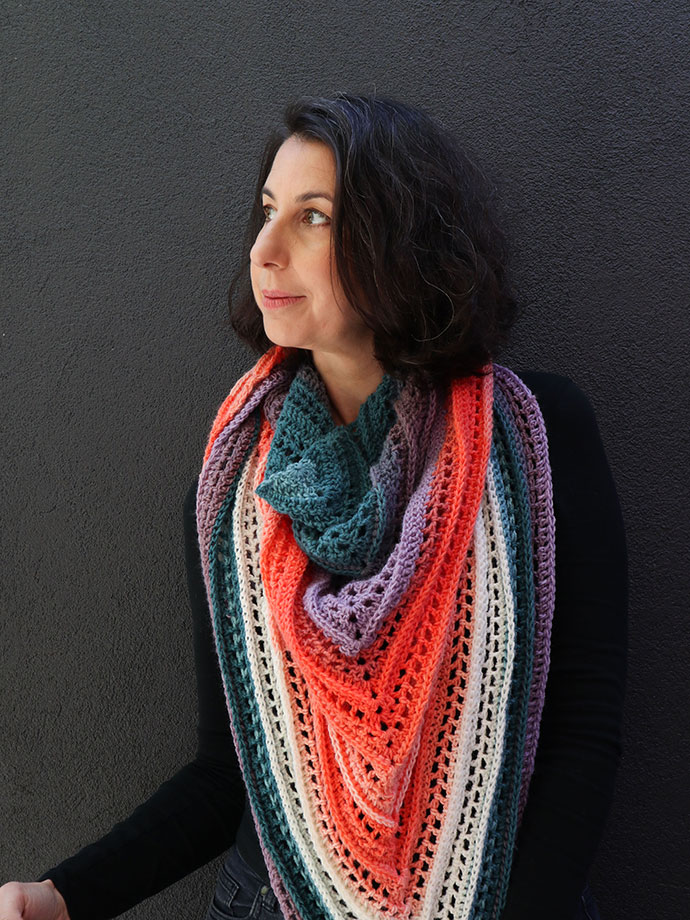
Named Sunset Peaks, this crochet shawl pattern looks a little complicated, but it’s actually very easy and only uses a couple of basic crochet stitches. The raised ridges form little textured ‘peaks’ to highlight the colour changes, so you can guess how the pattern name came about.
Even though we are only a week away from Summer here in Melbourne, it’s been quite cool, so this lightweight crochet shawl has been perfect for keeping the chill off my back and shoulders.
My initial idea was to make this shawl a one ball project, but as I progressed I knew I’d get more wear out of a bigger shawl.
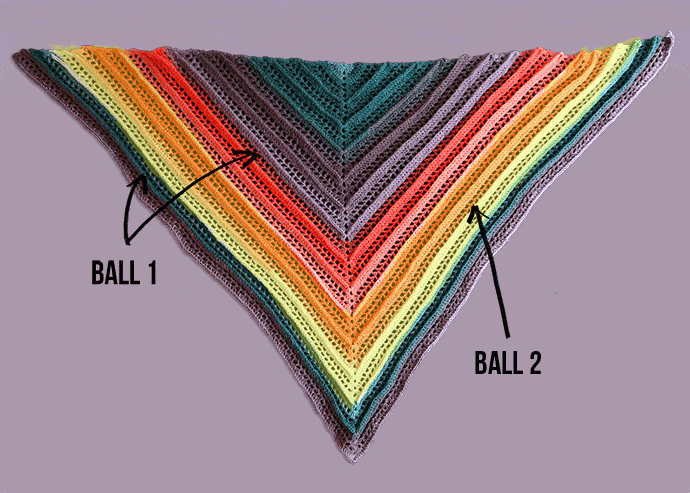
All up, this crochet shawl pattern uses just under 2 balls, with a second ball of Mandala cleverly blended in between the first ball so as to continue the colour gradient effect. (I’ll share more about that in the pattern notes.)
I really enjoyed using Lion Brand Mandala, and out of all the different types of yarn cakes I’ve reviewed, it’s my favourite so far.
Of course you could make this crochet shawl pattern with any 8ply (DK) yarn you have on hand, but I think the gradient effect of the Mandala yarn cakes looks very pretty.
I hope you enjoy making your own Sunset Peaks crochet shawl with this free pattern that was generously sponsored by American Yarns.com.au

Crochet Shawl Pattern – Sunset Peaks
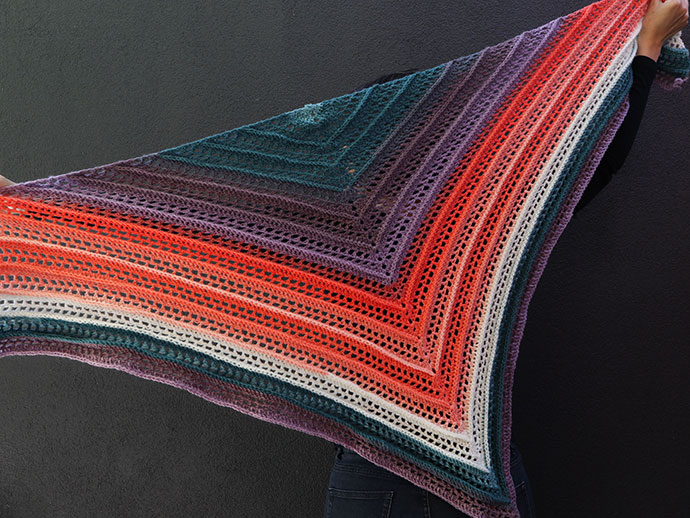
You can choose to make this shawl to any size you prefer as it’s worked from the center out. The pattern repeats every 4th row and is worked flat (back and forth).
Once you get the hang of the simple pattern you won’t need to refer to the instructions which makes this the perfect project to crochet on the go.
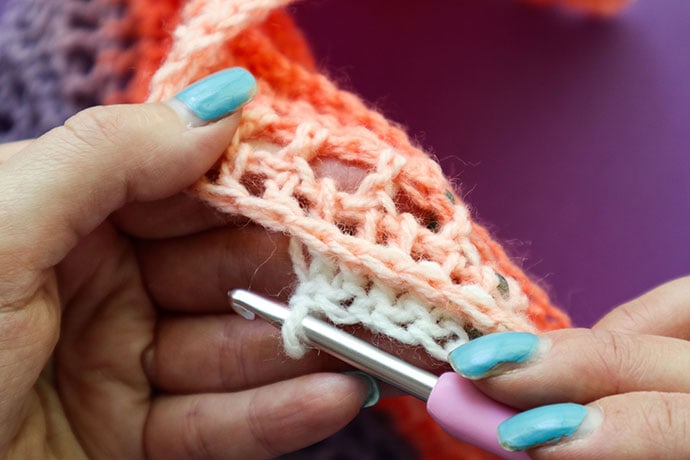
Apart from deciding how to blend the yarn balls (if you choose to do that), this crochet shawl pattern is a doddle to make. I’ve even made a video showing you how to make a Front Post Double Crochet – FPdc (US) stitch if you are unfamiliar with how to work crochet stitches into the posts.
The FPdc stitch is what gives this shawl the raised ridged rows.
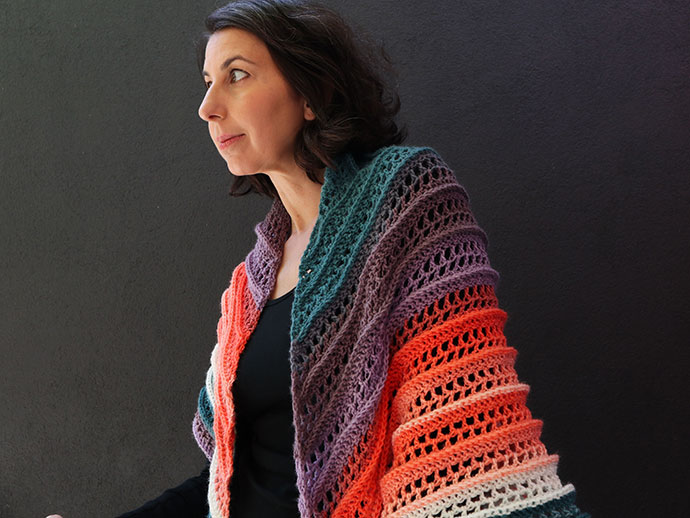
Finished size (unblocked): length 93cm (36.5″), width 163cm (64″)
You will need:
- 2 balls Lion Brand Mandala yarn – Pegasus
- 5mm crochet hook
- Yarn needle
- Scissors
Stitches used US terminology:
- Chain Stitch (ch)
- Double Crochet (dc) US = Treble stitch (tr) UK
- Front Post Double Crochet (FPdc) US = Front Post Treble (FPtr) UK
- Slip Stitch (sl)
How to make a (US) Front Post Double Crochet Stitch
I’ve included both video and written instructions – follow whichever you prefer.
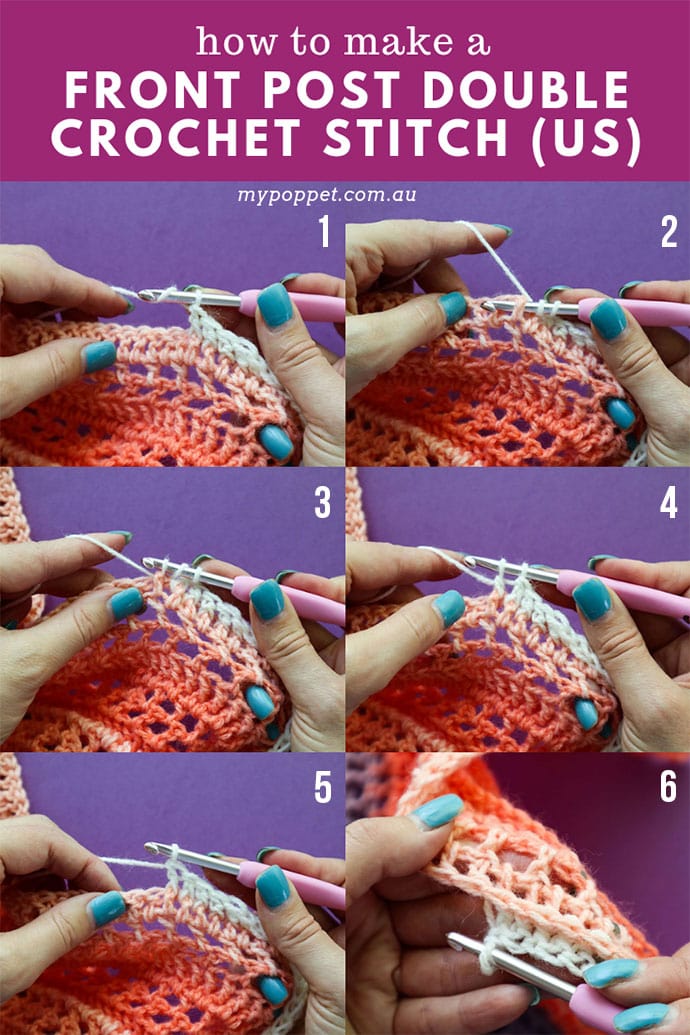
- Yarn over
- Insert hook around post on row below
- Yarn over and pull loop though behind post
- Yarn over and pull yarn though 2 loops on hook
- Yarn over and pull yarn though remaining 2 loops on hook – stitch complete
- Will form a ridge behind the stitch
Crochet Shawl Pattern instructions:
Turn after each row. First 3 ch in each row counts as 1 dc.
Make a ring – 4 ch, sl st in 1st ch to form a ring
R1 – 3 ch, working all in centre ring, 4 dc, 2 ch, 5 dc
R2 & 3 – 3 ch, 1 dc in 1st dc of row below. 1 dc in every dc up to 2ch space. 2 dc + 2 ch + 2 dc in 2ch space. 1 dc in every dc of previous row. 2 dc in 3rd ch in the beginning of previous row. Same again for row 3
Start of repeating pattern
R4 – 3 ch, 1 dc in 1st dc of row below. *1 ch, skip 1 dc, 1 dc in next dc*, repeat ** up until last dc of the side, 2 dc + 2 ch + 2 dc in 2ch space, 1dc *1 ch, skip 1 dc, 1 dc in next dc*, repeat ** ending with 2 dc in 3rd ch in the beginning of previous row.
R5 – 3 ch, 1 dc in 1st dc of row below. *1 ch, skip 1 dc, 1 dc into the space*, repeat ** until the last group of 3dc in row below. 1 ch, skip 1 dc, 1 dc in next dc, 1ch, 2 dc + 2 ch + 2 dc in 2ch space, 1 ch, skip 1 dc, 1 dc in next dc, *1 ch, skip 1 dc, 1 dc into the space*, repeat ** ending with 2 dc in 3rd ch in the beginning of previous row.
R6 – 3 ch, 1 dc in 1st dc of row below. 1 dc in every dc and chain space up to 2ch space. 2 dc + 2 ch + 2 dc in 2ch space. 1 dc in every dc and chain space of previous row. 2 dc in 3rd ch in the beginning of previous row.
R7 – 3 ch, 1 dc in 1st dc of row below. 1 FPdc in every dc up to 2ch space. 2 dc + 2 ch + 2 dc in 2ch space. 1 FPdc in every dc of previous row. 2 dc in 3rd ch in the beginning of previous row.
Repeat Rows 4-7 another 12 times ( total of 13 ridges).
Repeat Rows 4-6 once, to finish. Break off yarn and weave in ends.
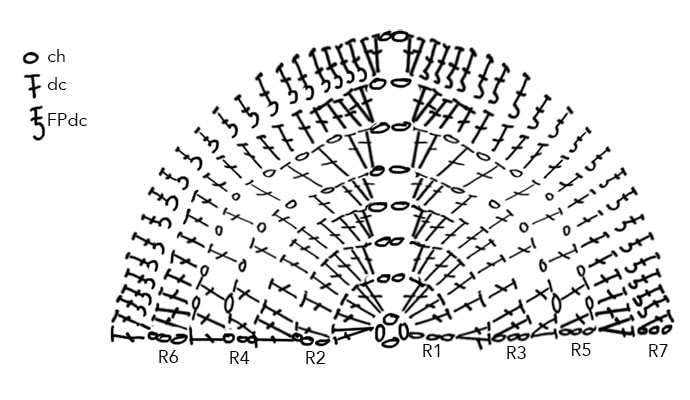
Pattern Cheat sheet and chart:
The basic pattern to follow is:
Start every row with 3 ch, 1 dc into 1st dc of row below.
Center increase is 2 dc + 2 ch + 2 dc in 2ch space.
Finish every row with 2 dc in 3rd ch in the beginning of previous row.
For those of you that prefer a chart I’ve quickly sketched one up for you. Apologies that it looks so messy, I was wrestling with some chart creation programs for hours after giving up and just drawing freehand.
Colour planning

Depending on your ball of yarn the colours may vary. As a general guide, if you are pulling the yarn from the center, the colour pattern will replicate the center out. Keep in mind as the shawl grows your stripes will get narrower.
You can choose to let the yarn decide where you want your colours to fall, or manipulate them slightly by adding in the 2nd ball between the 1st ball to extend the colour sections as you work down the shawl.
In the image below the yellow area overlay is where I changed to the 2nd ball, and then joined it back to the 1st.
I hope you enjoy this free crochet pattern – Tag me on Instagram @mypoppetmakes if you make your own, I’d love to see it.
Feel free to leave any questions or queries in the comment section below and I’ll answer as soon as practicable.
All yarns featured are available from www.americanyarns.com.au
Sunset Peaks – Crochet Shawl Pattern
Named Sunset Peaks, this crochet shawl pattern looks a little complicated, but it’s actually very easy and only uses a couple of basic crochet stitches. The raised ridges form little textured ‘peaks’ to highlight the colour changes.
Materials
- 2 balls Lion Brand Mandala yarn – Pegasus
Tools
- 5mm crochet hook
- Yarn needle
- Scissors
Instructions
Crochet Shawl Pattern instructions:
- Turn after each row. First 3 ch in each row counts as 1 dc.
- Make a ring – 4 ch, sl st in 1st ch to form a ring
- R1 – 3 ch, working all in centre ring, 4 dc, 2 ch, 5 dc
- R2 & 3 – 3 ch, 1 dc in 1st dc of row below. 1 dc in every dc up to 2ch space. 2 dc + 2 ch + 2 dc in 2ch space. 1 dc in every dc of previous row. 2 dc in 3rd ch in the beginning of previous row. Same again for row 3
- Start of repeating pattern
- R4 – 3 ch, 1 dc in 1st dc of row below. *1 ch, skip 1 dc, 1 dc in next dc*, repeat ** up until last dc of the side, 2 dc + 2 ch + 2 dc in 2ch space, 1dc *1 ch, skip 1 dc, 1 dc in next dc*, repeat ** ending with 2 dc in 3rd ch in the beginning of previous row.
- R5 – 3 ch, 1 dc in 1st dc of row below. *1 ch, skip 1 dc, 1 dc into the space*, repeat ** until the last group of 3dc in row below. 1 ch, skip 1 dc, 1 dc in next dc, 1ch, 2 dc + 2 ch + 2 dc in 2ch space, 1 ch, skip 1 dc, 1 dc in next dc, *1 ch, skip 1 dc, 1 dc into the space*, repeat ** ending with 2 dc in 3rd ch in the beginning of previous row.
- R6 – 3 ch, 1 dc in 1st dc of row below. 1 dc in every dc and chain space up to 2ch space. 2 dc + 2 ch + 2 dc in 2ch space. 1 dc in every dc and chain space of previous row. 2 dc in 3rd ch in the beginning of previous row.
- R7 – 3 ch, 1 dc in 1st dc of row below. 1 FPdc in every dc up to 2ch space. 2 dc + 2 ch + 2 dc in 2ch space. 1 FPdc in every dc of previous row. 2 dc in 3rd ch in the beginning of previous row.
- Repeat Rows 4-7 another 12 times ( total of 13 ridges).
- Repeat Rows 4-6 once, to finish. Break off yarn and weave in ends.
Pattern Cheat sheet and chart:
- The basic pattern to follow is:
- Start every row with 3 ch, 1 dc into 1st dc of row below.
- Center increase is 2 dc + 2 ch + 2 dc in 2ch space.
- Finish every row with 2 dc in 3rd ch in the beginning of previous row.
Notes
Stitches used US terminology:
- Chain Stitch (ch)
- Double Crochet (dc) US = Treble stitch (tr) UK
- Front Post Double Crochet (FPdc) US = Front Post Treble (FPtr) UK
- Slip Stitch (sl)


The shawl is beautiful, it truly does look like the shading of a perfect summer sunset. And it’s just what I have been looking for, a real shawl to wrap up in and snuggle into. Thank you.
I just saw your pattern for sunset peaks. How do I get a copy of of it plus all you’re other patterns. I love working with Mandela yarn. I have made an Afghan so far with it
Now I’m beginning a sweater with it. I love the color of the shawl can’t wait to do it. Thanks
I only offer my patterns as blog posts. I have plans on expanding my digital download store but haven’t found the time to create PDF versions of all my patterns. Maybe next year. Until then you can bookmark the relevant post and visit when you need to read the pattern. I’ve also added a print button at the bottom to make it easier to print a copy if you wish.
Why do we not see a “Print” so we can print the pattern out? I have looked all over this page and not found it.
I’ve just updated the post with a simplified printable version of the pattern at the bottom of the post.
The R6 written instructions don’t see to match the picture pattern. It says to DC into every DC in the row below, but the picture appears to include DCs in the chain spaces as well. I’ve made and undo the first 7 written rows 3 times now, I can’t get the number of stitches to work for row 8 and I’m wondering if that’s the issue.
It’s a lovely pattern and I’m really hoping I can get it to work 🙂
You are quite right, yes it’s a dc into every dc and chain space in previous row. I’ve amended the pattern to make it clearer.
Hello. I love this pattern and i want to use this to make a rectangle shawl. Can u help me with that pattern like how to start it and initial set of rows. I ll be really greatful.
Just chain on as many stitches as you want the width of the shawl to be, double crochet all the stiches, then work rows 4-7 without any increases.
What am I doing wrong? When I get to the repeat of row 7 where I’m to do FPDC around, I’m facing the wrong way!
Row 7 is on every 4th row, so you must be missing a row.
Beautiful pattern. Did you realize that you are actually yarning under most of the time in your video? You yarn over for the first loop, but for the rest of the stitch you are yarning under. That could be confusing to new crocheters.
Yes, it was recently brought to my attention. I may add a note to my posts to mention this.
Funnily enough I have been using this technique for over 35 years, it was taught to me by my mother. I find it makes no difference in my finished result and also feel it’s more efficient.
But I do agree with your point that it could be confusing for new crocheters.