My baby is growing up, Sob!
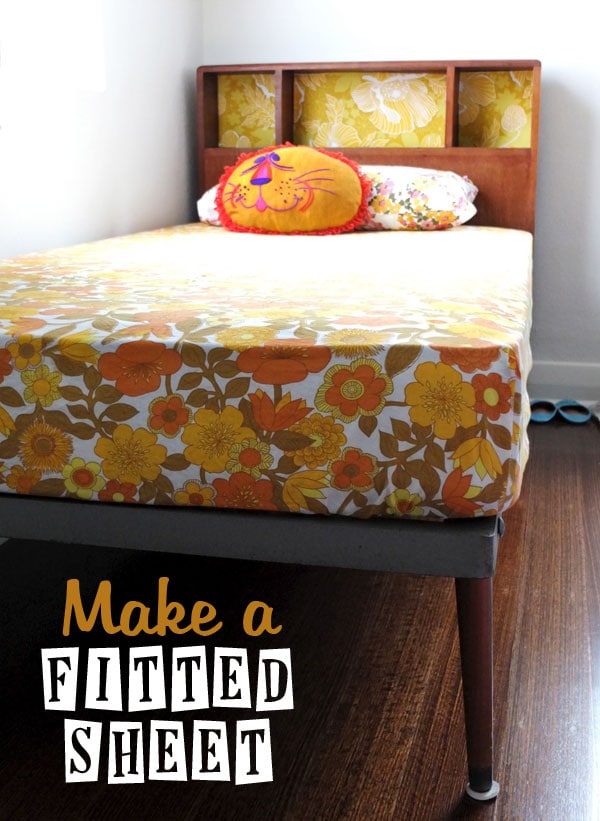
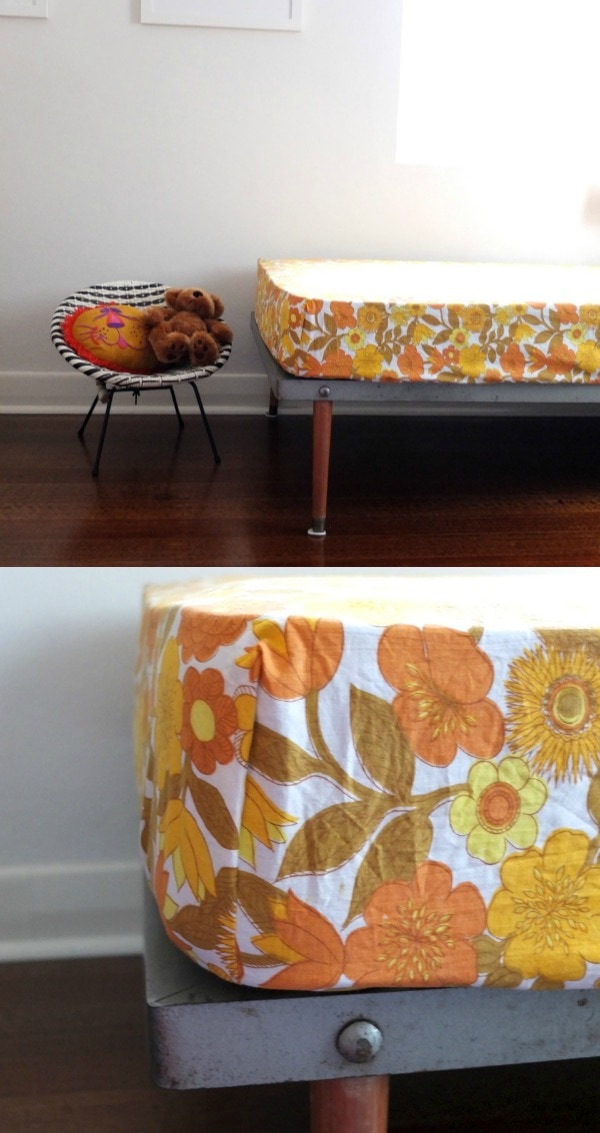
Emma has grown out of her toddler bed and has graduated to a single bed, (you call them twin in the States). We were lucky to enough to inherit this cool vintage one from a family member in great condition.
I didn’t have any single size bedding so rather than hitting the stores, it was the perfect opportunity to make use of all those thrifted vintage sheets I’ve been collecting, the only hitch was vintage sheets are all flat, which is a pain in the backside.
No drama, with a few easy steps, all flat sheets can be converted to practical fitted sheets.
I’m going to show you how to make a fitted sheet. And best of all, the instructions below apply to any sized sheet, so you can use this tutorial to make cot sheets right up to a king sized bed sheet.
Vintage sheets are great for this, but I if you don’t tend to use the top sheets that come in a sheet set (I use a duvet without a top sheet), it’s a great way to double the value of your bed linen purchase.
You will need:
- Flat sheet the size of your mattress
- Firm thin elastic (about 0.5cm / 1/4″ width) length will depend on sheet size
- Elastic threading tool or Safety Pin
- Measuring tape
- Sewing machine
- General sewing supplies
How to make a fitted sheet:
Gather you materials, you probably have every thing you need in your linen press and craft drawer.
This guide to bedding sizes is a great reference to help you calculate the measurements required for your sheet, but I suggest taking your own measurements of the mattress you are sewing for, as sizes and especially depths may vary.
The mattress measurements you will need are:
length
width
depth
and extra tuck under (several inches if possible but that will depend on the size of your flat sheet)
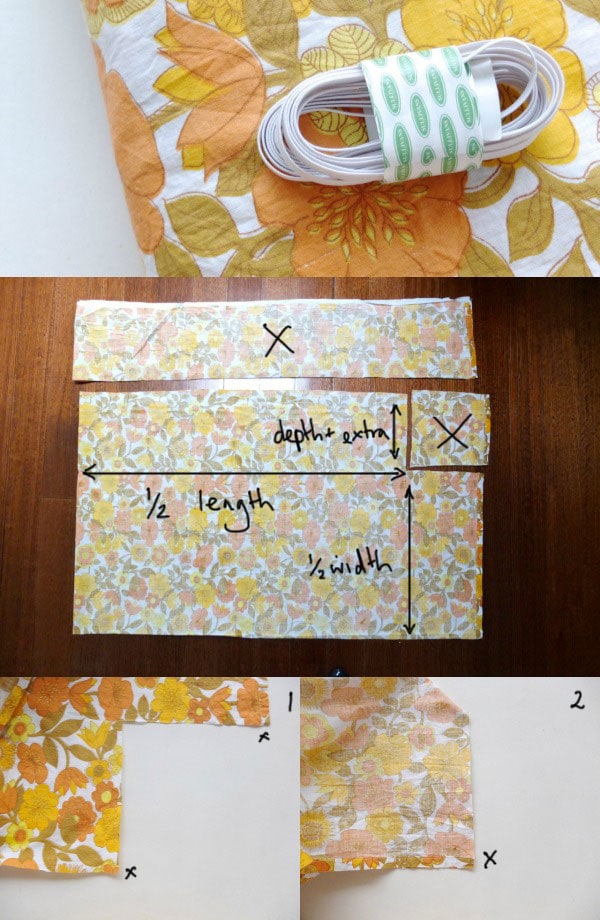
Cutting:
Fold your sheet into quarters, from the center fold measure half the length and half the width, add the depth and as much extra as your sheet will allow.
Tip: some flat sheets tend to be wider as they are designed to go over your body, so cut off the excess width so the depth + extra is same all around (marked with a X).
Cut away the square that is remaining in the corner, leave 1cm (half inch) for seam allowance (indicated with an X).
It’s always best to cut a fraction bigger to allow for mattress protectors etc… You can always make it smaller but not the other way around.
Sewing:
1. Fold over the edges of your corners matching the little x’s.
2. The right sides of the sheet should be facing each other as pictured.
3. Sew a seam back stitching towards the corner and finish the raw edge with a serger or zig zag stitch. Repeat for all corners.
Tip: Try it on your bed at this stage just to make sure you are on the right track.
4. Serge or zig zag right around the raw edge of the sheet.
5. Fold over and sew to make a casing for the elastic to thread through. Mine was about 1.5cm wide (6/8″?) but it will depend on the width of your elastic. Don’t make it too narrow or it will be hard to thread elastic through.
6. Leave an opening about the width of your hand.
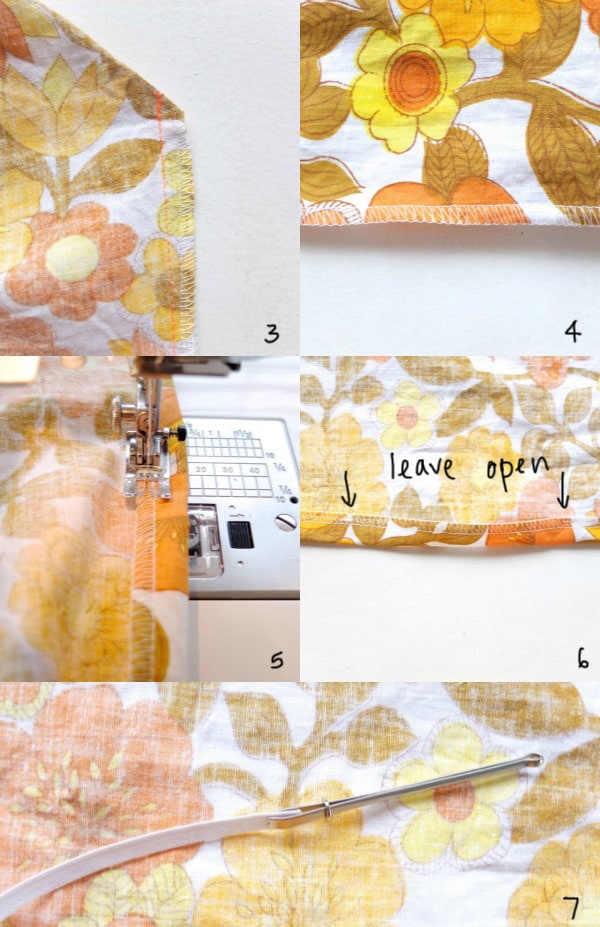
7. Secure the end of your elastic with an elastic threading tool (pictured) or a safety pin.
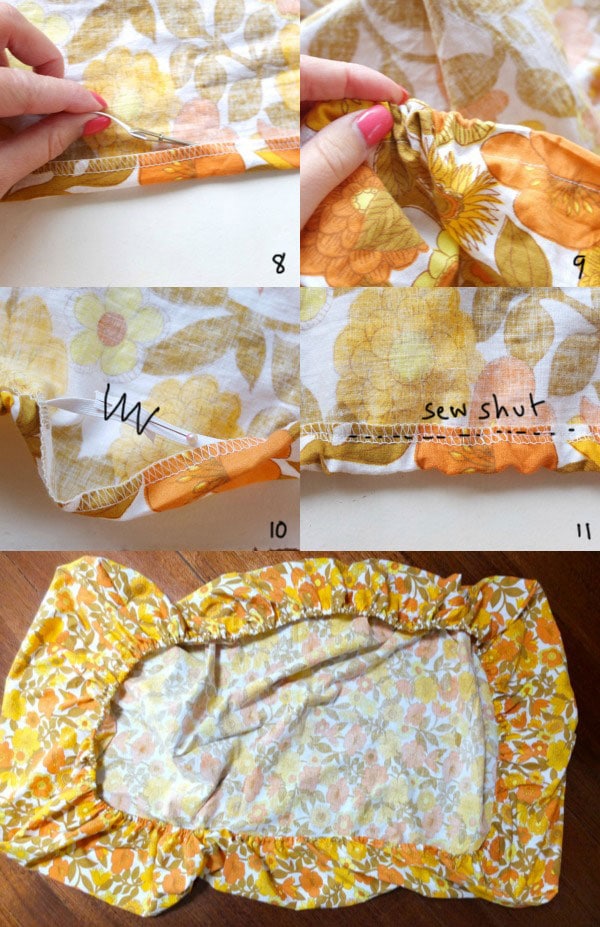
8. Thread your elastic into the opening.
9. Keep feeding all the way around till you get back to the opening.
10. Pull the elastic so it gathers the edges of the sheet in like the bottom picture, but not too much that it won’t stretch over the mattress. Sew the ends of the elastic together.
11. Sew the opening shut.
All done! Wasn’t that super easy?
Check out how nice and snugly the sheet fits over the mattress. Bed making is such a breeze now, no more messy corners.
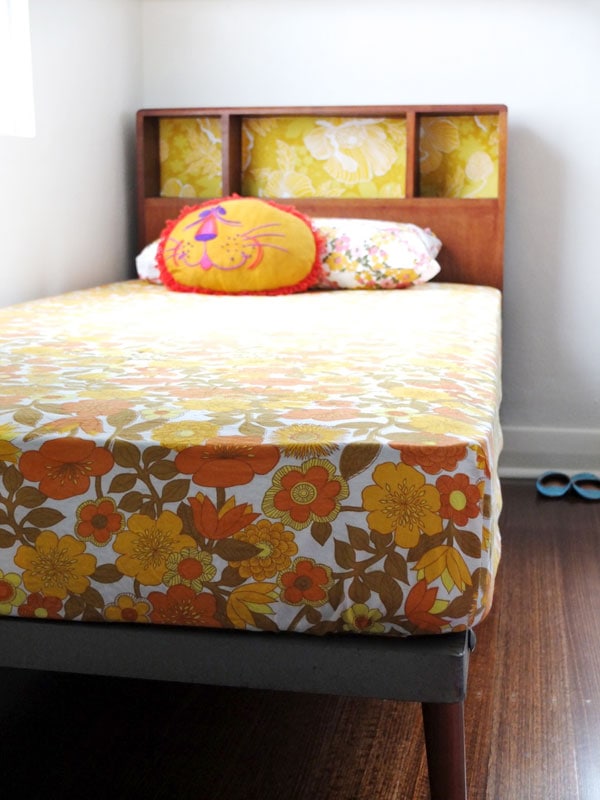
Emma’s new big girl bed is coming together, next on the list is a duvet cover and a quilt.
So go and dig out all those flat sheets at the back of your linen press and convert them to fitted sheets, clear the clutter and save money at the same time!
Any questions? Feel free to leave a comment and I’ll get back to you with an answer as soon as I can.
Related Projects – Vintage Sheet Duvet Cover
Like this project? Sign up to the mailing list and get lots of fun stuff delivered to your inbox.


Absolutely love this; I have flat sheets multiplying in my cupboards none as gorgeous as this though!
Love the sheets! I believe I had a pattern close to this when I was a tot. The lion pillow. It reminds me of either a storybook, or possibly a cartoon from the 70’s. I know that face! Did you make him as well?
The lion is a super cute thrift shop find. I imagine he was made in the 70’s, I remember seeing some similar animal pillows in vintage craft books.
Love the retro fabric you have used and great instructions thanks
I love how easy it is to make fitted sheets! I’ve recently been going through a fitted sheet DIY frenzy but hadn’t considered using vintage flat sheets. They’re super cute!
I have been thinking about doing this to my flat sheets for a while now … sets are normally better value than buying individual pieces but I end up with sheets that hardly ever get used. Now I don’t have to walk in blind and experiment, thank you!
Awesome, thanks for the tutorial. I’ve been looking for orange cot sheets for our new nursery and they are impossible to find! Might just whip some up 🙂
Great tutorial Cinti. I’ve had this project on my to do list for a while now… I really should get onto it shouldn’t I!
Also love your elastic threading tool. I’ve not seen one of those before.
The tool used to thread the elastic is called a bodkin. You can usually find them in the “notions” section of a fabric store.
Oh thank you! I knew it had a name but couldn’t think of what it was. I find mine very practical.
Great idea. I love tutorials that show instructions step by step. My question is, how does one determine the measurements of the elastic that goes around the sheets,
whether it is twin to king size. Do you have a chart that gives the elastic lenghts?
Thanks! Good question re elastic. As a general rule estimate by calculating/measuring the distance around your mattress (circumference) minus about 15-20%. Of course this may vary depending on how stretchy your elastic is and how much depth you have in your sheet/mattress. Always best to get a bit extra then you can pull in to adjust once you have threaded through.
Hope that helps
Cheers Cintia
Since we usually purchase the King sheet set for a Queen size bed — more width on the top sheet — this is any excellent tutorial on how to modify the bottom sheet. Thanks!
This blog is fabulous! Within 10 mins of finding it, I had so many things that inspired me I don’t know where to start! I am moving back to the UK from Ghana this summer and I have lots of cotton flat sheets that I thought would be going to waste….not any more! And as for all of the t-shirts my husband has accumulated over the years, I feel a rug coming on! Thank you!!
thanks so much for the tutorial. really appreciate you taking the time to make it look so easy!
Great tutorial, thanks for that! Also, I just found out what is that funny thing that I bought the other day, it’s a bodkin! It came together with a loop turner, and I had no idea how to use it, but now I know!
Just a quick question, how do you calculate the size of the elastic?
Tatiana
Brazil
Thanks! Good question re elastic. As a general rule estimate by calculating/measuring the distance around your mattress (circumference) minus about 15-20%. Of course this may vary depending on how stretchy your elastic is and how much depth you have in your sheet/mattress. Always best to get a bit extra then you can pull in to adjust once you have threaded through.
Hope that helps
Cheers Cintia
You don’t even have to go all the way around with the elastic. You can just do the ends.
Yes, great to save elastic
I AM SO EXCITED TO FIND THIS!!!!!!!!!! You have NO idea how frustrated I have been with my current sheet situation. The corners are always coming off, because although they are the correct size for my queen bed, they were old, and had shrunk from washing. Also, it seems like the pockets are not deep enough for my mattress. The final problem is that there is not elastic going all the way around. I was blessed to find 3 sets of king sheets yesterday at a yard sale! I also do not use the top sheet as a cover, so I could have up to 6 new fitted sheets! Yea!!! Thank you, thank you, thank you!!
great find. I’m sure you’ll have no problem converting those king sheets. I always find it hard to find sheets deep enough for those extra deep mattresses too.
I had a regular mattress then bought a pillow top. Bottom sheet ended up being too short and the elastic on the sheet barely touched the bottom of the mattress but wouldn’t go under it.
About 3 inches in from the point of each corner, I sewed 1/2 inch elastic, diagonally so the elastic was attached with one end on the long side and one end on the short side of the sheet. The elastic went under the mattress and was wide enough that the sheet finally stayed put.
Great tip, thanks for sharing.
What a brilliant site,easy instructions and diagrams.cannt wait to start making flats to fitted sheets,with correct depth for my mattress.
Thanks, glad my tute was useful
Cheers Cintia
Great tutorial, thank you!
Just an FYI for anyone doing this with a modern Australian queen flat sheet, the sheet probably won’t be long enough. I found this out making my first fitted sheet today. Fortunately, I had a spare flat single bed sheet, which I sewed on to the bottom of my queen sheet before making it fitted. Now I have a “custom” bi-colour fitted sheet for my queen sized bed. 🙂
Good thinking, like a gusset.
Thank you! I just used this great tutorial to turn a couple of charity shop bargain curtains into great sheets for my son’s awkwardly shorter-than-a-single-bed mattress. So much easier than trying to use too-big flat sheets on a midsleeper!
Thank you so very much for posting the step by step directions- with pictures for this project. I was certain there had to be a reasonable solution for this, but didn’t know how. What a blessing you are!
thanks so much for the tutorial. really appreciate you taking the time to make it look so easy!
Once again thank you.
Hi I have got so far as measuring and cutting but I have ended up with a rectangle rather than square cut offs! What have I done wrong?
good one! You need to have the side depth the same on each side so the cut out square sides are the same. you can fix it by either cutting away the extra length, or sewing on a strip of fabric to the shortest side to make up for it.
All assuming you have the top of the mattress measurement correct?
hope that helps
Holy moly, why didn’t I ever think of this? I have a super deep mattress and the only sheets I can ever find for it cost a small fortune. Now I can buy king size flat sheets and convert them into extra deep pocket queen size sheets! Sure elastic is pricey, but it’s still a lot cheaper than expensive sheets!
glad I could help, I always find you can get flat sheets on sale because not as many people use them.
I had the same problem with my old mattress. It was 18 inches deep. I bought a lot of king-sized flat sheets to make my bed, but they won’t be long enough to make a fitted sheet even if you open up the placket at the top. I just did the math and measurements to convert my kings to a fitted queen for an 11 inch deep mattress, and they just aren’t long enough. They will, however, be long enough for an 8 inch deep mattress (my daughter and son-in-law’s bed), without opening up the placket. And since there is already a casing at the top and bottom, I don’t have to sew as much! Just have to make sure it stays open for the elastic when I sew the corners. Plus I have the consolation of being able to make crib sheets from extra queen flats I have because the fitteds got worn out.
As a side note, we always had a fitted bottom sheet when I was growing up, so I had no idea how to make a bed with just flat sheets. In case you don’t either, there are plenty of tutorials on line. I learned how from an episode of Martha Stewart’s first TV program a very long time ago. The instructions online from her aren’t the same as those I learned. That was actually what inspired me to use flats instead of over-priced but cheap sheet sets for deep pockets. They have come a long way since then in quality and price, but you also run the chance of the top sheet not being wide enough (had that happen with one of the two sets I bought)when you buy a set.
I find that the top sheets aren’t made long enough to make a properly fitted fitted sheet. Ugh. This may be where your ‘vintage’ sheets are a great find … they are probably longer!
I converted a knit jersey top sheet (it could barely be called that at only 82 inches in length!) The jersey wasn’t cut on the grain line so I had to eliminate wonky extra corners. I did cut off approximately 6 inches from the width.
I literally ‘eyed’ it because I just couldn’t figure out how to salvage enough of the fabric if I cut it on the best grain line as properly as I could. I also ‘cheated’ and didn’t make a casing all the way around. I sewed the elastic into a circle and pinned it at the half-way points around the sheet. (I ‘eyed’ it, too.)
I am not a perfectionist-brain-surgeon kind of sewer! LOL!
So ….. it is wonky, a bit twisted and actually ‘too small’ but it will work because jersey stretches. LOL!
I wish my kid would use the woven fabric … I have a TON of those from my older children who are grown ups now …. and this one doesn’t like them.
Stretchy fabric is so forgiving like that. You may be right about the vintage sheets, I suspect the top and bottom ones may have been the same size long ago.
Semi stupid question when yoh say in quarters does that mean fold my sheet 4 times?
Fold in half then half again so your sheet is a quarter and your are cutting through 4 layers.
Try it with a piece of paper first, it should help you clarify the steps
Thank you! Thank you! I have an adorable 101 Dalmations sheet that was my daughter’s, now it will be a crib sheet for my grandson. So fun to have 2 generations enjoying this. You did a great job of explaining and your pictures really clarify any questions. Thank you again.
In the states where I am, the selection for twin sheets is pathetic. I wanted something cute but not sport’s hero or mermaid cute – I wanted adult sheets cute. I needed a tutorial to do this. Yours fit the bill. Thanks so much!
Fantastic, that makes me so happy to hear.
I know this is an old post but I have to tell you my boys just ripped through the last fitted sheets in the house and this tutorial saved me! We have a pile of twin flat sheets and it never occurred to me to make them fitted( I sew clothes, not home stuff usually). I whipped up 2 in a half hour and am so proud at my thriftiness! Thanks so much for writing this up and posting it. I browsed your site and will have to make a couple duvet covers for the comforters that they have that are too ‘baby’.
Fantastic Christina, I predict you will never have to purchase expensive bed linen again. Thanks for your lovely feedback, I really appreciate it and gives me a reason to keep sharing on the blog.
x cinti
Hi,
Thanks for the tutorial! I’ve been asked by a friend to make her some cot sheets for her soon to be born bub as the cot she’s purchased has slightly rounded corners. Do you have any suggestions as to how to get the sheet to fit nice and snug as I imagine that even if i cut out the corners, there might still be some slop in the fit… if you understand what it mean 😀
Thanks!
x
Emma’s cot had an oval shaped mattress and I didn’t add corners at all. Most mattresses have just slightly rounded corners so it should still sit snug.
Thanks for your response (i know this tutorial is a few years old!) I’ll have a go and see what happens 😀
Hello, this is fantastic, I have been eyeing this project off for awhile now but not been brave enough – not great at sewing or reading instructions it turns out!! sigh, however I decided to take the plunge with some lovely pink and white stripe sheets that have been in the family for years! I thought I followed the steps as laid out – and the single bed measurements seem to match yours – but my sheet fitted a double bed rather than the single, any ideas on where I’ve mucked up? I am guessing it’s painfully obvious seeing as you’ve had many comments on how easy it is, but still I would like your input if possible, many thanks, Genevieve
You can still save it. Just lay the sheet upside down (with seams out) over your mattress and pin where you want the corners to be, then sew there.
thanks, and of course, that makes perfect sense. cheers Genevieve
Yours is the first (of many I’ve read) that actually makes reference to the additional fabric needed to account for the “tuck under”. Thank you for including that….it’s kind of a personal choice of how many inches extra for that, right? I’ve made one crib sheet and think it’s not going to work b/c the instructions were too generic and my daughter’s crib mattress is thick. Now I’m about to make covers for my DIL’s new banquette cushions, doing them like a fitted sheet so they can be easily washed…but all the measurements have to be custom calculated. Your instructions are giving me the confidence that I’m on the right track. Your instructions and pictures are really, really helpful!!
Great idea re: using this technique to cover banquette cushions. Yes you can add as much tuck under as required but don’t go overboard or you may get too much bulk under the corners.
Tell me how it turned out.
Thanks for a really clear explanation of the steps, you illustrations are fantastic! I have had my eye on some lovely fabric, will have a go at making some sheets for my baby, but first ill be browsing the rest of your site in search for more ideas. Thanks again, gg
Oh, my goodness … I know I am years late for your post, but I was just looking for information on sizes for fitted sheets for a cot (for granddaughter). I couldn’t believe your photo! My grandma made me a lion absolutely identical to that one – in the 70s when I was at uni… AND my mother had that sheet and pillowslip. Crazy deja vu! The lion was a kit – grandma did the embroidery (but never could see the lion’s face, haha), and I did the turkey stitch for the mane (I think that’s what it’s called).
How fun, we found it at a thrift store, and Emma still loves it.
This tutoria gets me one step closer to making a mattress pad. Any ideas on how that could be done?
You would need to add rectangular panels to each side of the mattress topper and then join the corners as per the sheet instructions.
I guess I was asking how to do the topper part, since this tutorial already explained how to make the fitted part. It’s one of the next things to be done on my sewing list. Thank you for the help!
Have just purchased a king single with non-standard trundle. Will follow your tutorial. What interested me was your vintage bed! We had them in 1970’s as hand-me-downs for our kids. Patterned sheet also looked familiar and resembled our kitchen wallpaper – circa 70’s. Many, many thanks.
Glad I could help. Emma’s bed was also a hand me down out of someone’s shed. I wonder if it was yours. How funny!
I’m not a sewer. I looked at around 10 websites giving instructions on making fitted sheets.
I struggled to follow their instructions which I found frustrating.
However Cintia’s instructions were logical and easy to follow. Thanks!
Thanks Simon. Glad you found the post helpful.
How do you determine how much elastic to use?
Thanks! Good question re elastic. As a general rule estimate by calculating/measuring the distance around your mattress (circumference) minus about 15-20%. Of course this may vary depending on how stretchy your elastic is and how much depth you have in your sheet/mattress. Always best to get a bit extra then you can pull in to adjust once you have threaded through. You don’t need elastic all the way around, if you are a little bit short of supply. You can just add elastic to the ends and sew the tails in so they don’t move.
Hope that helps
Cheers Cintia
Dear Cinta: many years ago, my mother made sheet sets for my boys outsized children’s beds. She made a bottom sheet to fit the mattress and a light weight quilt out of the same sheeting material. Then she stitched the quilt to the fitted sheet. With no top sheet, the bed was super easy for a kindergartener to make himself just by pulling the quilt to the top of the bed. Come laundry day, since it was all made of sheeting, it was easy to wash. Now my daughter wants me to copy it for my granddaughter’s bed. You’re instructions on how to make a bottom sheet are extremely helpful. Thank you!
So glad you found it useful.
I’m even more years later finding your furs! Was given an all white down-alternative comforter that I will be making a duvet cover for. Found that tut first. Also going to use thrifted flat sheets that I will be adding a piece of those sheets to bottom of existing fitted sheets. I was hoping to figure out how to do that without removing existing elastic but w ur post will take out elastic, add my four rectangles to each side/end and then add back elastic. Hope this makes corners stay firmly where they belong. May have to figure out how to make corner to corner measurement longer since I believe the fitted sheet is too small over all. Any suggestions on how to compensate for sewing corners that will no longer be in the right place. Thanks for your wonderful clear instructions on all.
I’m afraid the existing corners will always be a problem. You could always unstitch them and add an extra square of fabric to fill in the hole?
Love the idea, since I do not use the flat sheets either. But would love a quick video to get a better understanding. Also, would love to see this same concept done for sofa cushion covers please…