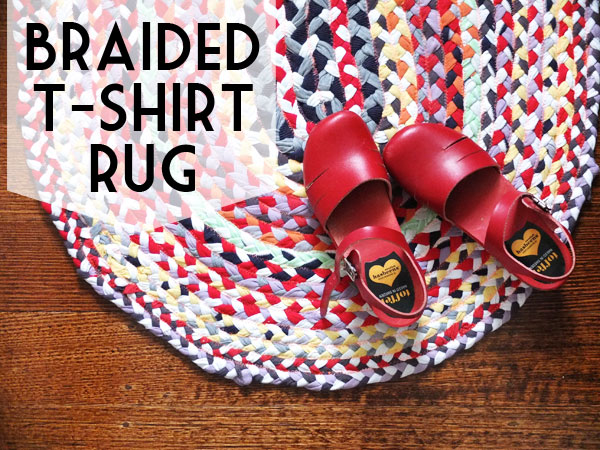
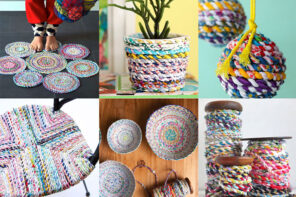
I love making projects that involve at least one of the following criteria: decluttering, upcycling, sewing and a need. This Braided T-shirt Rug ticks all the boxes, so when I spotted a circular rug made by Sewing For Life on Pinterest, I was itching to start on my own immediately. Here’s why…
- Declutter – I’d been hounding Mr Man to clear out some of his old t-shirts that he no longer wears, the bottom actually fell out of his t-shirt draw from the weight of all the excess clothing!
- Upcycle – Most of said t-shirts were well past their use by date with most of them having holes, stretching or stains, so charity donation was not an option. Usually I tear old shirts up for dusting rags, but the truth is, who needs to dust that much?
- Sewing – enough said
- Need – With a chilly winter on the way in Melbourne, I thought it would be lovely to finally have a bedside rug to treat my feet to some cushy comfort on a chilly morning.
This Upcycled Rug is a super satisfying project to make but it wasn’t all smooth sailing, so this tutorial is less about ‘How To’ and more about what not to do and troubleshooting solutions. Read on to see how I made mine.
You will need:
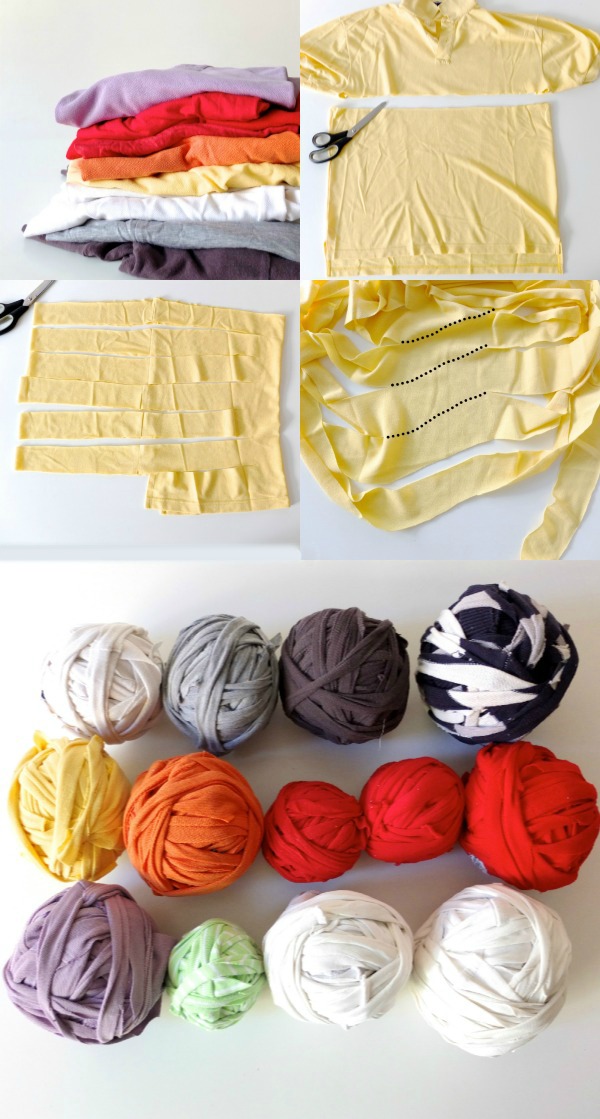
- Old T-shirts or fine cotton knits (the more you have the larger the rug will be. I used 13)
- Scissors
- A clothes peg
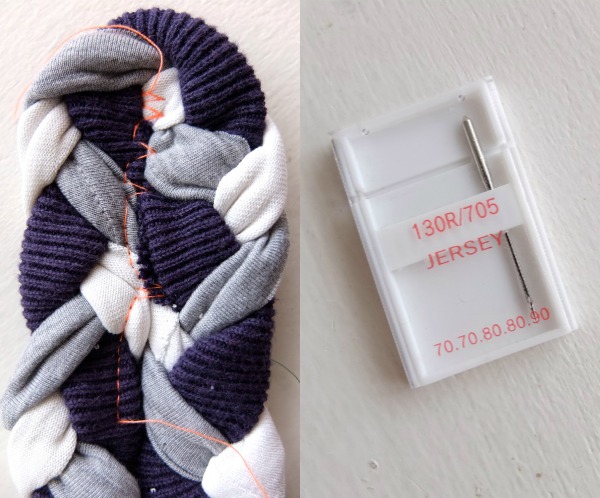
- Sewing Machine and general sewing supplies (jersey needle recommended)
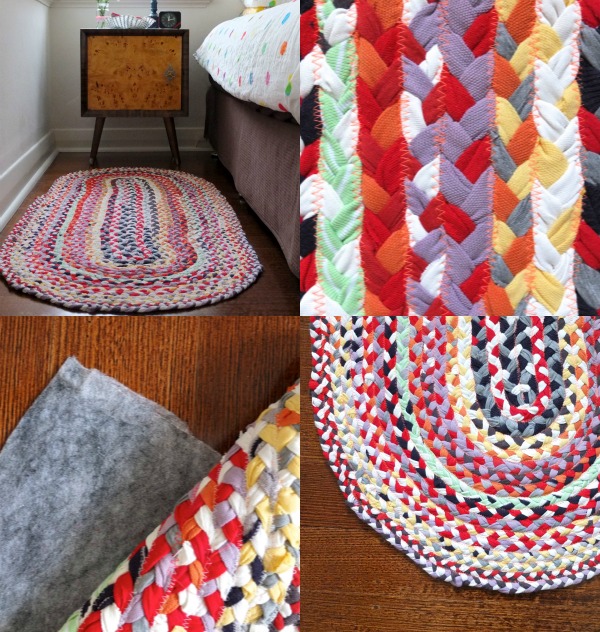
- Non-slip rug underlay (IKEA STOPP FILT works great)
How to make a Rug from Old T-shirts:
Cutting the t-shirts into strips
I’ve made a video explaining this step – WATCH VIDEO, or
Cathy from Sewing for Life covers this in great detail so I recommend reading her post Prepare your T-shirt Yarn.
Cut t-shirts into 2″ strips, I didn’t measure exactly so don’t be too fussy about measuring.
Tip: if you are mixing thinner knits with thicker fabric, cut the thinner t-shirt into wider strips.
Roll your yarn into balls.
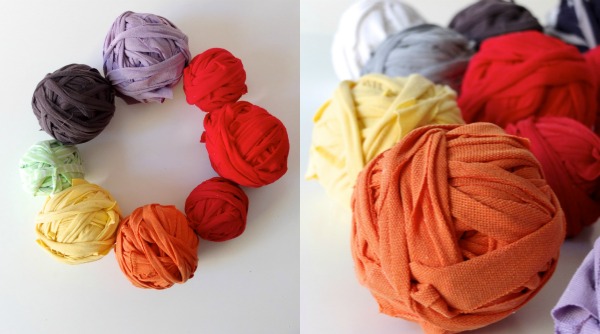
My thirteen t-shirts made thirteen balls of yarn.
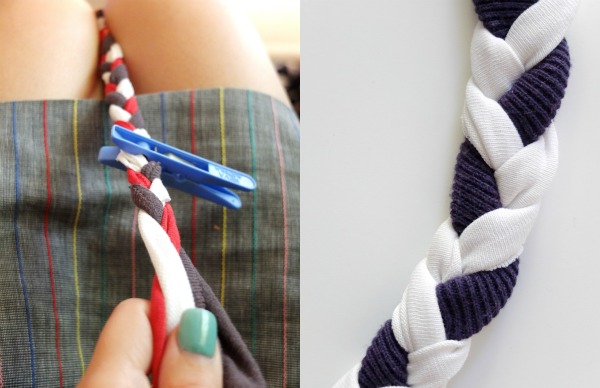
Make a braid
Work the yarn just like you would braid a plait of hair.
It’s up to you if you want to braid and sew as you go along or if you want to finish all the braiding before sewing.
I chose to do all the braiding first, it took me a few evenings in front of the TV.
To start and change colour you can either sew your strips of fabric together as Cathy has done, or use a No Sew option that I used, of making a little hole in one strip and looping the new colour through.
When braiding think about how you want your finished rug to look. For solid bands of colour, at least two of the three bands of braid should be the same colour or very tonally similar. If you want a more specked random look, make each strand a different colour with as much contrast as possible.
Sewing for Life method of Starting and changing colour.
Braiding Tip: Hold the braid between your knees as you work and fasten the end with a peg, as you work your braid, move the peg down to keep the braid nice and firm and prevent it from unraveling.
The braiding was my favourite part and I found it quite therapeutic.
Here is what thirteen t-shirts worth of braid looks like.
Sewing the Rug
You can choose to sew a circular rug like Cathy’s or an Oval Rug like mine.
To make an oval rug lay out a long straight piece of braid and fold it around itself. The initial length will determine the final shape of the rug, a short length will result in a shorter wider rug, a long length will make a long narrow rug.
Pay close attention to the direction of how you lay out your braid to avoid repeating my mistakes.
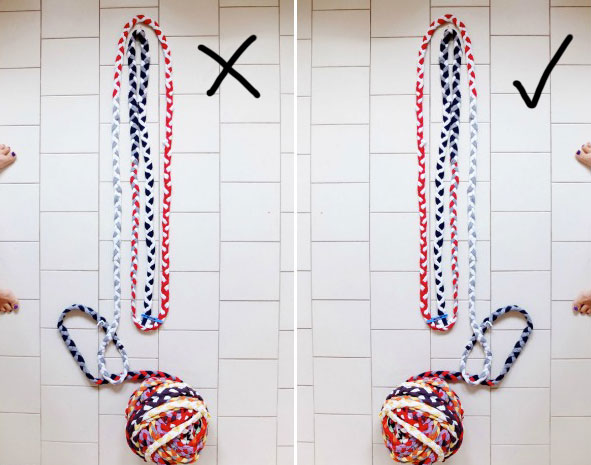
As you can see from the photo above there are two options for laying out the direction of the braid.
On the left was my initial attempt, anticlockwise. DON’T DO THIS, I’ll explain why later.
On the right is the correct way with the braid going around CLOCKWISE.
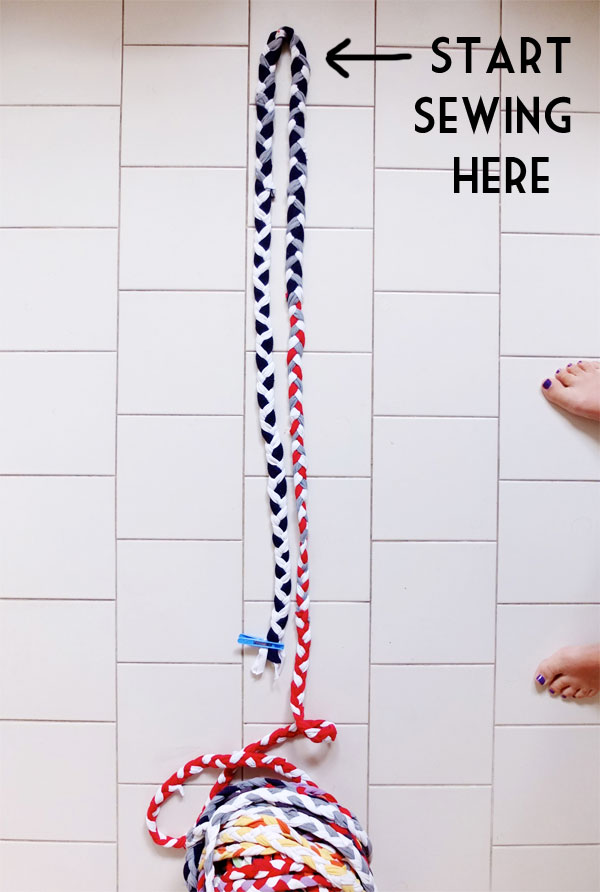
Decide on the general shape and length of your rug and start sewing where the arrow is pointing.
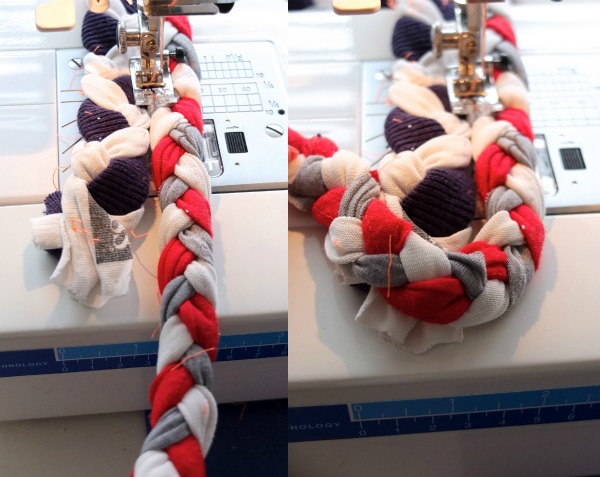
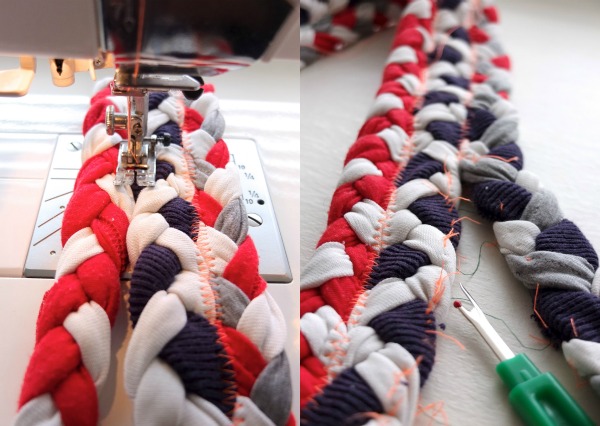
Use the widest Zig Zag stitch setting on your sewing machine, medium stitch length is fine.
Push together the edges of the braid as you sew, when you get to the end (first curve), loop the braid around tucking the start of the braid underneath, and sew around. This will fasten the loose braid end.
Continue sewing around and around.
Sewing tip: If you find your stitches are skipping, try using a jersey needle which is designed for knit and stretchy fabrics.
Luckily I had one jersey needle left to save the day!
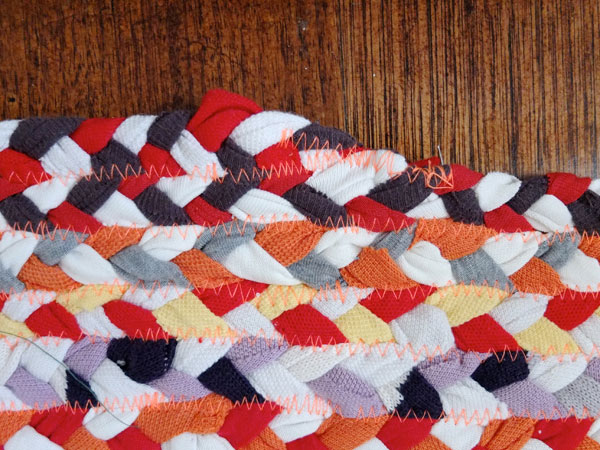
Here is what you want your stitching to look like.

Below is my first attempt at sewing the braid together and my big Boo Boo. Can you see what you did wrong? If you look closely and what became apparent to me fairly quickly is that because I had started the braid coil anticlockwise, as I started sewing the bulk of the rug was going to grow on the machine side under the sewing arm. Doh!
Because the rug is so big you need the bulk of it to grow towards the outside of the machine and onto the table. I had some unpicking to do.
TAKE TWO!
Once you get the hang of it the rug grows fairly quickly.
Because the fabric was stretchy and the thickness of the braid varied, the rug took on a slightly organic curvy shape.
Sewing tip: To prevent the edges curling up or becoming fluted as you sew, feed extra braid around curves to keep the ends sitting flat and when sewing straight sides pull the braid a little firmer. You will understand as you start sewing.
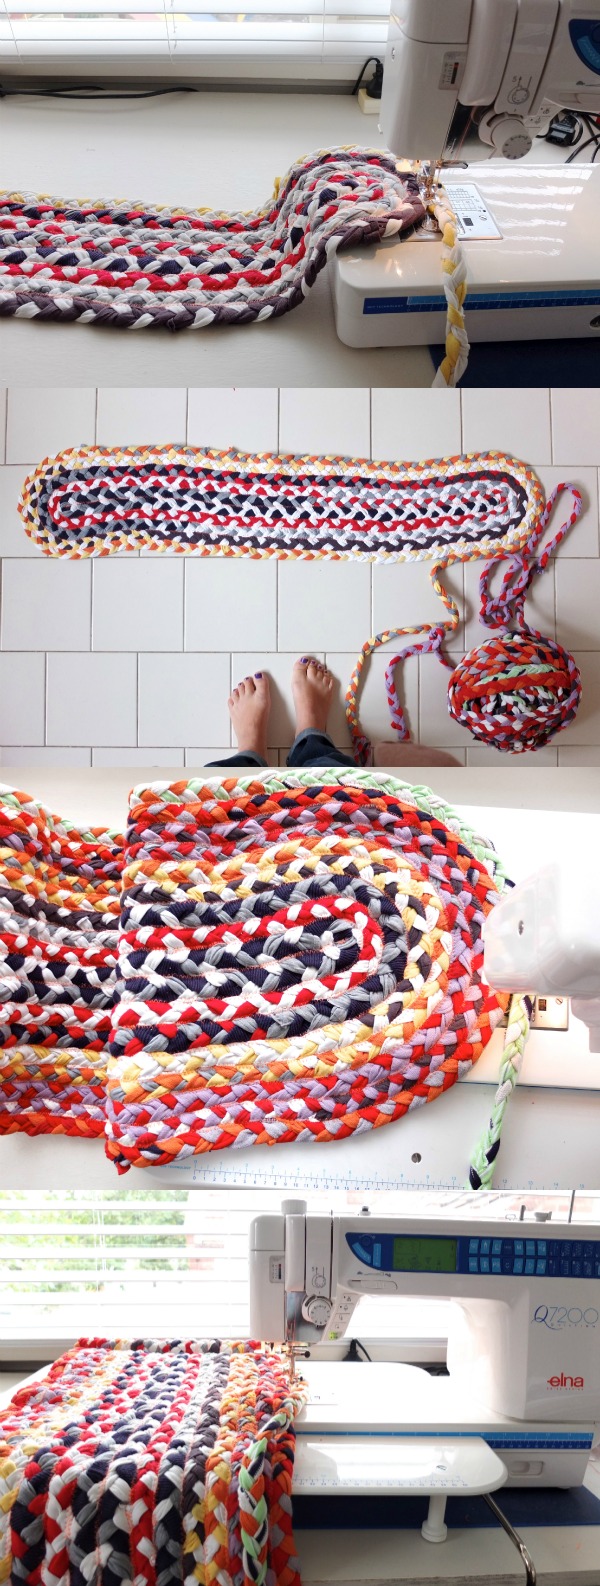
If you have an extension table for your machine, now is the time to use it. It helps keep the heavy rug supported and prevents irregularities in braid tension.
To finish just tuck the end of the braid under the rug and sew over a couple of times.
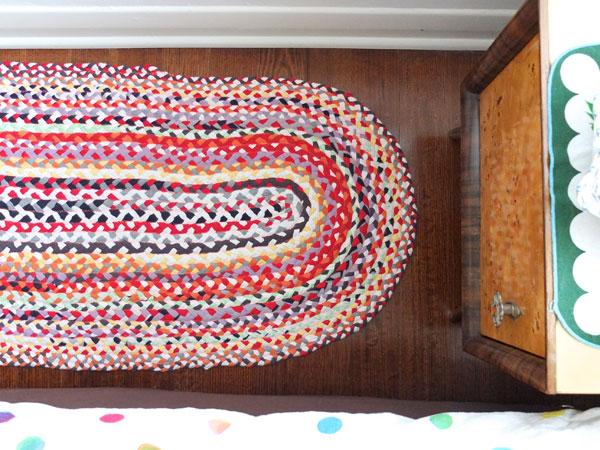
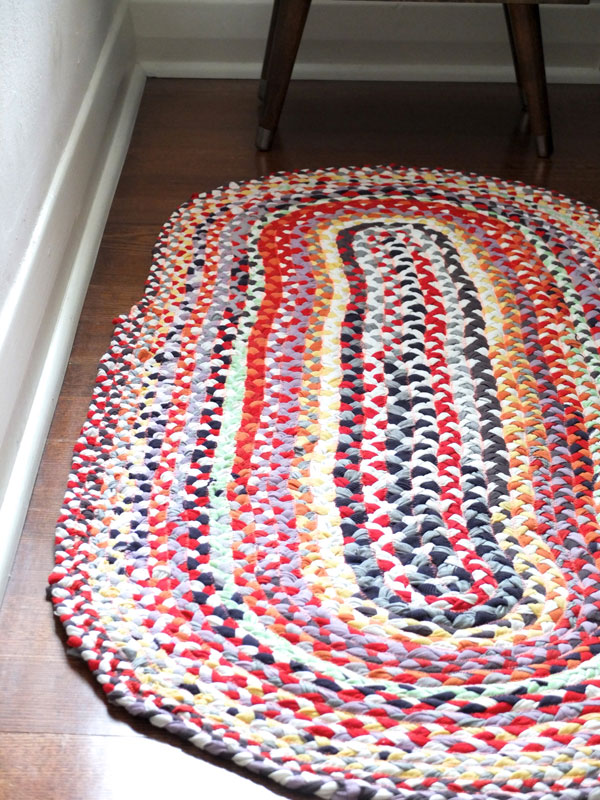
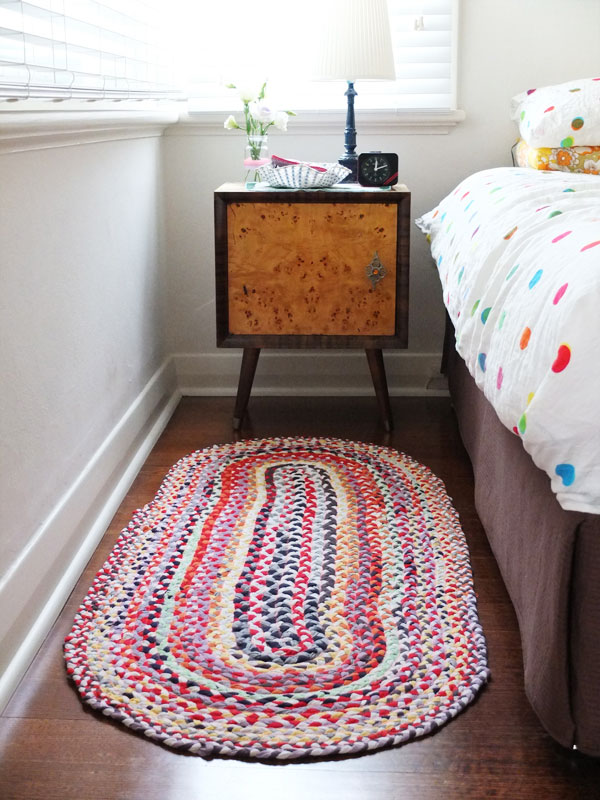
Here is the finished rug, it fits perfectly beside my bed.
If you find it curls up or bubbles a little, give it a good stretch out and use a non-slip underlay beneath it. I found that helped smooth it out nicely and of course makes it safe to walk on.
I quite like how it turned out, and the most amazing thing was that it cost next to nothing and diverted thirteen garments from landfill.
What do you think? Are you keen to make your own Braided Rug from all those old t-shirts cluttering up your wardrobe?
Need more t-shirt upcycling ideas? You may like – Upcycled T-shirt Tassel
Like this project? Sign up to the mailing list and get lots of fun stuff delivered to your inbox.


i love your colourful rug! it must be so satisfying to feel it under your feet every morning.
I love this! It is so timely too since I just tore up my bedroom carpet exposing the 50 year old hardwood floors. I need a lovely rug to step on when I get out of bed. My husband’s t-shirts have printing on them. Does this matter?
I don’t think the print would matter. It would just add to the textural look. I included a striped sweater and you don’t even notice the pattern.
I can’t wait to do this! I have a whole pile of old T shirts from my son and I that I wanted to upcycle but wasn’t sure what to do with them. This is great! I can’t wait to try this! Great tutorial..thank you.
Your rug turned out beautiful. I have been wanting to make one of these for so long, and you have inspired me to start! I hope to teach my daughters to braid at the same time!
What a great family project
GREAT PROJECT!!!
love everything about it!!!
thank you for sharing,
xxxx Ale
That is so amazingly pretty, must remember to start saving old shirts!
Colour choices are more to do with what my Mr wears than a conscious choice. But yes, they all came together nicely.
Hi, I’ve got plaits done but the fabric is a mix and much tougher than t-shirt, how could I ajoin them? Is there a weave options for plaits?
You can weave the plaits, but you need to do that as you go along. There is an example in this post https://mypoppet.com.au/makes/7-ways-to-make-a-rag-rug-from-old-clothes/ Number 5.
Other wise you can try to hand sew the braids together, if the fabric is quite tough maybe try looping the needle through a gap in the braid rather than trying to stitch through the fabric?
Gorgeous! I’m off to the op shop tomorrow (The Dude won’t let me in his tshirt drawer!)
Such a fab tutorial! Thank you. I’m going to make one for my little boy. Also…what brand are those super cute red shoes in your first pic?
Thanks. The shoes are called Swedish Hasbeens
I luv this project, the only problem is that I don’t have a sewing machine? Is there any way to do this without one?
Yes, Cathy from Sewing for Life blog who’s tutorials inspired me to make my own rug, sewed her first one by hand I believe. There are a few links to her blog above. Traditionally braided rugs were always sewn by hand. Just a little more time consuming.
Hello,
A very pretty rug – but I would crochet it instead of
braidin and sewing.
Yes that would be another good option as well, may want to cut the strips a little thinner for that.
These were originally sewn by hand in the ‘olden days’ and made with cotton, denim, any fabric you have. Use a sturdy thread like doubled sewing thread, quilting thread, or even crochet cotton. Takes a little longer but looks pretty. Hope you post a pic if you make a rug
I made a very large (6 X 8) rug from cotton strips. I laced it together using 1/4″ cotton strips. I had to tear it apart two times due to heavy waffling, but finally got it together. It looks great. The pain in my wrist is still here after a year as well.
That’s quite an effort. I’m always sore from crafting. Currently have a sore back from crocheting a rug on the floor.
Hi, do you have a regular sewing machine to be able to do this? Thanks
Yes a regular machine should be able to sew this. You may need to experiment with types of needles for best results. Heavy duty machines do a better job if the braids are thick.
But I SLEEP in my old teeshirts. Now you’ve got me wanting to raid my PJ drawer! Looks like a trip to Goodwill MUST be had! 🙂
I don’t think I ever would’ve thought to try to machine sew one of these! I’ve always wanted to make one, but the thought of sore fingertips and aaaall that time has made me put this project on the back burner. Thanks for showing how easily it can be done! It’s perfect!
These are lovely – can they be put in the washing machine?
It’s quite heavy when dry so I wouldn’t risk it as it may damage the machine. You could probably wash it in the bath tub and dry it in the sun. I’d treat it like I would a normal rug. Maybe in the heavy duty machine at the laundromat it would be ok?
Hi Cinti, Hi Sue,
I wash mine in my front load machine. Mine are small enough (about 10-12 t-shirts) and fit nicely in both the washer and the dryer. Though if you put it in the dryer use low heat, those t-shirts tend to shrink up a bit. Best to dry in the sun. Mine buckle a bit but once they go down on the floor, just a few days of walking on them flattens them out again!
~Cathy
Thanks Cathy, I haven’t needed to wash mine yet.
My grand daughter was just asking about a t shirt quilt for her sports t shirts. This would be a great way to use the backs too. Great for a college dorm room also!
Could you please share both the initial center length and the final width/length of the rug so I can get a better idea of what my stash of shirts could produce?
Remainders of shirts than have been used in T-shirt quilts could also be cut up for the shorter pieces needed so there is little waste from them also.
Thanks for the tutorial!
You could braid and make your rug as large as the t-shirts you have would make. If not large enough, clip the ends or tack them down, wait till you have more and add on later. This would clear up old bags of old t-shirts as well as get a jump on you ‘new’ rug!
Amazing!!! I love the colors and the way yours turned out! Funny, I was just thinking that I should weed out my tshirts-since there are only a certain set I actually wear for working out–yet have tons from all the road races! (In particular, I love this one green one-but it is too big and heavy to run in–it would be great in the rug!) Thank you for giving me the push to clean them out-yet still be able to enjoy the colors!
Easier than crochet!! My hands just can’t handle those big needles anymore, thank you so much, now I need to round up some orphaned T’s! Blessings, Terri
This is a Great idea. One I might be able to finish since you don’t have to use knitting needles or Crochet hooks. :0) Thanks.
Wow this is great! I would like to try it using cotton fabric strips – still cotton but no stratch. I think it might work. I have lots of fabric to use up. Thanks for the tutorial – yours looks awesome!
Because the fabric wont stretch, yo may have to experiment with braiding tension. Here is a link that may help
https://www.modabakeshop.com/2009/02/braided-rag-rug.html
Cintia,
Oh My Gosh! I LOVE YOUR RUG!!!!!! Can I say it is so amazing!?! It turned out so great and so happy looking! Aren’t you addicted now? My stack of shirts have piled up again and I am so doing an oval now!
Great job!
Cathy
Thanks Cathy, you did such a great job with yours that I just had to make one. I’m totally addicted but have run out of t-shirt. Will ask family and friends if they have any to donate to me, I’m sure they will appreciate the opportunity to declutter 🙂
I am a little obsessed with making my own rug, and this is by far the simplest and clearest explanation of how to do it without crocheting! I knit a t-shirt rug, but it didn’t have the look I was going for. Your rug is beautiful – I am majorly jealous. So jealous, in fact, that I will have to make my own!!! Thanks for the tute!
This rug looks beautiful, what a great idea! I started doing the same thing with my shirts a few weeks ago but didn’t know yet what to do with them. This will be a nice plan, thanks!
This is so cool! I really love how your rug turned out. I’m definitely inspired to give it a try. I have a crafty kid at home, who insists on being part of all my craft projects, but I think I can leave part of the braiding to her. Thank you for a fantastic tutorial!
All the best from Sweden
Karin/Pysselbolaget
Our youngest son passed away 5/24/2012. (MATT 11/29/1976 – 5/24/2012) I have two big garbage bags of his t-shirts and planned on making t-shirt necklaces – of course, there are soooo many shirts that I think I will also make a rug. TY for the info.
Oh Ruth, I’m sorry for your loss. It must be so difficult having to go through all his things.
Well you can only have so many necklaces (but I imagine you could give some to his friends too), so a rug would be something practical to make.
Thanks for sharing your comment, I’m glad I could help in such a small way with something that must still be very hard to come to terms with.
Hugs Cinti
so cute! cant wait to try this out.
I love this soooo much. What a great idea, I just need to know how to using a sewing machine………Sad I know, any tips…….
I hope you don’t mind, but I’ve featured you in my blog. You inspired me, and I wanted to share that, so thank you x
Thanks. Glad you like it.
Love this idea and have started making myself a rug. I do have a problem – When I go and try to sew my rug together, it doesn’t fit under my presser foot. Is there a trick to this? Any suggestions?
Fabulous! Yes most machines have a pressure foot adjustment dial at the top which lets you dial the pressure up or down. Check your manual. If its still too chunky when the foot is up even, dry squashing the braid down a bit. As you braid made it a little flatter rather than round like a rope.
Tell me how you get along.
In the USA a “hopping foot” is needed for bulkier sewing projects.It flexes to varying widths. I CAN’T WAIT to make a rug for my baby girl. She’s 4 and this is the PERFECT SOLUTION to buying a $400 rug + $50 pad that likely she would get sick of in a few years. I’m beyond stoked and can’t wait to try this. I actually have a bunch of t-shirts cut into strips – but couldn’t quite find the right project for.
Thanks for the ‘Hopping foot’ tip – I haven’t heard of that before.
Another bonus is that this rug can be washed in a machine (depending on how big you make it), so it’s perfect for a kids room. I’ve washed mine a few times and it’s held up great. I chose a really hot and sunny day so it would line dry quickly.
My mother made me a rug like this from all the scraps of clothes she made for me while I was growing up. She gave it to me as a high school graduation gift. It was one of the best gifts I have ever received!
Thank you, Miss Cinti, for the suggestion. I am using my mother’s old machine but I will surely check on the pressure foot adjustment. My sister and I have been having a lot of fun looking for old t-shirts and cutting them into strips. Thanks again.
50 plus years ago my Grandmother taught me this with stockings (before pantyhose) and sewing by hand
Brought back memories. Will do this with T Shirts now.
Thanks
WOW! really nice. and diverting things from landfills… you get big points for that! best of luck and enjoy the comfort underfoot. K.
I love this!!! Can’t wait to up-cycle our stuff!
Of course I love your rug. I also love your pok-a-dot bed spread. Did you make that too?
My daughter would love it! Thank you
Thanks Vicki, the duvet cover is from Ikea 🙂
Hi, i’m in the middle of sewing the plaits into a rug and my stitches look like your first picture but i am using a jersey needle! Help! I have even changed needles but it’s still doing it and looking very holey. Any ideas?
Maybe it’s your thread. Polyester thread (stretches a little) is recommended. 100% cotton thread will have no give. Also this may help https://creativechicksatplay.blogspot.com.au/2012/02/t-shirt-series-needles.html maybe try a stretch needle instead of jersey as your t-shirts may have some lycra in them (just guessing?)
Hope that helps. So frustrating I know!
Thanks for speedy reply and useful link. Will go out and buy some stretch needles and hope that they work. I’ve managed to sew about a metre in an hour so far as the polyester thread keeps breaking and the stitches are skipping so that i had to sew over all the holey bits twice or three times, which has resulted in the rug becoming curly. It is beautiful,, however and i will persevere. I’ve used about 4 reels of polyester thread so far! Need to buy more.
I’d love to see a photo when you finish – I’m creating a reader project gallery, I’m sure other readers would be inspired by your work and persistence 🙂
Any tips on the braiding? I’ve only done half a metre and it is all getting tangled. The balls of t-yarn that is. Thanks
It helps if one of the strips is shorter
Hi Cinti! I will be starting this soon! Love it. I saw the question about the braiding & I remember macramé projects from the 70s… Keep the long ends in rubber bands! Wrap them around something, and remove it & band, so you can just slide it out as you go. When you are working with 10 yards at a time, like macramé, it is very helpful!
Thanks for the suggestion. I tries little balls but the rubber bands would be much better!
Yes I find if you leave one of the lengths shorter, you can pull it out to untangle every so often.
Hi. I had a problem with the stitches skipping. That has now been resolved and i have switched to a stretch needle and no more skipping! But the rug is very wobbley indeed. I unpicked about 15 cm width as i thought the problem would be resolved but the same thing has happened and the ends are curling up again. This is so depressing. I just want to get finished. Do you think i need to unpick it all and start again, making sure i keep the sides tight and give more slack on the curves? Or is there a quicker solution?
Hi Charlotte, yes I found that a little frustrating as well, I did have to adjust my tension around the curves to prevent curling. If it’s really bad you may need to unpick. I noticed quite early on and tried to adjust as I went. I did have some waves in the sides and a slight bubble on the curve, but once i placed and smoothed it out on a non stick underlay it sits nice and flat. The solution you suggested is how I resolved it and did mention it in the post. Don’t give up, I’m sure it will look great in the end.
I must try this rug! My first will be small and round for my tiny powder room. I have seen these over the years and the ones I noticed were hand-stitched to assemble. I will try that, with a large needle and a thimble. Thanks!
Hey! I got all the way to the braided part, now I can’t get it through the machine. It is too thick (not for the thread/needle)…it simply doesn’t fit between the plate and the foot…any advice?!
Try to spread the braid so its a bit flatter, also most machines have a little knob at the top of the machine that can raise the presser foot slightly. If you still have the machine manual have a look in there.
Hello there! I love it and will try it soon! Could you give me your final dimensions? I think that would be very helpful.
Thank you
Sure, will get back to you asap with measurements
sorry kim, kept forgetting to measure.
the initial center length was 36″ and final measurements are 60″ x 28″
cheers cintia
LOVE, LOVE, LOVE THIS XX
I love this project! It’s a great tutorial and I think what is most helpful are the many comments and questions from your readers! Trial and error is the key so wish me luck! Can’t wait to get started!
Yes I always appreciate comments as it does help clarify instructions that may need further explanation. Sometimes I just assume that people understand what I’m talking about.
What a great idea! I just need the polished floors to put the rug on!! Pinned the pic on my Pinterest Artsy Crafty Stuff board!
SpikeyRose 🙂
Thanks
Wow, your rug is just gorgeous! I’ve been wanting to make a braided rug for years, but have been terrified at the idea of sewing it all together. I tend to use t-shirts for refashioning, but I would love to use other cotton fabric scraps. Thanks for the wonderful tutorial and the tip about which direction to coil the rug! (That must’ve been so annoying when you realized your mistake!) 🙂 Lisa
Yes it was annoying, that’s why I thought it was important to share it so others don’t make the same mistake!
Really great tutorial! I’ve seen these before, but hadn’t considered doing one until walking through your tutorial….now I am inspired. Won’t be on this years list of projects, but will be on this next winter’s list. Thank you for sharing.
Hi – I just found this via SewCanShe. What a great idea! But I don’t understand your no-sew method of adding another strip by looping through a hole. I’m trying to picture that in my head but, you know, it’s just not focusing in! Do you have a picture or a link showing that method? Thank you!
This link may help. There are some pictures included with the technique I used. I hope it helps https://www.craftstylish.com/item/39345/how-to-crochet-a-rug-out-of-t-shirts/page/3
Ah! Thank you so much. I just couldn’t wrap my head around that in just words!
I’m wondering about your no-stitch method for changing colors. Can you give me a little more information on how exactly you did that? Thanks.
Good question. This link may help. There are some pictures included with the technique I used. I hope it helps https://www.craftstylish.com/item/39345/how-to-crochet-a-rug-out-of-t-shirts/page/3
I was wondring the same thing about joining. Thanks for the link that shows how. This is definately a winter project must do!
This is super cool. I tried making one with old fabric a long time ago, but you do some kind of knotting to make it go around not zig zag stitch it together. Well to say the lease after several hours of working with it, it looked like a bowl. LOL. So now I’m askign my FB friends if they have any old tshirts, I just cleaned out, so I can make one of these. LOVE IT>
thanks for your tutorial. I have the entire ball of t-shirt braids done (probably 30 t-shirts total. i have attempted to make a round rug three times, and each time, it ends up cupping like a bowl, regardless of how much i pay attention to the tension. Any hints to help?
You really need to make sure the braid is flat on the outside edge. It has less to do with the sewing tension and more to do with how much braid you feed in.
what brand are those shoooooooooooes????
They are Swedish Hasbeens 🙂
Can you please tell me where to get the red shoes from the picture.
thank you
They are a brand called Swedish Hasbeens, had them shipped from Sweden
Question,,,,I don’t have a sewing machine. Do you think this could be done hand sewing it?
Yes it will take longer but hand sewing is fine
Wow! I love how its got the antique- and modern look at the same time! So cute and the colours make it so unique!
What a fab idea! LOVE it!! Hubby has quite a few ratty t-shirts, so I really want to give this a go.
Just one question: can I do this without a sewing machine? Can I hand-stitch the braids together?
I know it will be a lot harder to do, but I don’t have access to a sewing machine. 🙁
Yes, you can hand sew – you may find this link useful https://sewingforlife.wordpress.com/2011/03/08/more-stash-bustin-making-a-rug-with-all-those-t-shirts/
Thanks for your super-quick reply! Really enjoying your inspiring, creative blog…
I could not for the life of me sew my rug with a sewing machine. the thread kept getting all messed up and the rug turned into a bowl. i tried 3 times and it didn’t work. i resorted to using a drop cloth base and hot glueing the braids in place. it was SUPER FAST and it looks really good. the rug is flat, there are no stitches showing, and i love it. it is a nice alternative to using a sewing machine OR hand stitching.
you are welcome. just make sure you have a nice and big supply of hot glue sticks and you are golden. 🙂
genius!
Thanks! After trying three times the other way, I remembered the quote: The definition of insanity is doing the same thing over and over again expecting a different result. 🙂 Happy braiding!
Oh my gosh! YES I want to make one! I want to shirk all my responsibilities and make one right now!!
I have seen these rugs and thought about making a few. My mother had them all over the house, on top of carpet even to keep the carpet clean longer. Hers were all store bought but I love recycling old stuff. Thanks for this tutorial
This is so creative . I was hopeing I would be able to sew it by hand though lol that would take forever!
Great idea! A relative of ours in Maine used to make braided rugs out of wool, turning the cloth under and handstitching them so that you couldn’t see the stitches or the cloth edges from either side. I have one of hers which is 9′ x 12′ that she made in her 90’s!! Very beautiful but overwhelming— your t-shirt rug seems so doable. We’re putting an addition on with one room for just for a studio/art room, so this just might be my first project!
Wow, what an amazing thing to inherit. I don’t think I have the patience for hand stitching such a large rug.
I was thinking of handstitching it, too, as i would not take a chance on hurting my sewing machine….I want to make a thick, fluffy one using fleece from a bunch of old throws I have that I was gonna just throw away. With some durable yarn, one can whip stitch it quickly!
Yes I think you could hand stitch quite quickly if you are using thick fleece
Am I doing something wrong? When I braid it gets all tangled, (loose ends). Anything I can do to not let the loose ends get tangled?
Try to keep one of the tails shorter. Also wrapping the loose ends into bundles may help. 🙂
I love love love it. I searched for a link in pinterest just for this problem … too many old stained men’s shirts. And yours is the one i chose. Thank you for the excellent easy to follow and understand instructions. My Brisbane grandma will be so proud of my rug 🙂
Great, tell me how you get on 🙂
My son had a habit of “eating” his shirts when he was smaller – so I have all these tiny shirts with holes in them that I can’t pass along to anyone else or to Goodwill. This will be a great project to recycle those destroyed shirts into a usable item for his room!
Do u cut the strips all the way threw
No, you need to cut cut the strip on a spiral pattern up the t-shirt, the photos should explain how. leave a few inches uncut from the end and then cut diagonally to next strip to get a spiral.
This will be a great project when I have my granddaughters for the weekend! They can make and take! Then everyday they can see what they made and use it too! Or give as a present! Plus side, fun at Grammas! Thank you!
I am a little confused about the cutting. What is going on there? Are you just cutting in 2 inches and going on up in a continual, but somehow doing it partially to start with? Please explain the cutting more for me? Thanks.
Sorry. I now see what I needed to know on the comment of the 18th of January. Please disregard the 31st by me.
I really like the rug, looks like a fun project.
I was curious where you got the night stand by
your bed. I have never seen a piece of furniture
like that before. It’s a very unique piece.
I actually bought the pair at a thrift store about 15 years ago for $24. It’s a funny story. One had a missing handle which was very elaborate and distinctive, but I had the exact same handle on my medicine cabinet in the apartment I’d just moved into.
I wondered if they had once belonged to the previous tenants and they removed a handle off the bedside to pop onto the cabinet in the bathroom. It was the only explanation I could come up with for having the exact same handles.
Needless to say I replace the matching handle and popped a new one on the medicine cabinet.
You said you used 13 tshirts, but what was the dimensions of the rug?
the initial center length was 36″ and final measurements are 60″ x 28″
Lovely rug. I will try and make one too. I had made a small potholder many years ago using similar technique.
FYI-most charities sell soiled/worn clothing that is donated to rag makers. For some thrift stores the income by selling to rag is greater than selling the wearable clothes. Don’t worry about the holes in the shirt when donating to a national thrift charity or the local parking lot donor bin.
I make these by hand and use the not so pretty fabric to make a rug for pets. I’ve never thought of sewing it on a machine lol.. That would make life a lot easier!!
How did you connect the different color t shirts to one another?
oh i love this, i tried this ages ago but was low on techniques, now i see you use a sewing machine i shall hopefully crack it….! thank you so much for helping and your’s looks great
Hi! I’m working on mine now for my baby’s nursery (and once that’s done I have a feeling I will still be begging for old tshirts and every room will have one…) 2 questions, what was finished size of your rug? AND as I braid I find I am forever untangling I have to “unbraid” one color to get the strands straight again, so I never get past about 6-8″ of braid without having to unweave my ball.
I am completely obsessed with this project!
Thanks!
I think the size is there somewhere in the comments. The key to the tangling problem is to keep one of the three strands shorter than the others, then it’s easier to pull the short strand out. Hope that helps.
Hi Cintia! I just began making my yarn yesterday, but braiding took two people! One to braid and one to move the balls of yarn to keep them from getting all tangled up. Do you have any tips for faster braiding? Also, I had to admit I was pretty impressed that you just happened to have a jersey needle on hand! A true craftswoman! I sew all the time, but I’ve never employed that tool…off to the store I go! Looking forward to doing this with my daughter and making it together!! Thanks for all of the tips and links to tips.
Cintia hi ! I love your rug! I ‘ve been trying to make one myself but I just can’t seem to be able to sew the braids together. I have an old (and cheap I would say) sewing machine (bought it a few years ago from a local store and haven’t actually used it much) and the braids are thick and don’t seem to fit under the walking foot.. any ideas? I already tried to make my braids more loose and will try to sew it again..
A walking foot will catch, try a normal foot, or you could hand stitch if you get stuck.
I’ve begun hand-sewing my rug together (sadly, I don’t own a sewing machine; I might be sewing this together until I’m forty) and I’m noticing that it’s curling up an awful lot. It’s starting to look more like a little bowl than anything. Is there a certain stitch I can use to fix this, or is it just inevitable?
Try a ladder stitch and make sure the rug is laid out on a flat surface.
Hello! Am trying to make this rug as yours is very special! Just a question… Do you have any suggestions for not getting the strands so muddled during the braiding process? It’s doing my head in!
It’s best to keep one of the strands shorter than the others. Helps with untangling.
About how large did your rug turn out?
I absolutely love this idea, and will be making one for my dorm!
the initial center length was 36″ and final measurements are 60″ x 28″
I just wanted to say that I have ALWAYS wanted to make one of these rugs, and, as others have said, your tutorial is the best I’ve found because you explain it so clearly, and simply! I still don’t really know how to use a sewing machine; we have two or three, but my husband keeps promising to take them apart and clean/oil them, but it’s never gotten done! As we are planning to move, I will soon have my very own crafting room, and I AM going to make one of these rugs- and if it is by hand, well, then, it will be by hand! (I can show him my poor, tired fingers afterwards! 😉 ) Thank you so very, very much for such a great, easy to understand tutorial!
Can I just say I loved making the yarn, seeing it all rolled up was awesome! BUT the braiding was making me hate this project. I did it when I could over months, probably watched 5+ movies so over 10 hours of braiding. YUCK! Then suddenly I was done and the huge ball of colors got me excited again. Today I finally sewed on it and….. Love love love it!!!!
So glad you persisted. The big craft projects can be a bit tedious at times but I find those most rewarding in the end.
I followed your directions for curves and the straight sides, but it still ended up not laying flat at all. Could you explain that part of it in a little bit more detail. Like when do I start feeding a little bit extra on the curves? going into it? Or just on the ends? How hard do you pull on the straight sides?
Yes this is the trickiest part. I also had some trouble at the start but with a bit of trial and error got the hang of it. You need to feed in extra at the start of the curve and then the whole way around.
You don’t need to pull very hard on the straight part.
I would recommend laying it flat on a table every couple of rows to see where it needs adjustment as you go along.
Hi Miss Cinti, I don’t have many old T-shirts, but I do have tons of old sheets as my husband is a massage therapist. Can this rug be made out of old sheets?
Yes, just tear the sheets into strips and tuck the edges in when you braid.
Hi there! We’ve completed the rug fully but now are completely lost. It’s completely curled up like a basket. Is there any way we can salvage this project? Thank you so much for the inspiration and for the help!
Oh no!You will probably have to unpick the stitching and try sewing again. It’s really important to stop every couple of rounds and lay it on the floor to make sure it’s flat.
Love it! Going off to college next year, and with this project I’m killing two birds with one stone…cleaning out my fabric scrap drawer, and getting a super cute rug for my dorm room!
I have a Goffin cockaoo that eventually eats through everything that I wear. I have TONS of T’s I can’t wear in public because of this. Thanks for the great ideas for upcycling. I was going to cut the T’s in to rags, but now I have something fun and creative to do!
This is a very cute rug, I remember my grandmother making something similar though on hers the rug scraps were crocheted.
Great tutorial. I just finished up two tshirt quilts and need something to do with all the scraps. Can’t wait to make one of these.
Awesome tutorial. BTW, I love the Birdseye side table!
Yes the side tables were a luck thrift shop find many years ago. Only $12 each!
I was thinking, instead of putting a non-slip pad underneath, what if you put lots of puffy paint dots on the back. That could be a project for the kids. HHHMMMM I will try it.
That could work.
OK, I was super psyched when I saw your post and got right to work collecting, cutting, braiding t-shirts. I have a giant ball of braided material (representing oh so many hours of braiding) and I, too, am having problems with the stitches skipping. I switched to a Jersey needle, but to no avail. Fiddled with all of the other settings just in case, then put them back to normal.
The little labels have fallen off all of my spools of thread, but it seems to have a little give so I’d guess that I’m using basic polyester thread… Still nothing. The stitches skip and/or the thread breaks at any given point.
Any further suggestions?? I’m REALLY not looking forward to sewing this by hand!
Thanks in advance! 🙂
I’m not sure what else to suggest, could you borrow a friends machine to test it out? Some people like to layer some thin tissue paper over stretch fabrics to prevent skipping, I wonder if that might work. then you just tear it away. If all else fails hand sewing isn’t all that bad. I’ve started hand sewing one myself and although it goes slower it still looks good (and maybe less frustrating for you).
I have crocheted a few t-shirt rugs, and it is time consuming and hard. I want to try it this way! There is a thrift store in our area that has a baby bed FULL of t-shirts for a dime each, every day……and I have plenty for a huge rug. I just hope my machine can sew it, looks kind of thick, but worth the try.
I want to try crocheting a rug too. We can swap tips. Good luck with your t-shirt hunting 🙂
My roommate and I have this on our list of things to make for our dorm over the summer! Thank you for the inspiration 🙂 I will be sure to link back to your tutorial when I make a post about it.
Great, can’t wait to see it. Have fun!
Wow! I’m happy that I found your tutoring. I now can drop crocheting mats from old t-shirts and start to do them as you have done here instead. This is far more better and faster way to do it. 🙂
Thank you for sharing, it’s adorable mat!
Greetings from Helsinki, Finland
I don’t sew so I was wondering if this could be done with a strong fabric glue.
I’ve seen the braids being hot glued to a heavy backing fabric. It could be worth a try if you are a non sewer.
Gracias por enseñarnos a todas tan lindo trabajo, particularmente me encanto la combinación de colores, precioso.
Un abrazo desde la distancia y lindo fin de semana
Thanks for the tutorial! Mine ended up looking all wonky like a sea creature of some sort. Has anyone had any luck stretching…or washing…their rug back into shape. I can’t bear to unpick and start again. TIPS?!?!
🙂
I found that mine was a but lumpy but using a rug underlay helped hold it down. If the edges are wavy you have excess braid. If you send me a picture I’m happy to have a look and suggest a remedy. [email protected]
This is awesome! I am making it this summer for my first ever apartment! But did you sew all the braided strands together (like the ends) before sewing them into the rug shape? Thanks so much!
Very much enjoyed reading your post for making the tee shirt rug. Also impressed at all the comments from your followers. I hope to try this out one day.
Thank you for the post!
Just wondering if instead of sewing if you could use fabric glue?
I’ve seen some people use a hot glue gun and glue the braids onto a firm fabric base
Hello! I found your rug on Pinterest and loved it! This is my second attempt, and it turned into a bowl again. I am hand sewing my rug. My rug is circular. Should I sew it on a table so that it stays flat? And any other suggestions? Thanks!
Yes, sewing on a table should keep it flat. Also try not to stretch the braids as you sew as it pulls the mat out of shape.
This is amazing! especially since rugs are so expensive.
What are the dimensions of your rug? I understand that every rug would be different sizes, but I am just wondering. Thanks!
I’m sure the answer is somewhere in the previous comments. I’ll scroll through and have a look.
the initial center length was 36″ and final measurements are 60″ x 28″
Hi I have been trying to make this rug for quite some time now and getting very frustrated with it. Making the ball of yarn was fine. But my needles keep skipping so many stitches. I’ve tried needles which are little ball for knit fabrics, round sharp for woven fabrics and stretch needles and all of them skip!
I’m using 100% polyester thread too.
Any tips please? I really don’t want to hand sow it. So my only other option is gluing it if I can’t sow it.
Please help. I want to so badly make loads of these rugs!!
Thank you
What a bummer. you’ve certainly tried most of my suggestions. It’s obvious your machine isn’t happy with the stretchy fabric. Maybe gluing may be worth a try.
Cintia, If I remember correctly. to make an oval rug like mine/yours you take the desired length divide by the desired width and you will get the length of your starting strip. 🙂 ie mine was 7 feet/5 feet = 1.4 feet. (15 inches.) … at the beginning of each round (End) I laced two braids into one. to help increase the round without puckering.
Not quite. You need the width first. Take the desired length – width = starting length (not divided) so 7-5= 2ft starting length. Yes double lace the corners. Hope that clarifies it.
Thanks Cintia, My memory is pretty bad. Your readers would want to know this anyway. BUT, Close isn’t always good enough. LOL. Thanks. I plan to make another for my new apartment. Love your web site. (Y)
My mother used to make those rugs with not only recycled pants and shirts but also with recycled pantyhose, which you know are ruined quickly.
I absolutely love this rug and definitely will be giving it a go (hubbies t-shirt drawer needs to watch out). The only thing was you said you use the no sew option by making a little hole in one strip and looping the new colour through, I don’t mean to be silly but how does this work and how is the piece secured? Thanks so much as I love your blog!
HI Heather, the little hole method is to join strip not secure the whole rug. Here is a link to what I mean https://www.craftstylish.com/item/39345/how-to-crochet-a-rug-out-of-t-shirts/page/3
I wonder if you could braid the second strip into the first one, etc., eliminating the need to sew. In other words, braid only the length you need for the first strip (center of the rug). Then continue braiding, pulling the yarn through the previous braid as you go. Has anyone done this? I would think you wouldn’t have to go through the previous braid every time. Just a thought…Thank you for the inspiration!
Yes there is a technique to do that but I’m yet to work it out or find a good reference with instructions. Would be awesome not to have to sew
I love this idea, and the past few days I’ve cut a dozen t-shirts into colorful balls of ‘tarn’. But…
I just started braiding, and it’s not very therapeutic to me as the very long strips get tangled…so for every few cm’s that I’ve braided, I have to untangle the end of the strips… How do you prevent the yarn from getting tangled?
Yes the tangling is a bit annoying. My trick is to keep one of the lengths quite short about 50cm maximum and that just pulls through to untangle. The other 2 will just unwind quite easily. Otherwise you can wind the fabric onto a small card and fasten it with a rubber band to keep the lengths shorter.
I luv u already for dis
Thanks so much for this illustrated page, I had crocheted various strips of cloth, folding each strip and sewing it like biased tape before sewing the whole thing circular till I used it all up. My results were pretty enough, but it bunched up in the center like a little bowl, and the edges all curled up. Most disappointing. I wold like to undo the whole thing and plait it as you showed, but all the materials are different, so I may start over using the correct material.
Hi, I love your rug.
I have braided a long braid and ready to sew. Too bad I am facing serious skipped stitches. I tried both with both machines and i tried with stretch needle no 11, 14 and 16. None works.
So I suspect maybe is the way I braid the t shirt. Do you pull tight when you braid?
About medium tension when pulling. I had that problem too. It was a bit of trial and error with trying different threads and tension. It would take longer but hand sewing may be another option.
I absolutely love this!
I love this project! I’ve just made my own rug after encountering every problem possible but it was so worth persevering! It’ll be so perfect for my uni room & it’s the first proper sewing project I’ve done, thankyou for such a helpful tutorial! 🙂
I’m glad you stuck with it! It’s a very satisfying project.
I love the sound of this!
Thanks I’ll check it out
Fresh idea for recycling, upcycling, redesigning old t-shirts!
What are the dimensions of the finished rug after using 13 t-shirts?
the initial center length was 36″ and final measurements are 60″ x 28″
My braids are too thick to fit under my presser foot! I have been hand sewing but it doesnt feel very tight and the edges are curling….any ideaS?
Bummer about the braid being too thick. If hand sewing feels too flimsy, maybe stitch it onto a canvas fabric base to make it stronger.
The best word to describe your work is fanastic. I have seen this kind of a rug at a Cafe and i used to wonder how it was done, today i go it. Thanks cintia for sharing ur idea.
Beautiful! I love the way your colors came together. I’ve started my own rug…. looking for some advice. Instead of an elongated rug, I’ve started mine circular, hand-stitched. As it’s grown, it seems to bubble in the middle and doesn’t lay flat on the ground. I think it might have something to do with how tight I pull the braid as I stitch it together. I noticed you mentioned something about giving more braid around the curved edges, and pulling tighter on the straight away. I’m hoping you might have some suggestions about what is causing my bubbling and how to fix it! The whole rug is about 2.5 feet in diameter now and I REALLY don’t want to undo it, but if it doesn’t lay flat it is a useless rug haha. Thanks in advance and thanks for sharing your beautiful project.
Seems you are not giving enough braid around the curve. If you pull too tight it will bubble in the middle. Sadly you may need to unpick the last few rows and re-do them giving more braid around the curve.
Could you do this with plastic grocery bags? And possibly hot glue? Trying to find a way to upcycle them into a rug for my entryway.
I think the hot glue may melt the plastic. I would recommend cutting the bags into strips like yarn (called plarn plastic-yarn) and crochet it following this pattern https://mypoppet.com.au/makes/upcycle-style-crochet-t-shirt-rag-rug/ You could crochet the rug to be any size.
I love this idea, but is there a way to make a braided t shirt rug without a sewing machine? I want to do this project with some young people at church and we don’t have a sewing machine to use.
Yes there is a weaving technique that could work. I’m trying it at the moment following these instructions. Hope you find the link helpful https://littlehouseinthesuburbs.com/no-sew-rag-rug-tutorial
This is awesome! I’ve started cutting my T-shirt yarn and so far so good! Anxious to start braiding but I’ve read all the comments to make sure I have all the facts! I love the look of yours and I almost feel as tho my T-shirt yarn balls are quite long and I want mine to be colorful as yours is! So when braiding did you switch colors out frequently— or how did you decide when to change a strands color? And does that mean having different lengths of yarn that are ready to braid? I hope I’m making sense in my question! Also I appreciate you replying to a majority of the questions ? hope you see mine as well!
Hi Abby, I just changed the colours as I ran out of strips, it was sort of random. I recommend braiding with 2 stands of one colour and one of another. Make them slightly different lengths and add a new colour as the strip runs out for a gradual colour change.
Awesome! Thank you so much for the advise! Can’t wait to start braiding I’ve finally finished cutting all my yarn 😀
I’m confused on how to cut the strips and how to make the ball of “yarn”. It looks like you didn’t cut through the whole end of the shirt? and then how do you make the ball of yarn if they aren’t cut through? Finally — if you did cut it through to make strips — do you sew the strips end to end? thanks!
I’ve made a video here https://mypoppet.com.au/makes/how-to-cut-t-shirts-for-rug-making/