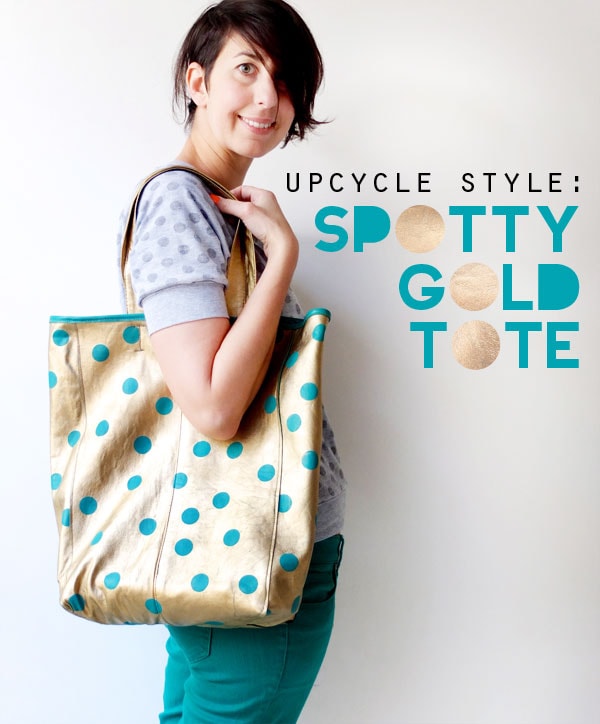
Make a leather tote bag by upcycling an unwanted thrift store find. Leather bags are expensive, but I’ll show you how to make your own for just a few dollars and a little bit of crafty know-how!
This post contains affiliate links
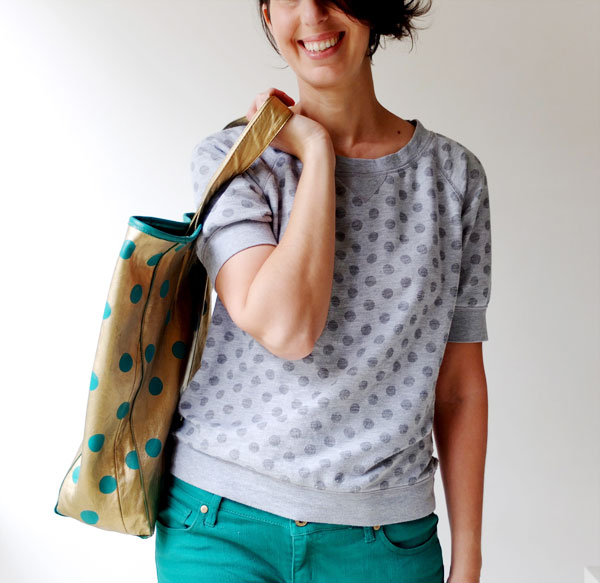
The weather is warming up here in Melbourne, so it was time to update my every day handbag to something a little lighter and brighter.
Problem is leather bags cost a pretty penny and I was having a hard time finding something to suit my needs, style and budget.
Of course I saw that as a challenge and was inspired to flex my creative muscles to make a bag of my own.
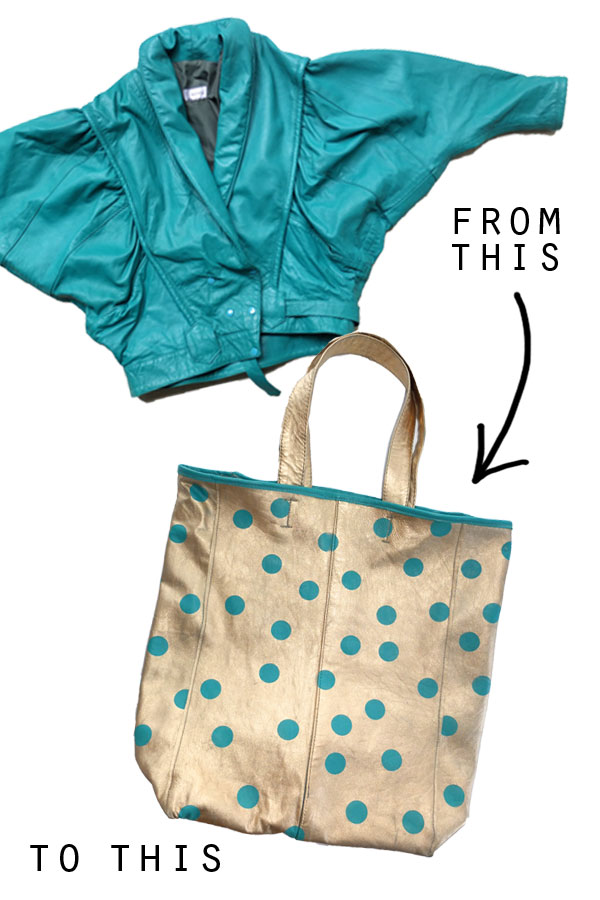
You will never believe what I made this leather tote bag from. I’ll give you a hint, it was an 80’s fashion disaster!

I thrifted this old leather jacket for an 80’s dress up party a couple of years ago and paid $15.
The colour is fab but the styling is truly awful, I knew it had potential but it took me a while to work out what it was.
I knew I wanted to make a tote bag, and bought leather needles about 6 months ago in preparation.
The gold treatment just came to me out of the blue, luckily I had all the supplies required at hand when my epiphany struck.
This is not really a project I’d recommend for a novice sewer, even I found working with leather a challenge.
Unpicking seams will leave holes so you really need to get it right the first time. If you want a practice run, try making a mock up in thick canvas or heavy denim.
Allow a whole afternoon for this sewing project.
Not confident enough to sew with leather? Try making these fabric tote bags instead:
You will need:
For template drafting:
- paper
- ruler
- pencil
- scissors
Materials:
- Soft leather (or faux), this can be from a large leather jacket (like I used) or from your local leather supplier.
- Dot stickers (the easy peel kind)
- Gold spray paint (lash out on the good quality stuff for best results)
Tip: Take your bag pattern pieces with you when buying your leather to work out how much you will need.
Cutting:
- Cutting mat
- Rotary cutter
- Quilting/cutting ruler
- Pattern Weights (I used a paper weight and sardine cans)
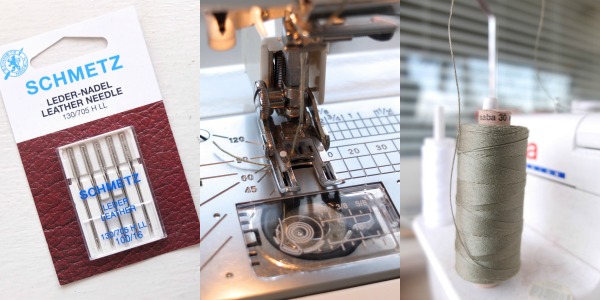
Sewing:
- Sewing machine with walking foot (a regular foot will work ok too)
- Leather needles
- Heavy duty thread (khaki works well with gold)
- Sticky tape or masking tape
Miscellaneous:
- Protected well ventilated area for spray painting
- Soft cleaning cloth
How to make a leather tote bag:
Strap yourself in, this is a long one.
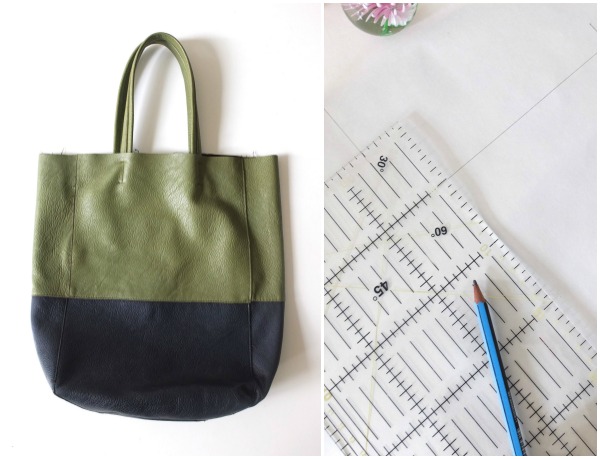
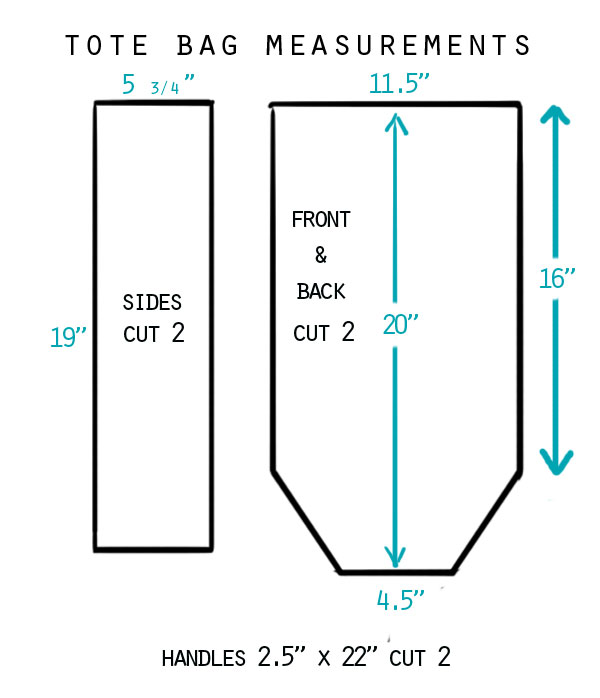
I based this pattern on my favourite bag that I use every day. It’s the perfect size for my needs and have included the measurements for you to draft. Feel free to adjust the sizing to your needs or draft your own simple tote pattern.
Preparation:
1. Draft the pattern measurements (below) onto paper and cut out pattern pieces. If you are making your own straps (I used the belt jacket for my straps) draft a strap pattern too.
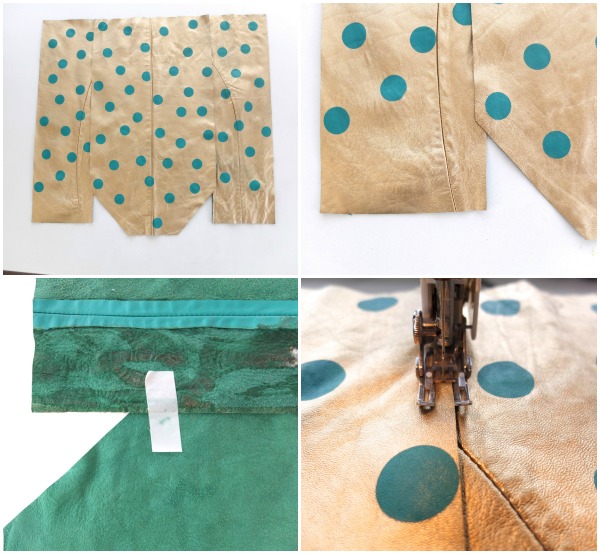
2. If you are upcycling an exsisting garment, remove lining and unpick (or cut) into largest panels possible. Don’t worry if there is a seam in your piece as long as the piece lies flat.
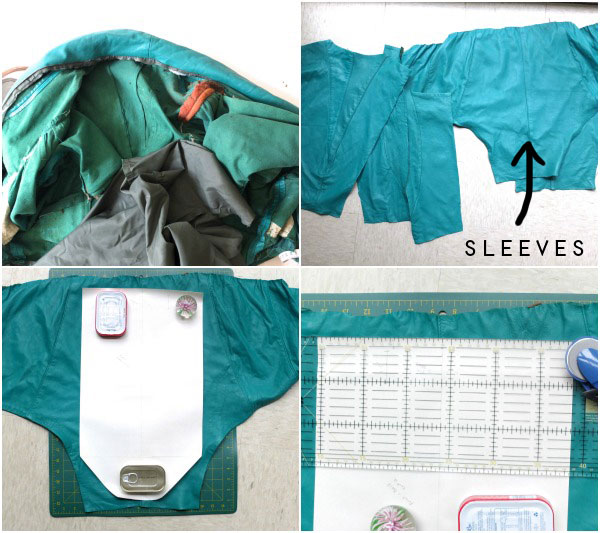
3. Lay pattern on to leather and weigh down (don’t use pins or you’ll make holes in the leather).
4. Cut with rotary cutter and mat.
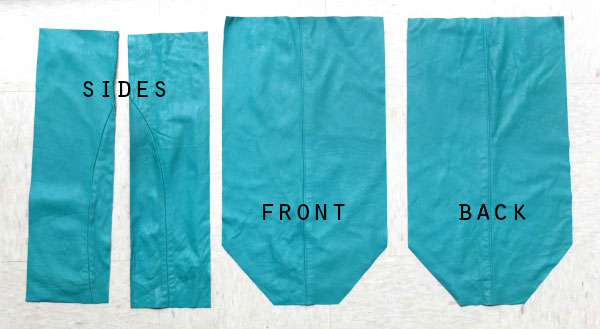
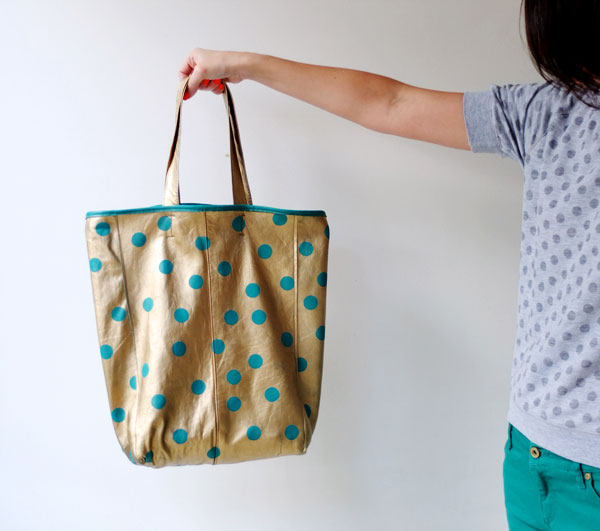
I cut the front and back panels on the sleeves and the sides from lapels. Belt became bag handles/straps. You’ll notice I included some existing garment seams in the pieces
5. To make the spots, stick on your dot stickers randomly. Have fun with this one, the kids may want to help.
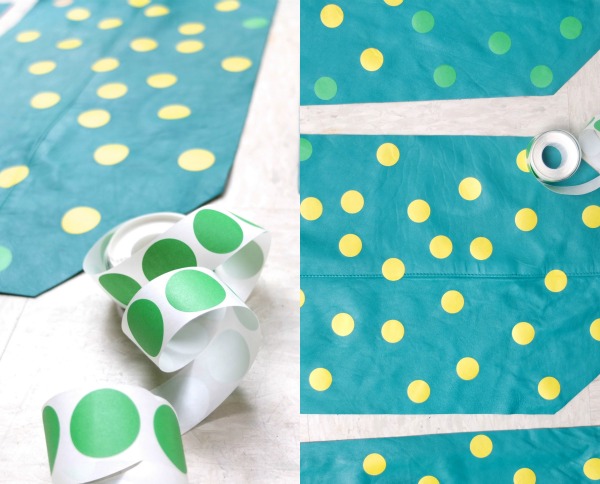
6. In a well ventilated area, spray paint one panel at a time and allow to dry. Spray just enough to cover the base colour, we are aiming for a thin coat. Avoid over-spraying as it can cause drips, or cracking later on.
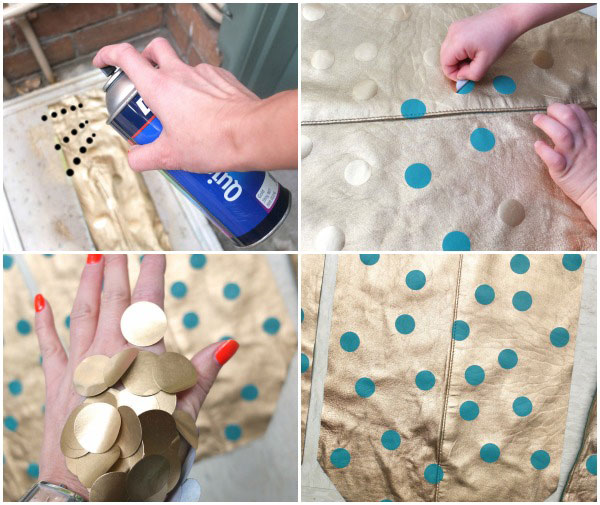
7. Once dry, remove your gold spots. Emma helped me with this step and stuck all the stickers on me!
Assembly & Sewing:
Sewing tips:
- Set your machine stitch length to long.
- Test your stitches out on some scrap pieces first.
- Sew slowly and steadily, you may need to hand crank fly wheel over any really bulky seams.
This bit is a little tricky, you may want to do a mock up out of paper to understand how the pattern pieces fit together.
8. Working with both side panels and a front panel, lay out as shown making sure top of panels align and the front panel sits over both side panels.
9. Tape to hold in place
10. Stitch front to sides stopping about 1cm (1/2″) from bottom
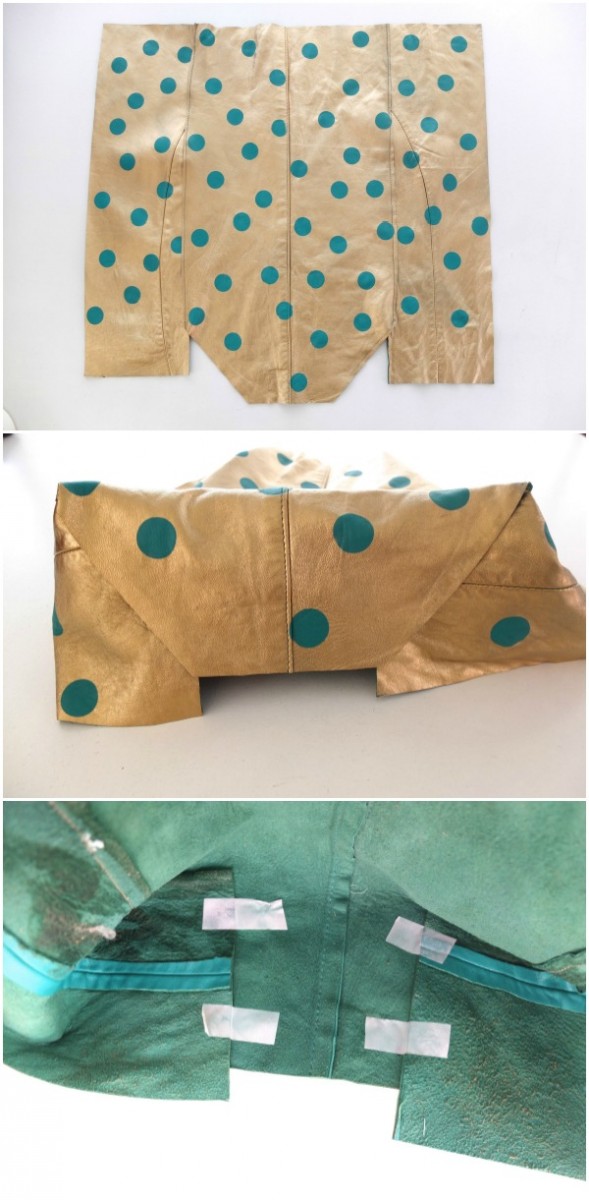
11. Fold the sides in at right angles to make the base (see picture)
12. Tape in place and sew. Continue the existing side seams down on an angle to base.
This corner seams are really tricky, go slowly and try not to catch any extra leather as you sew.
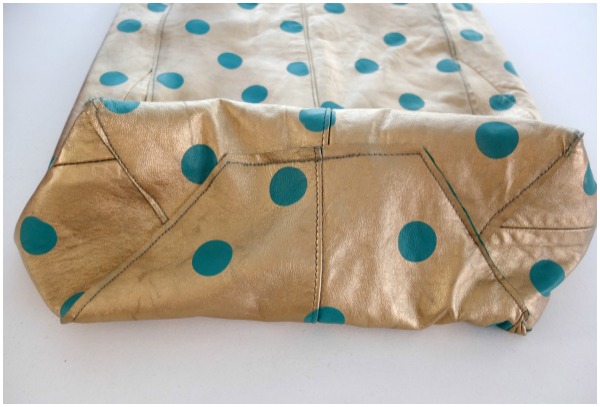
13. Align remaining back panel with side, and sew all the way down, when you get to the bottom fold flat and keep sewing around corner. Sew across bottom and back up other side.
If the top doesn’t line up perfectly just trim it so it’s straight.
You will need to do some maneuvering, I had a slight boo boo and one of my corners wrinkled a bit (luckily it’s not that noticeable).

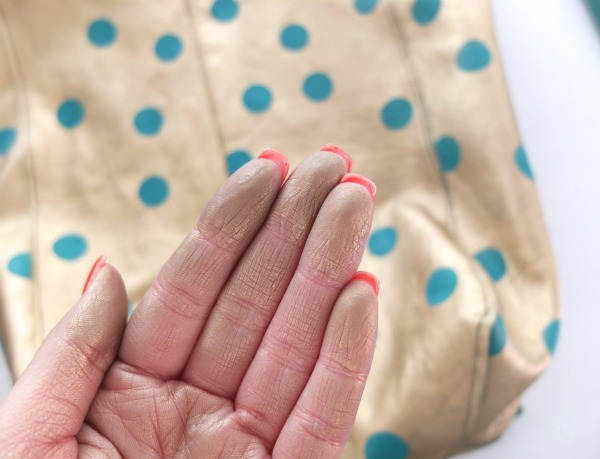
By this stage you will have some very gold fingers, go wash your hands.
Adding Binding & Handles:
I used the leather jacket’s belt to make the handles.
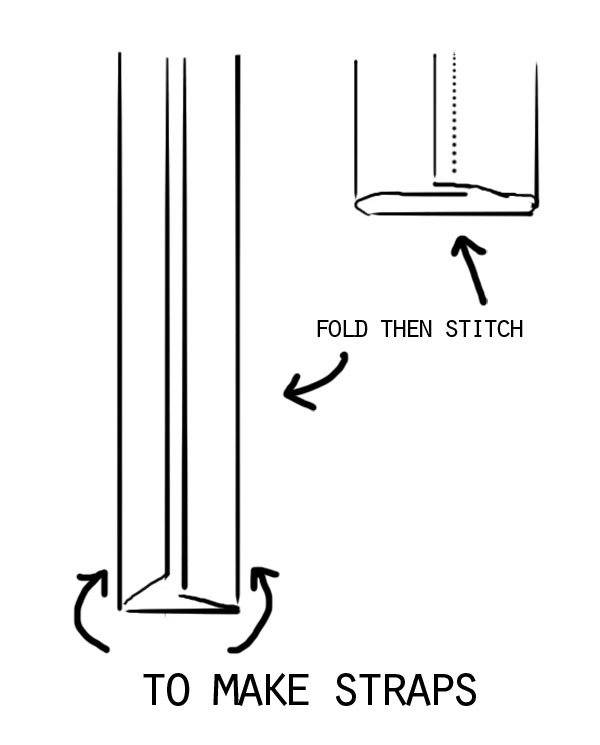
14. To make your handles, fold edges of strap into center and sew a seam down the middle as per diagram below.
The following step is optional but I think adding the contrasting trim adds a nice professional finish to the edge of the bag.
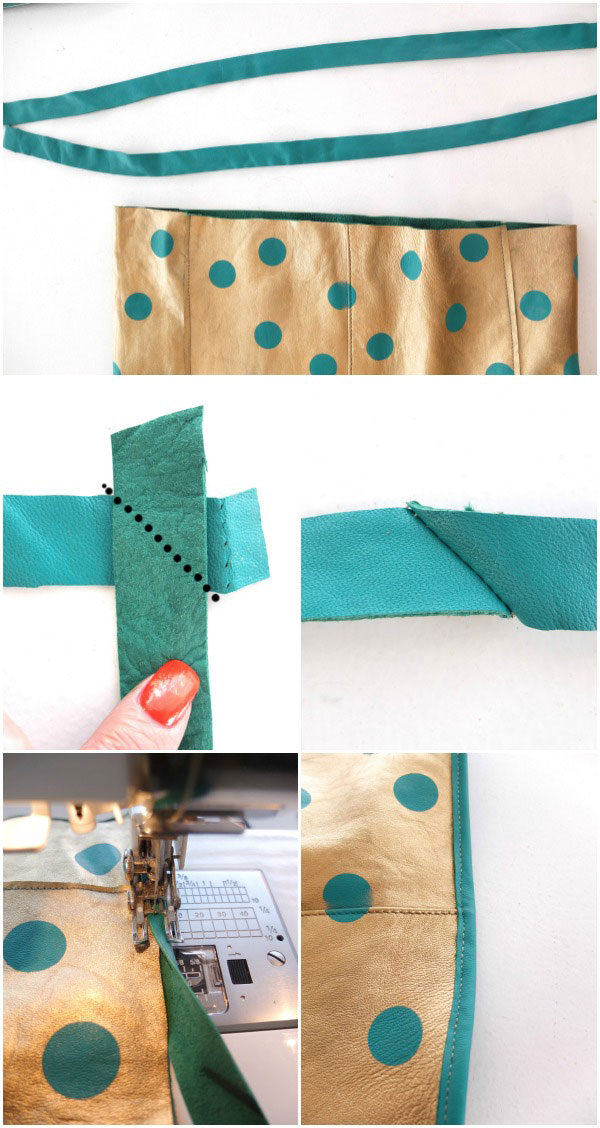
15. Cut a long strip of leather (long enough to go all the way around the top of bag) about 2cm wide (just less than 1″). You may need to join two strips. Treat them as you would bias tape and join at right angles to reduce bulk.
16. Starting on a side panel fold over edge and stitch on making sure to catch both front and back. Finish by just overlapping and trimming where you started.
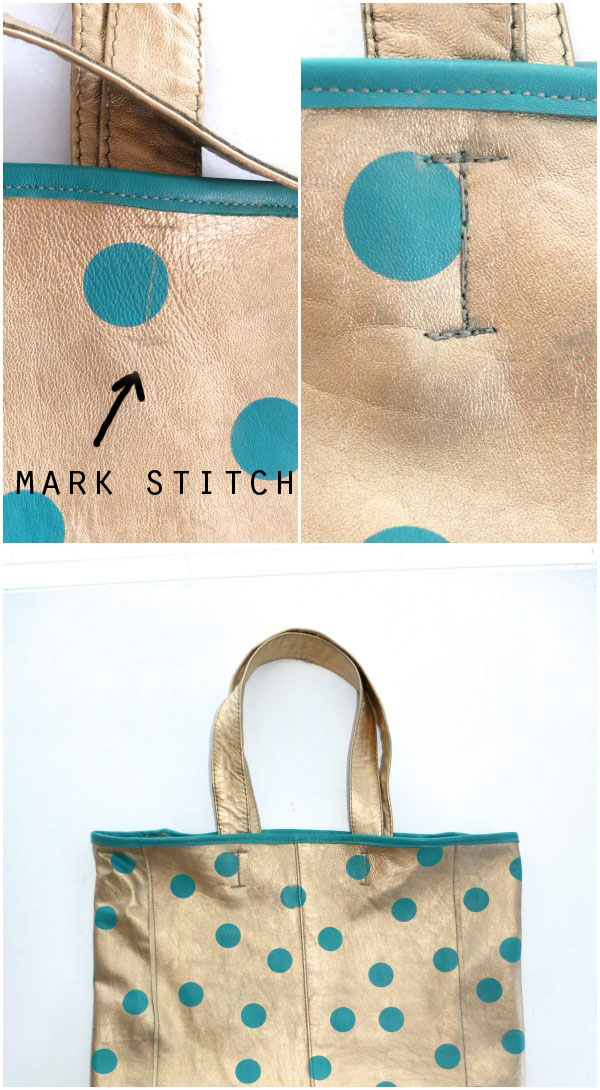
17. Tape straps into position and mark stitching lines with pencil. As a guide divide the bag into thirds to mark where straps go, stitching starts about 1/2″ away from edge in a capital ‘I’ shape, 1.5″ long and top and bottom about 0.5″.
18. Stitch straps into place, go over a couple of times for extra strength.
19. Give the bag a gentle rub all over with a soft cloth to get rid of excess paint residue. This prevents staining of your clothes.
The gold will wear off with use but I don’t really mind too much, it will eventually have a lovely burnished look.
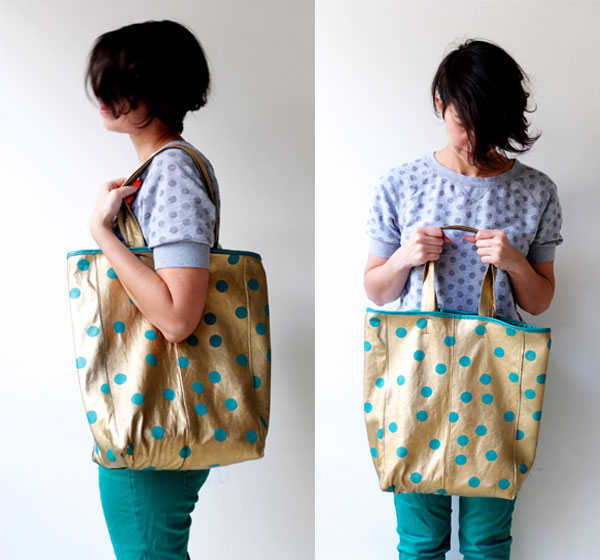
Phew! All done.
That was a big project but certainly worth all the effort!
I’m so happy with it and can’t wait for someone to say “Love your bag”, then I’ll say “I made it!”. Then my day will be made.

Do you prefer the before or after?
I can’t believe what we wore in the 80’s, I had a denim jacket in a similar style, I’m betting you did too!

That is pretty darn amazing. Amazing how ugly the initial jacket design was, that you had such a great idea, how you managed to sew it (I’d be terrified to sew leather!), how it came out. Just love it! 🙂 Lisa
Thanks. Sewing with leather wasn’t easy, but easier than I expected.
Great bag! I especially love the colours. I can’t believe it started out as that terrible jacket!
I know, who knew? Just took some imagination and a little elbow grease.
Awesome and so cool! Chapeau!
Kerstin♥
Wow that is an amazing project. Pretty full on one too. Visiting you from Sunshine x3
WOW! Something so hideous became something so lovely. I admire your vision, I couldn’t see past what was truly the best/worst example of the wrong bits in 80’s fashion. Well done.
you did a great job!!! beautiful!!!
xxxxx ale
Fab makeover! I actually really like the colour of the jacket ‘before’ but definitely not the style. I’ve always been afraid to sew with leather, you did well
Thanks Erica, the aqua colour really pops with the gold now.
This is so awesome, and your idea of using the stickers is ingenious! I would have never known that it came from that 80s jacket, but great colours there! Love it. What was the brand of the spray you used and does it have to be a special type?
Thanks. I used a dulux outdoor spray enamel (just what I had in the shed left over from another project).
I think there are leather spray paints available but not sure on the finish.
My sister suggested a leather waterproofing spray over the top may make the finish more durable.
ok now seriously.. I LOVE THIS TUTORIAL!! haha it’s so funny! especially the photo with ‘oh my what a fashion disaster’!!!! nice idea with spraying the fabric to give it a different colour. love it!
That is amazing! You are my hero! I am a bag nut. In fact, my aunt calls me the bag lady. And, although I have a very creative mind, the signals/talent/impulses get lost before they make it to my hands. That bag is gorgeous, and I wish you many years of happiness together.
Amazing! I have been holding on to an old faux leather coat to reuse, and I think this tutorial is just the ticket!
This is beautiful & I love your way of explaining the steps!
What a great idea! I can’t wait to find my own 80s fashion disaster and try this out:)
Genius! My sister & brother-in-law had horrid matching grey leather jackets like that! I’m going to see if she still has them!
That is so cool! I really need a jacket like that for a dress up party soon, I’m going to start hunting now then i can make a bag like that!
thanks, I’ll pop over and check it out
Cheers Cinti
Man….I love the bag but also think the jacket was kind of rad.:) I mean with a simple pair of jeans….you rocked it but now you’re rocking a killer bag soooo that cool too! We love you!!!xoxoxooxoxo
so amazing! i love this. upcycling is so fun : )
Very cool idea and it came out very professional looking! I am a horse lover and immediately thought how cool using a single large horse sticker instead of dots would look! And I love leather and need big totes for the warehouse grocery!
Well one, C – this looks so rad!
Can’t wait to see you totin’ this around!
amazing! super love this tote! may I know what brand and model of sewing machine you use?
It’s an elna, here is the model https://www.elna.com/en-au/model_quilt_excellence-720_pictures.php (updated because my exact model is superseded i think?)
Why thank you 🙂
Oh, man, that big blue jacket had me catch my breath with the sudden return of memories better left undisturbed!
A stellar upcycle. You are really good at these! I got this link through Imogen Lamport. Thanks for the lesson.
Excellent information. I’ve enjoyed reading the post. It is a very supportive and useful post. I would like to visit the post once more of its valuable content. Thanks for sharing the great information. Good Luck!