This post contains affiliate links
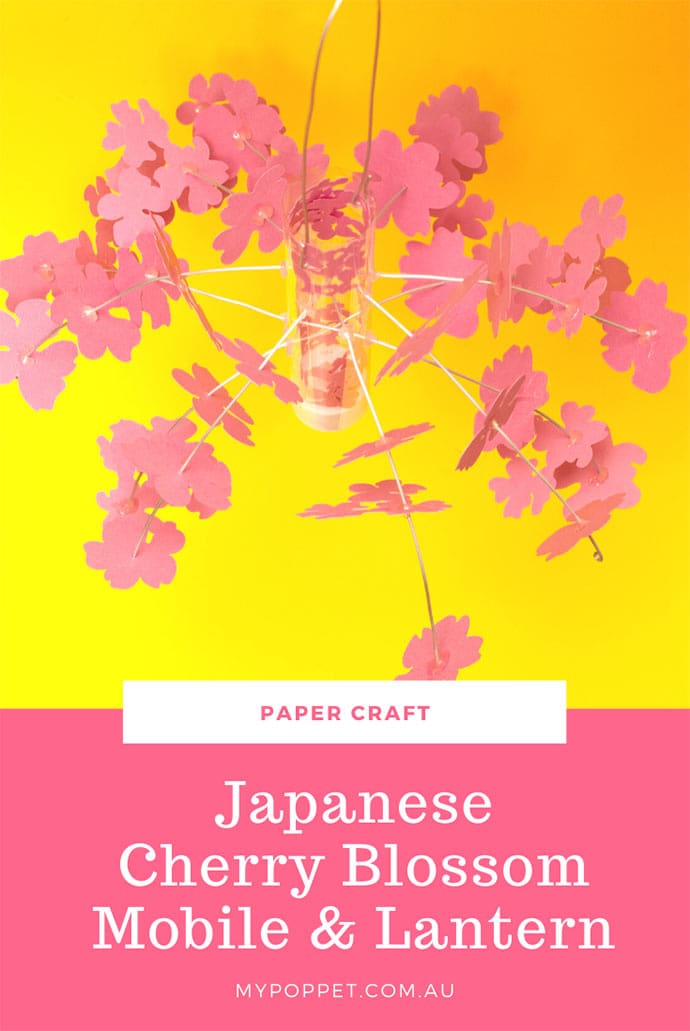
If you’ve always dreamed of visiting Japan to view the sakura, cherry blossoms in Spring – this beautiful Sakura paper flower mobile may just be the next best thing.
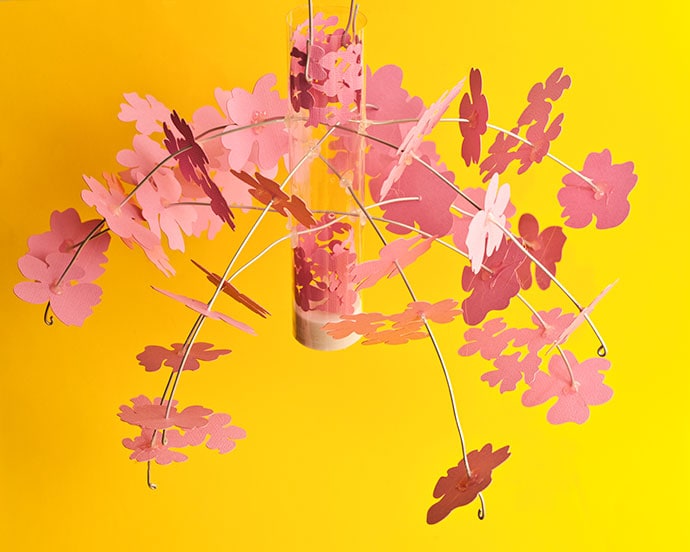
Resplendent with delicate pink flowers, this pretty mobile, that also glows in the evening thanks to the inclusion of an LED candle, will bring a little piece of Japanese springtime into your home.

Make several and hang them in your garden for an almost authentic hanami cherry blossom viewing party under the trees.
Add a touch of Spring decor to your home all year round with this DIY Cherry Blossom Paper Mobile.
You may also enjoy:

Make your own Sakura inspired Cherry Blossom Mobile
You will need:
- Acetate (1 sheet)
- 2 sheets pink scrapbook paper (light card) (12″x12″)
- LED tea light candle (with batteries)
- Flexible Aluminium wire or Copper Wire
- Scissors
- Art knife
- Ruler
- Cutting mat
- Pencil
- Hot glue gun
- Double sided tape
- Sticky tape
- Stiletto (Tailor’s Awl)
- Pliers
- Cricut cutting machine (optional)
Cutting options:
- Cut buy hand: Use this PDF cherry blossom template, which provides a simplified design, made easy for people cutting the pieces by hand.
- Cricut Cutting Machine: Open the Cherry Blossom Mobile project in Design Space to cut your design.
How to:
1. Print 2 copies the PDF template at 100% on of pink scrapbook paper (A4 size), two sheets in total. Or open file in Cricut Design Space.

2. Hand cut the PDF template pieces, trace onto your scrapbook paper and cut out the final pieces.
Cricut Option: Follow directions in design space to cut the ornamental pieces.
You should have:
- 30 large flowers
- 6 blossom trios
- 2 bands of flower blossom design (cylinder ornaments)
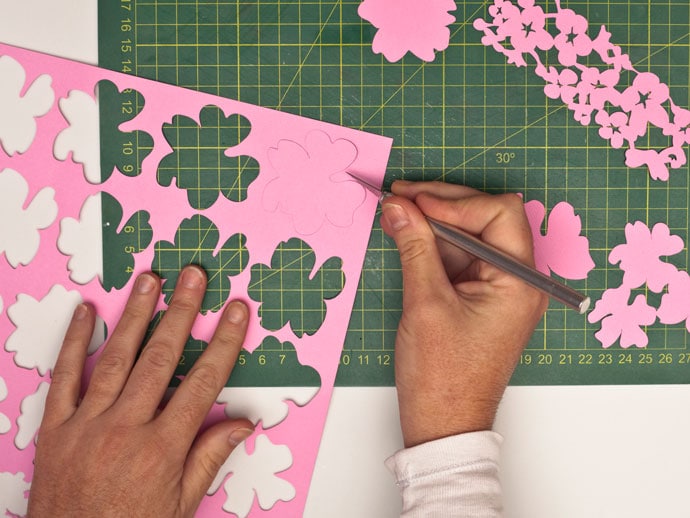
3. With the stiletto awl, puncture holes into the center of all the larger paper cherry blossom flowers, and in the center of only one flower in the blossom trio.

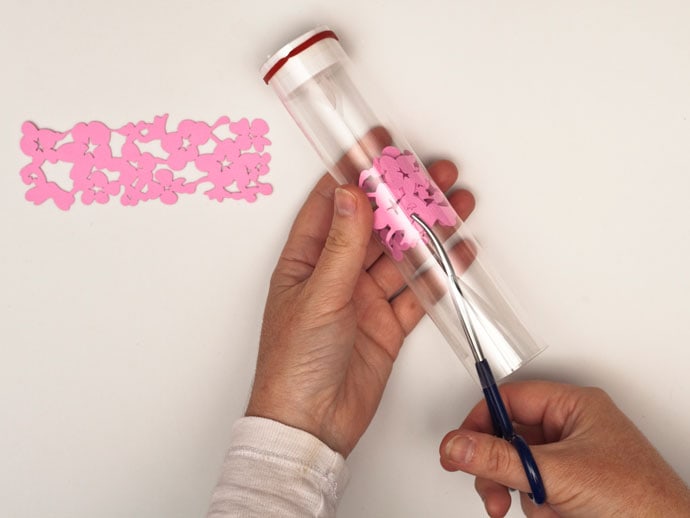
4. From the acetate, cut a rectangle acetate piece 18cm x 13cm with a ruler and art knife.

5. Wrap double-sided tape around the tea light. Place a strip of double-sided tape up the long length of acetate.

6. Remove the tape strips. With the tea light placed at the bottom, gently wrap the acetate around it. Press firmly on the tape. Apply a few strips of sticky tape along the long acetate edge, helping to keep it closed.

7. Curve the two cylinder ornaments. Gently push the ornaments into the cylinder. One ornament surrounds the candle. The second ornament sits at the top of the acetate cylinder.
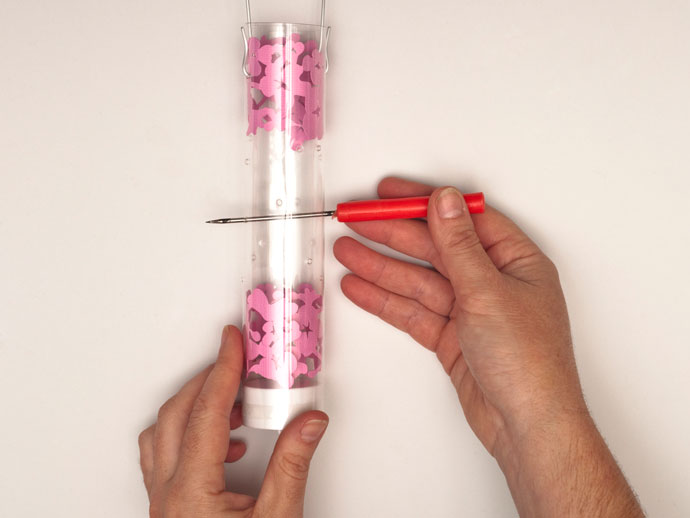
8. With the stiletto awl, punch two parallel holes into the acetate cylinder 2cm from the top.

9. Curve and bend 28cm length of wire into a loop similar to an elongated Omega shape (Ω). Slide the ends into the two parallel holes at the top of the acetate cylinder and bend up to secure.

10. With the stiletto awl, punch 6 pairs of parallel holes all around the acetate cylinder.
11. Cut a 40cm length of wire. Slide the wire into a parallel set of holes. Gently bow the wires downward, creating subtle curvature.

12. Slide the flowers onto the wires, and glue into place with a hot glue gun. Space the flowers several centimeters apart. Add a blob of glue onto the wire where it inserts into the acetate cylinder to stop it sliding out.

13. Repeat Steps 11 and 12, until all parallel holes are filled to complete the cherry blossom mobile.
14. Curl the ends of the wires using pliers.

All done! Now find an empty space that needs decorating and hang your beautiful sakura mobile. Switch on the LED tea light as the sun sets for pretty shadow projections on your walls.


PIN FOR LATER