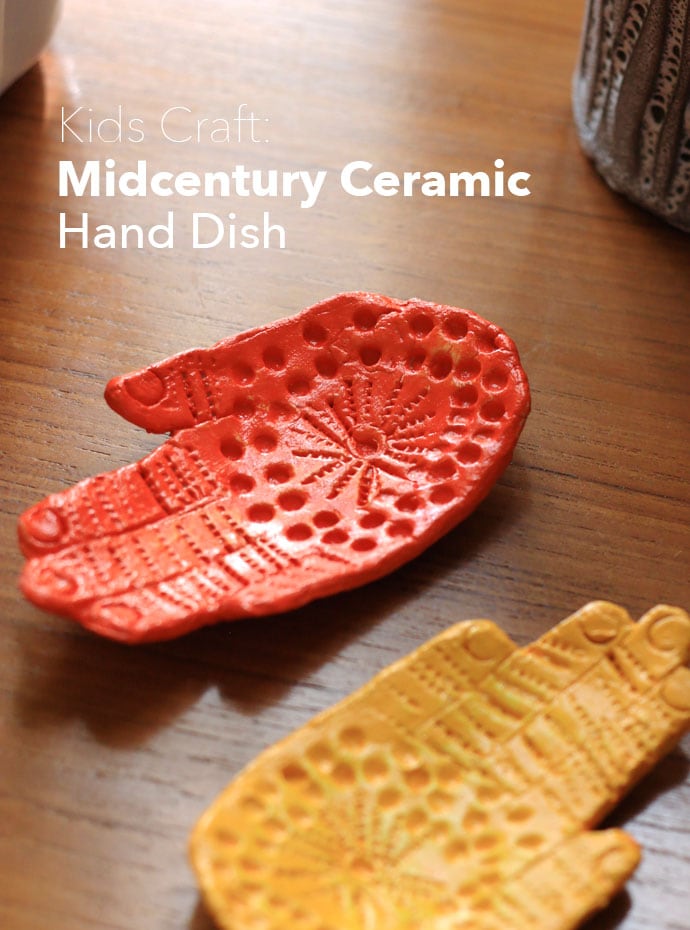
Kids can make this ceramic hand dish air-dry clay craft project, to give as a gift to a parent or grandparent.
This post contains affiliate links
I’m a big fan of Mid-Century ceramics, I especially like the textures and vibrant colours that came out of the Bitossi studio in the 50’s and 60’s.
I’m yet to acquire an piece for my growing mid century ceramic collection, but I think these Bitossi inspired hand shaped dishes Emma has created for me are much better than any original.
This little dish makes a great momento or gift as it captures a moment in time, the size of your child’s hand.
They would make a perfect gift for a parent or grandparent on Mother’s Day or Father’s Day, especially if they are fond of mid century design.
You may also like:
Let’s Make a Ceramic Hand Dish – The perfect gift idea!

School aged children will be able to handle most of the process with only a little adult guidance.
Air dry clay can take some time to fully cure, so please be patient and allow plenty of time to make this air dry clay hand bowl.
Because air dry clay does not go through a firing process, it’s best tot to expose it to moisture, even when fully dry, as the clay may become damp.
Proudly display your ceramic craft in an environment that is water free. So best not use this hand dish in bathrooms or kitchens where it may get wet.
You will need:
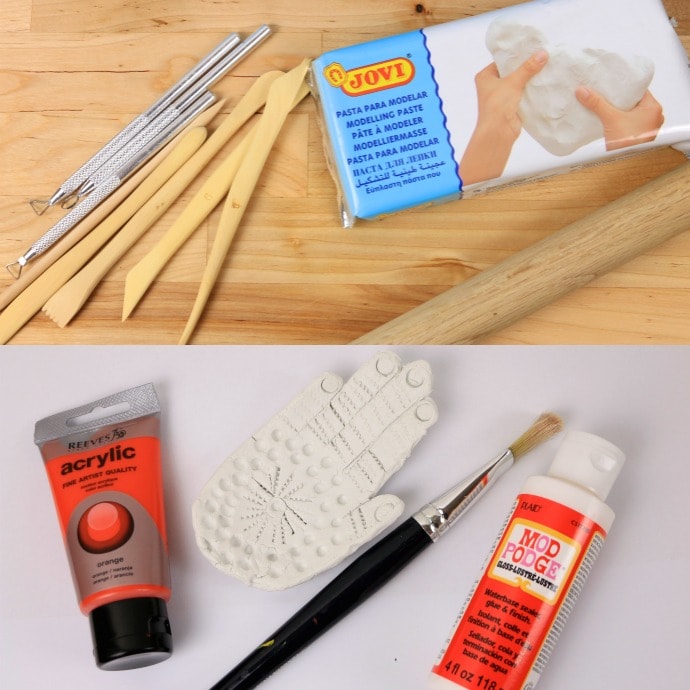
- Air dry clay (white) (Amazon | Etsy )
- Assorted clay tools or skewer, knife and textured items for stamping (Amazon | Etsy )
- Rolling Pin
- Acrylic paint (colour of choice)
- Mod Podge (Amazon | Etsy )
- Plastic container for paint mixing
- Paint Brush
- Protected surface to work on
How to:
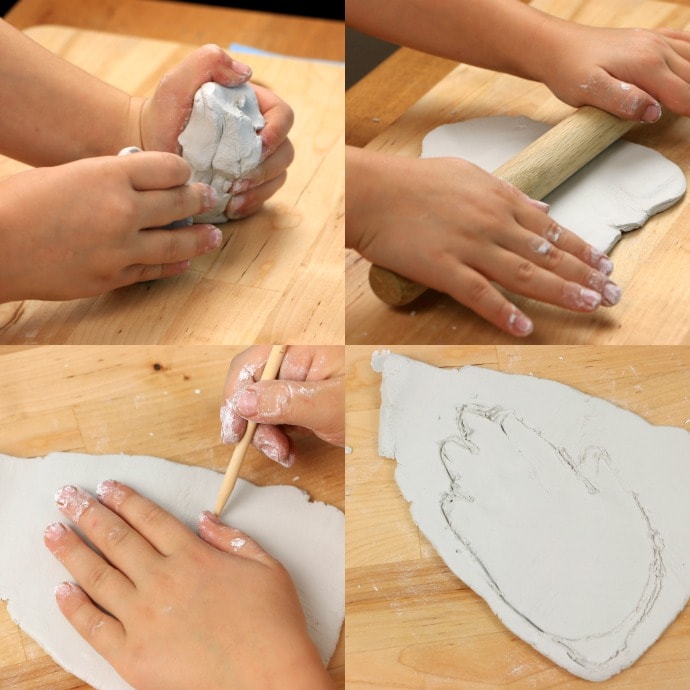
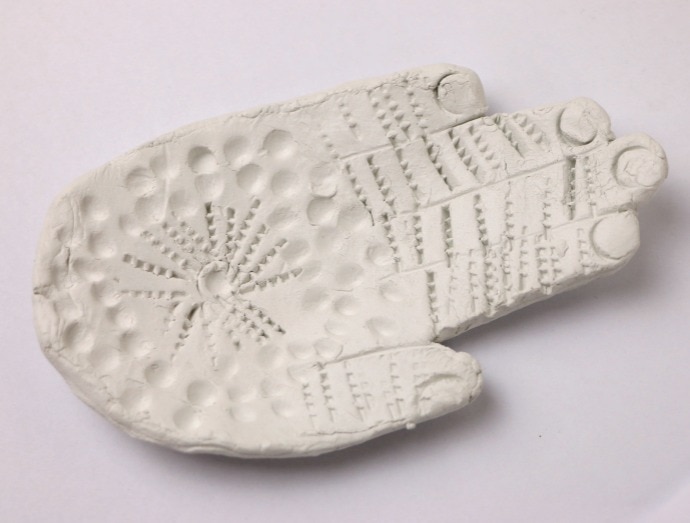
1. Knead clay to soften and get rid of air bubbles
2. Roll out a slab of clay to about 5mm (1/4″) thickness
3. Trace around hand with pointy tool or skewer
4. Cut away excess clay
5. Smooth edges (if the clay is getting a little dry, smooth edges with wet fingers)
6. Don’t forget to sign the back at this stage – I wish I’d added a date too.

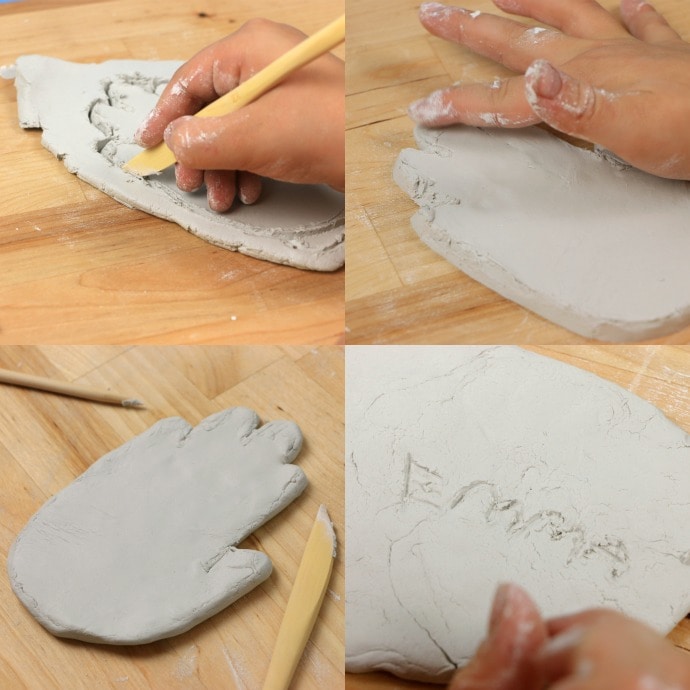
Now it’s time to get creative!
7. Use assorted shaped tools to stamp shapes into the clay. I marked out the fingers and nails and Emma designed the rest.
8. Curve the edges of the hand shape up slightly to create a concave dish shape.
9. Leave to dry for at least 24hrs (Drying time will depend on the weather, ours took 2 days to dry fully)
Tip: To maintain shape whilst drying, place on a curved surface, I’ve used the edge of a plate and wooden tool to make sure the dish doesn’t flatten.
The clay is fully dry when it’s all turned white and there are no damp grey spots.
Now it’s time to paint.
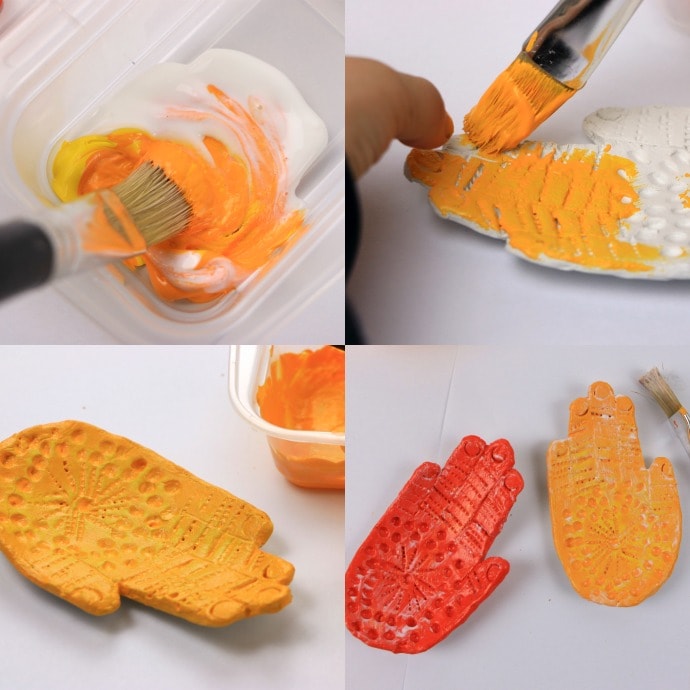
10. Mix one part paint to one part Mod Podge, this will give you a glaze effect.
11. Paint dish, try not to overload paint brush or you will flood the pattern details.
12. Gently wipe off excess paint on surface (at this stage Emma lost interest)
13. Allow to dry and then coat with a layer of Mod Podge to seal and give a shiny finish. Mod Podge will dry clear. Don’t forget to paint the back.
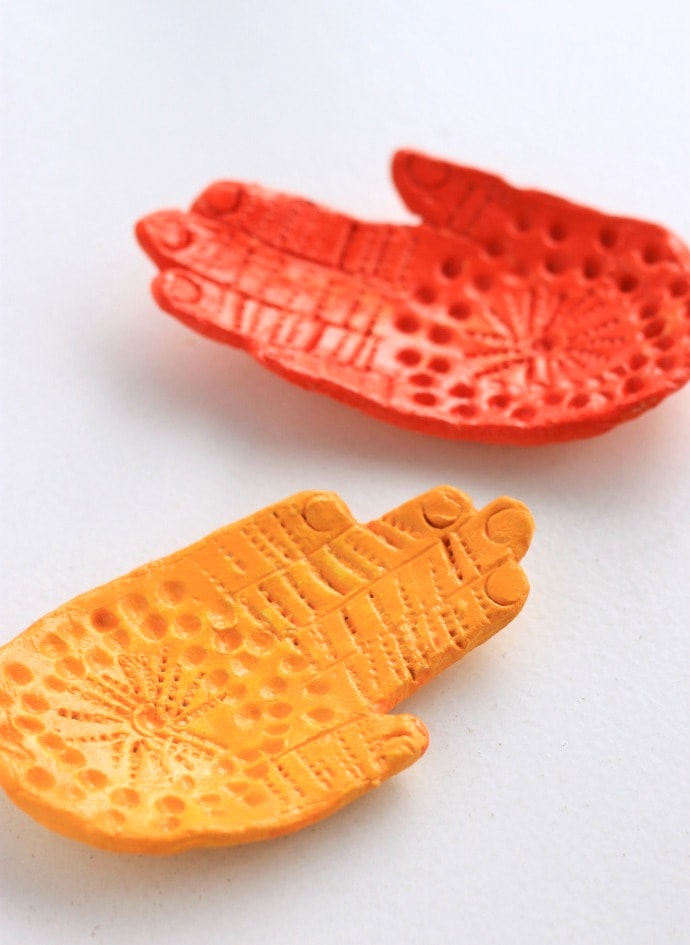
All done!
I love how these little dishes turned out and Emma is very pleased with her ‘handy’ work (pun intended).
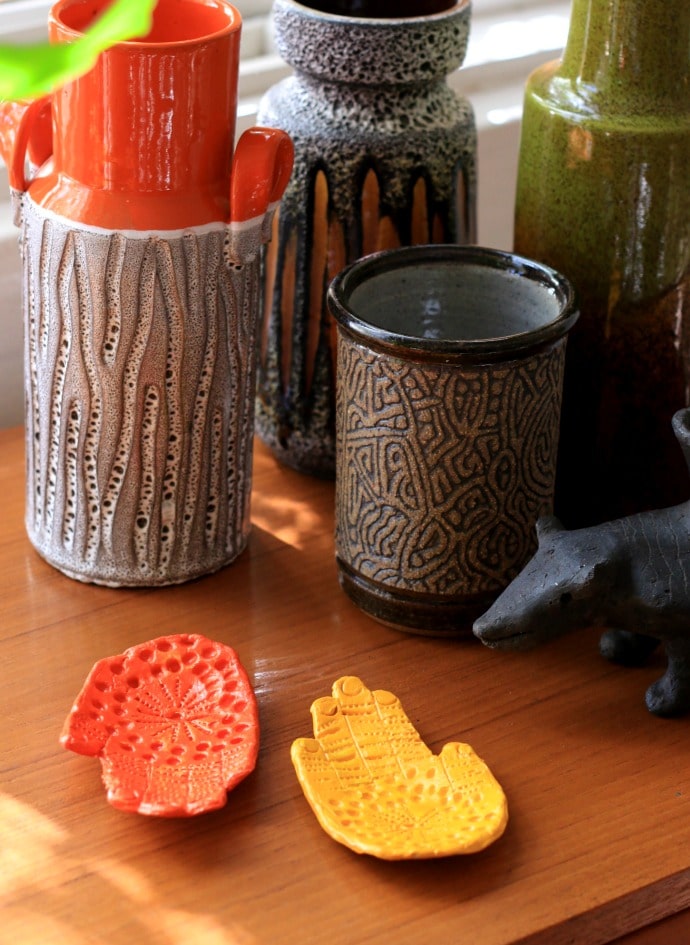
They make a beautiful and meaningful addition to my ceramic collection, and now take pride of place on my sideboard.


Wow, beautiful results! Definitely going to try this the next time I need a unique gift from the kids 🙂
Love these… can i use these on stove as a spoon rest or will they melt???
They shouldn’t melt but I’m not sure how food safe Mod Podge is (it’s the shiny glaze over the paint). You may need a clay that can me fired as this one may dissolve if it gets too wet.
The air dry clay I have used breaks easily.
Maybe try a different brand, or this will also work with polymer clay that you can bake.
i totally love this idea. i made a pair of hand dishes together with my daughter!
thanks a lot for this inspiring idea!
best wishes, doro K.
That’s lovely, thanks for sharing. I hope you both enjoyed crafting together.
Loved the project Cintia. What should I say cute, adorable, awesome or all three of them. It is so very perfect of kids. Who won’t love to trace their hands..:) very nice. I am definitely going to try this with my daughter and will share it with my readers as well…
Excellent ideas.
I saw this on The Artful Parent. Love your site and I will definitely try this out. Just started my own blog – literally. I only hope to be as crafty as ladies like yourself someday. Thanks for sharing! Tiffany
Hi Cintia, I love this idea! Can this be done with regular clay, not air-drying? My local art shop has clay (including pre-dyed and glittery!) that has to be dried in the oven at 130C. Would any changes need to be made to your process/materials if using this type of clay?
I’m pretty sure it would work with any type of clay. Tell me how you go.
How many ounces of clay is needed per a hand? I want to do this as an art project so I need to know how much air dry clay I will need.
I’m guestimating we used about 200g for 2 small dishes, so about 3-4oz per dish. Of course it will depend on the size of the child’s hand and how thick the clay is rolled.
In regard to the flowers Emma likes to eat — many flowers are edible. Plant yourselves a small garden of those, and have her help tend to it. Tell her ONLY the flowers from that garden. Totally organic.
My teenage daughter made this last year for my dad (he’s the cook and it was going to be his new spoon rest), but we had one issue….it cracked at the fingers before we even got it out of the house. Do you have any hints on how to keep this from happening?
Oh dear. Well air dry clay is fairly brittle because it doesn’t have the strength of fired clay. Maybe make it a bit thicker? You could also try adding a thin layer of gauze to the back and sticking it on with mod podge to reinforce.
But maybe a spoon rest is not ideal as air dry clay will absorb moisture (from a damp spoon) and become soft again.
How beautiful! Such a unique way to preserve memories 🙂
I just wanted to let you know I actually made some of these for my Mum for Mother’s Day AND they turned out as nice as yours. I did one “splayed” and one with the fingers together. it was fun! She asked the same thing as above. Could it get wet. I suggested not … It was nice to do something handmade that my daughter could be involved in. Thank you.
Thank you so much for sharing these. I am going to show this to my daughter, and I know she is going to just love it as much as I do. It will be an awesome project that we can do with my granddaughters aged 4 and 5 years old. We get together once or twice a week to do crafts with them and sometimes my mom, their great-grandma gets involved. Not for this one, however…..this will be a gift for her and we will make them for my grandma, their great-great-grandma! We are blessed to have five generations and it’s five generations of first-born females starting with my grandmother who will be 91 years old on March 6, 2017, right on down to my granddaughter, who will be turning 6 years old on March 31, 2017!
Wow, five generations, that’s wonderful. Enjoy your crafting time together.
That’s fantastic Robin. My five year old daughter had a great time making it with me when she was about three. It was mainly me doing it but with her gorgeous lil’ hands … We gave them to my Mum – her grandmother. Her Great Grandmother passed away a year before she was born and was born on 2nd March. 🙂 Enjoy!
I love this project! I’m just starting it with my kindergarten and 1st grade students in art class today – I had a ton of fun making the teacher example 🙂 thank you for posting it!!
I absolutely LOVE this and can’t wait to do this with my children!! What a wonderful keepsake this will make!
I have just attempted to make one of these of my own hand. Just waiting for it to dry but so far its looking good. If it turns out ill be doing both my childrens and my husbands too! A family of clay hand dishes ❤✋thanks for the idea i love it ?
Great to hear. I love the idea of a whole family of hands.
I am really excited about doing this craft with a class I am teaching! The baking clay sounds like it might be our best option for a few reasons. Do you have any suggestions for keeping the dish curved in the oven?
If you are using polymer bake clay I think rolled up tin foil will help the dish keep shape in the oven.
How long did it take the clay to dry? I want to do this activity with our youth group. While the clay is drying they will work on another activity. Thanks for sharing!!!
The clay takes about 24hrs to dry fully, depending on the weather.
I wanted to do this for our craft club but we meet once a month! Could we paint the hand while it’s still daring to make it a single day project?
You may find the paint makes the clay slimy and the moisture released from the clay as it dries will make the paint peel or bubble.
Air dry clay can take up to 2 full days to dry properly. Maybe your club could finish the project at home, or come back the following month to complete. I don’t think you’ll have good results if you skip the drying step.
I love this craft! Thank you for taking the time to post about it — the kids and I have had so much fun working on this together for both their grandfathers’ birthday presents. Just a heads up that we too ran into the same integrity issues with the air dry clay — one hand broke clean and so I glued it back together and then used duct tape — ! — underneath each hand to reinforce and keep its shape. Fingers crossed! (Pun intended;-)
how i can subscribe using email. Thanks in advance.
You can sign up to my mailing list in a box at the bottom of this post https://mypoppet.com.au/makes/scrapbusting-handmade-scrap-fabric-twine/ otherwise when you leave a comment you can click the ‘Notify me of new posts by email’ box and it will send you every new post direct to you inbox.
found ur site on pinterest love it!