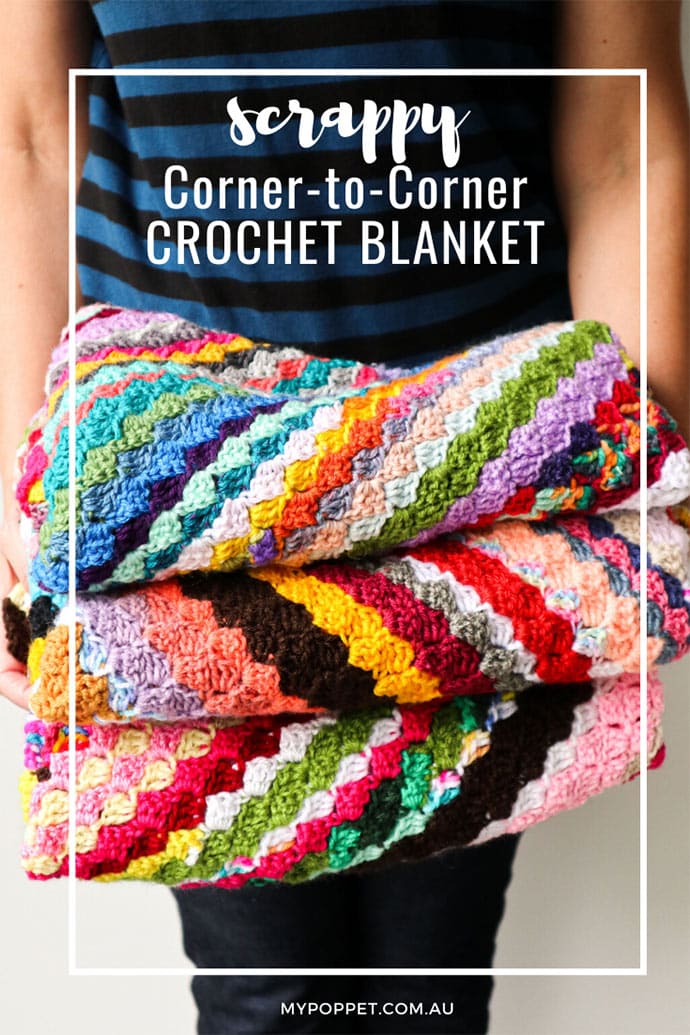
If you are looking for quick and easy crochet blanket pattern, look no further! This Scrappy Corner-to-Corner Blanket is the perfect crochet project to keep you hands busy while watching TV, with the added bonus that it uses up a ton of scrap yarn.
I’m a bit addicted to making magic yarn balls and crocheting these deliciously scrappy baby blankets.
In fact, I’ve made so many that I have officially run out of yarn scraps!
If you are like me and hate weaving in yarn ends, you are going to love making these scrappy blankets with a magic yarn ball.
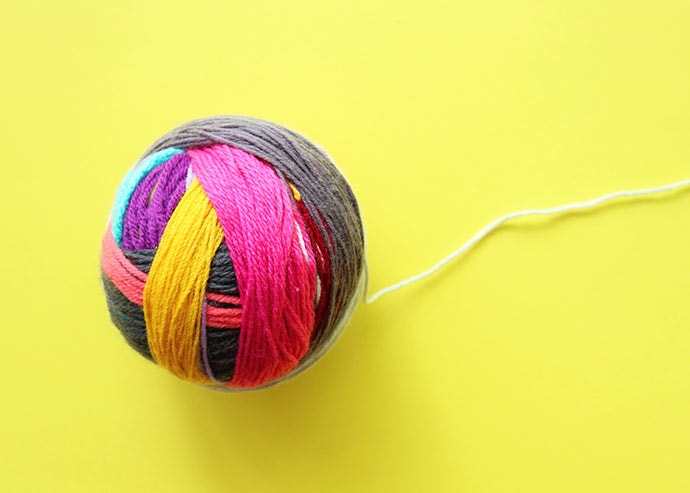
Learn how to make a Magic Yarn Ball here
Not having to weave in ends means that these crochet blankets were done as soon as I finished the last stitch!
I also found that not having to decide when to change colours was quite a luxury as well. The random colour changes make for a fun surprise as you are crocheting.
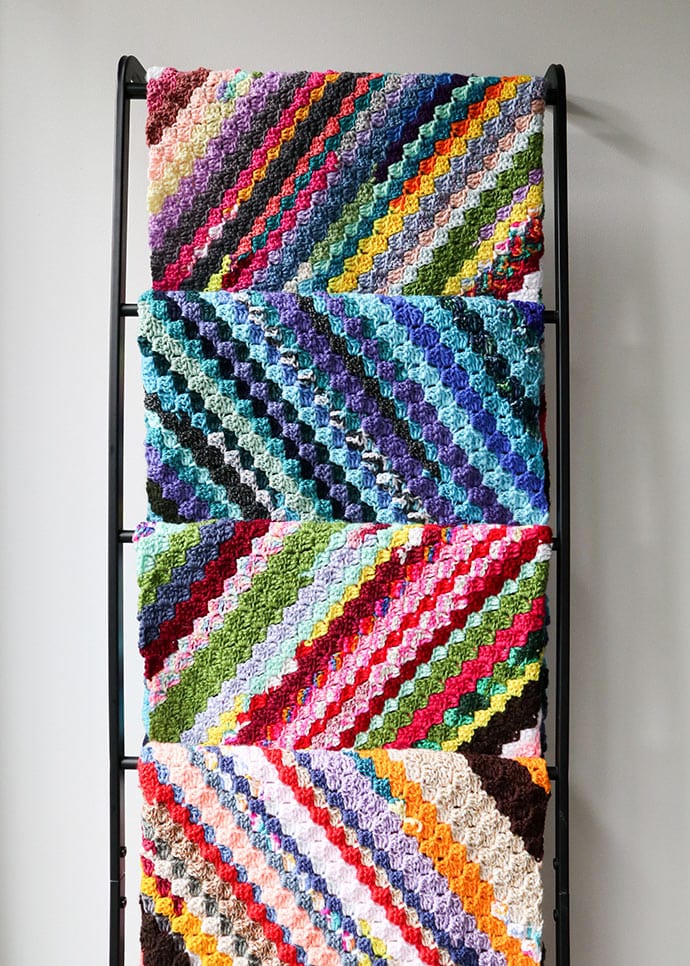
To really show off the lovely random stripes that the magic yarn ball creates, I decided a corner-to-corner crochet technique would be ideal. C2C crochet really makes for the perfect crochet scrap blanket!
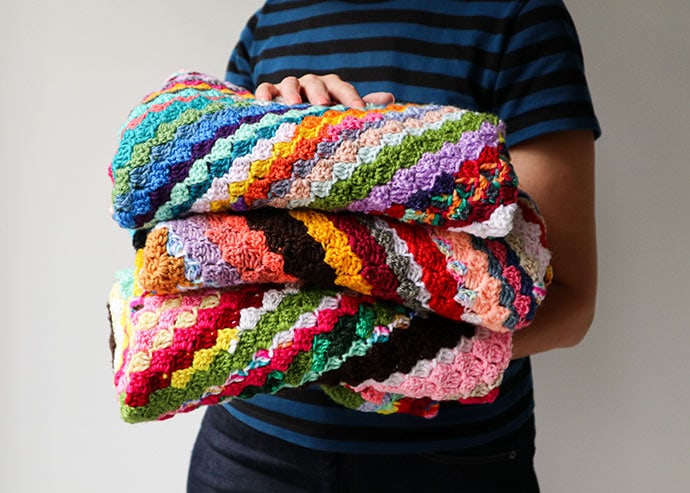
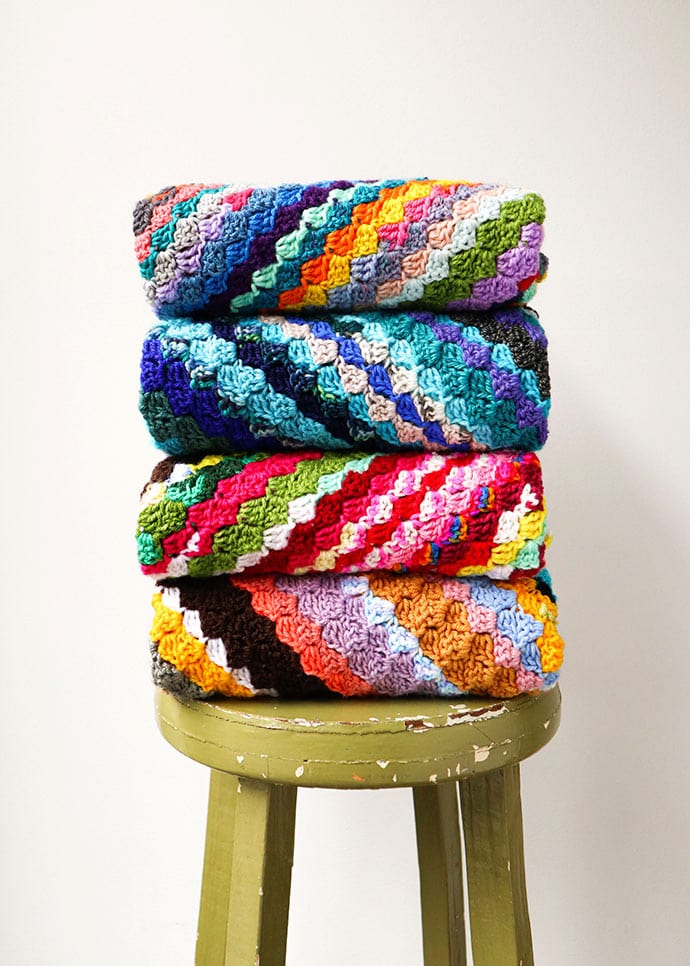
All stacked up together the stripes give off quite the Missoni vibe don’t you think?

The beauty of the stripes is in the randomness. I don’t think I could have created such a colourful stripe design if I was choosing the colour order intentionally.
I hope you enjoy using up your leftover yarn ends to make these fun scrap yarn crochet blankets.
Although I’ve made them in a baby blanket size (as they will be donated to St Kilda Mums), you can easily adjust the pattern to make a blanket or throw in any size you wish. You are only limited by your scrappy stash I suppose?
Now off you go and gather up all your yarn scraps, I see a stripey scrappy crochet blanket in you future.

You will need:
- A large Magic Yarn Ball make from yarn scraps (around 600g / 21 oz) – DK to Worsted weight (8-10ply)
- 5mm crochet hook (US 8)
- Scissors
- Yarn needle (for weaving in ends)
Corner-to-Corner Crochet Baby Blanket Pattern Instructions:
Corner-to-corner crochet is so adaptable. Once you know the basic technique you can crochet a blanket of any size. No need to decide from the beginning, just make your decision as your project grows.
As the blanket grows from just one corner, you will find it works up very quickly.
I’ve designed my pattern to be a baby blanket size, ideal for a stroller, pram or bassinet.
If you are new to corner-to-corner crochet, pop over to this corner-to-corner washcloth tutorial where I have included step-by-step pictures explaining the most complicated parts of this technique.
This video is also helpful, but just note that they have used 6 and 3 chains (as opposed to my 5 and 2) to start.
Love to crochet? Need to improve your technique? Get over 80 crochet classes on Creativebug – Start your free trial here
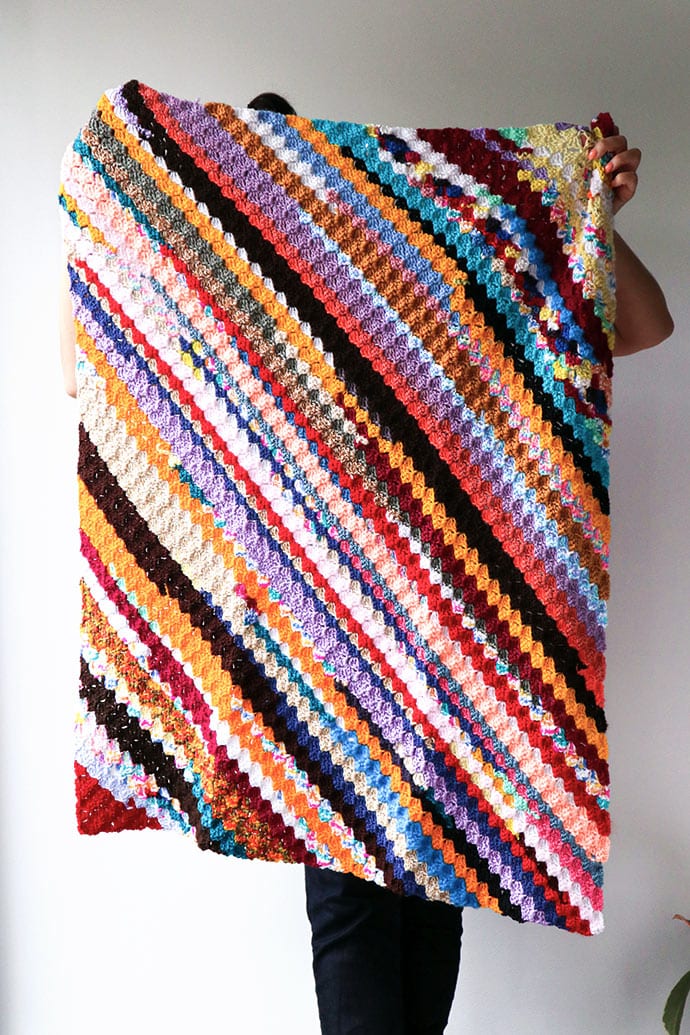
Finished size – 75cm x 95cm (30″x38″)
Crochet Stitches used (US terminology):
- ch – Chain
- dc – double crochet (US terms) same as UK treble
- sl st – Slip Stitch
This pattern is worked flat, diagonally, back and forth.
Blanket is 48 rows wide and 60 rows long.
To make the rectangle shape, the first 48 rows have increases on each edge of the blanket. Then then decrease only on one edge until the long side is 60 rows tall. Finally decrease at both edges on every row till the end.

Increasing Rows
Row 1: ch 5, 1 dc in the 3rd ch from the hook (this will create a space [sp] to crochet into later), 1 dc in each of the next 2 ch sts (the first shell group)
Row 2: ch 5, 1 dc in the 3rd ch from the hook, 1 dc in each of the next 2 ch sts. Flip the first shell group to allow you to work into the space created by the 2 skipped ch sts in previous row. 1 sl st into the space created by the 2 skipped ch sts in the first shell group, ch 2, 3 dc into the same sp.
Note: each increasing row will have the equivalent number of shell groups.
Row 3: ch 5, 1 dc in the 3rd ch from the hook, 1 dc in each of the next 2 ch sts, flip work. *{1 sl st into the space created by the 2 skipped ch sts in the next shell group, ch 2, 3 dc into the same sp} repeat from * until end of row.
Rows 4-48: continue as per row 3 with increases at both ends until you have 48 shell groups.
Working SIdes
Row 49: ch 1, turn, 1 sl st into each of the next 3 dc sts, *{1 sl st around the ch 2, ch 2, 3 dc into the same sp}, repeat from * until end of row.
Row 50: work as per row 3
Row 51-60: Work odd rows as per Row 49, even rows as per Row 50. (You’ll see that on one side all the edges have decreasing rows, and on the other side you are still increasing).
Decreasing Rows
Row 61 onward: ch 1, turn, 1 sl st into each of the next 3 dc sts, *{1 sl st around the ch 2, ch 2, 3 dc into the same sp}, repeat from * until end of row.
Continue as per row 61 with decreases at both ends till you have only one shell group left.
To Finish: Cast off, cut yarn and weave in ends.
It’s really quite an easy pattern once you get going. I haven’t added a border because the edges are quite tidy. But feel free to add one if you have extra yarn that you would like to use up.
Feel free to leave any questions or queries in the comment section below and I’ll answer as soon as practicable.
You may also enjoy these Crochet Patterns:

Want more posts like this straight to your inbox?
LOVE IT? PIN IT!


Thank you very much for all the projects and ideas you share, I enjoy a lot and really appreciate you work and creativity! I’ts a joy each time I receive your newsletter!
I love your newsletter too!! Your blankets are just lovely. I wish I could crochet from a pattern…alas, I cannot seem to follow any pattern of any sort. Wonder why? Must be my brain. However, my brain does not stop me from loving everything you do. I save (Pinterest) so many of your posts! Thank you.
Oh good lord, I don’t think I could love this more! Scrap busting and minimal ends to sew in – plus it’s beautiful!!! Onto the long long ‘to do ‘ list it goes!!
I love this pattern. I want to learn the c2c technique so bad. I’m a little nervous but I am going to try this pattern. Using scrap yarn is a brilliant idea.im keeping my fingers crossed as I attempt this pattern.
Just beautiful ,vibrant warm colours.Love these crocheted blankets
Beautiful patterns and love the magic yarn ball.
What size crochet hook do you use?
For this project I used a 5mm crochet hook (US 8)
Love making this pattern and using up scraps. What do you do for different thicknesses of yarn? The yarn seems the same, but my corners are fanning out ?. Any suggestions are helpful. Thanks.
Because it’s crocheted on the bias it will skew slightly. You can block the blanket when it’s finished to a rectangle shape.
Good morning, I love this C2C stitch!! I watched your videos and have mastered the stitch ! I am now making a blanket , using Yarn Bee Sugarwheel from Hobby Lobby . It is a striped color yarn and it is working up beautifully ! I found you in my Pinterest‘s crochet daily pins. It is the one where you show how to make a yarn scrap ball of left over yarns. Thank you again , Diane
Glad you enjoy this project. Thanks for sharing your progress.
Hi there! I’m enjoying the pattern and I’m amazed with how fast the blanket is being worked up. However, I had some questions about rows 49-60. Are these rows supposed to end with the normal sl st 1, ch 2, 3 dc? I’m noticing that on the odd rows the blanket is starting to warp outwards. Can you please clarify. Thank you.
Sorry I don’t get quite what you mean, can you send me a photo [email protected]
Because the blanket is crocheted on the bias it can skew a little but will pull back into shape when washed and blocked (if required).
I have the same issue going on once I get past row 48. So row 49 I follow as directed, but when I get to the end of row 50 there are the 3 sl st from the decrease in previous row that create a triangle like point if I chain 1 and turn to begin row 51. Are we supposed to sl st into where it was decreased as well because the instructions just say until end of row to sl st, ch2 and dc 3. I have been just sl st in last st of decrease and ch 1 and turn but it’s creating a curve in the blanket and I have no idea what I am doing wrong. Thanks!
You may find this video helpful to transition from the increasing rows to decreasing rows https://youtu.be/mQPVlaRE4Gw (just be mindful in the video they start each block with 6 ch instead of 5, but the rest is the same)
Also this video shows a similar baby blanket https://youtu.be/JeX1BiJih5s
Can I ask where you got that awesome blanket ladder?
I bought it here from amazon https://amzn.to/2XY66pB (affiliate link) I painted the top wooden rail black.
cool and amazing.i just wish i could share this with my mom,but she has been blind for five years, due to diabetes.she has taught me most of what i know about crochet.I love to crochet c2c(corner to corner)!!!!!
So colourful, love it, would be the perfect ‘excuse’ to tidy up my yarn bag!
Hi, i have a lot of odd balls so this will be perfect thanks.
If I want to make this larger what would be the ratio?
Yours is 48×60. How would enlarge?
It’s easy. Decide on your final width and length, then crochet as many rows as your desired width before decreasing side row. Work to your final length and then decrease on both edges.
Love this scrap blanket. I make C2C laghans for a hospice group. I make a similar blanket using different shades of one color.
I see she has answered the question of how to enlarge above but some of us do better with concrete numbers. Has anyone worked those out? I am afraid I will end up switching to the part to lengthen the sides on the wrong side or something without knowing exactly what number row to switch steps at.
Once you start making the blanket, it is very obvious as to which side needs increases and which need decreases. If you muck it up the edges will be stepped.
Hello! I just finished making this blanket as a gift for my pregnant sister-in-law. Although I’ve used a mix of 8-10ply yarn and was careful with my tension I’ve found that the edges have skewed inwards dramatically and it looks more like a very wonky parallelogram rather than a rectangle ? I am currently blocking it to stretch it out, but if that fails what machine setting would you recommend I wash it on? ☺️
I’m sure blocking will sort that out. Washing will depend on what type of fiber the yarn is made from so I can’t advise. Sometimes crocheting on the bias can make the blanket skew a bit, but blocking and use will usually fix that.
I found that the Russian join is very visible because you can’t blend it into the yarn, when the change comes in…so it’s like there is a odd coloured stitch among a different coloured yarn. For example if I joined a green yarn with a yellow yarn…then there would be a green stitch among the yellow yarn..so it sort of sticks out like a sore thumb and ruins the look of the whole blanket.
Yes, it does give more of a random effect, but I don’t mind it and not having to weave in ends is very appealing to many of us. If you prefer a neater finish you can join and weave in ends as you go.
It’s personal preference I suppose.
Hello! This worked up into a beautiful blanket, thank you so much for the pattern! I think I would like to put a border on mine…any suggestions?
A few makers on Ravelry have added borders, you can see how the various style of borders look there https://www.ravelry.com/patterns/library/scrappy-corner-to-corner-baby-blanket/people
You may need to sign up to ravelry (if you don’t already have an account) to view the projects. There are 93 to view.
How do you choose your colors when making you magic ball. Do you change your mind about colors when working on your project?
Mostly it’s just random. Sometimes when I have lots of scraps I group them into similar colours. The randomness is part of the fun.
Hi… When making the crochet magic ball and putting your colors together do you just put your hand in the basket and pull something out or are you putting all the greens together, all the blues together, etc. Also some of my balls of yarn are larger than others do you just whine so much and then cut it, or whine each entire ball of yarn….just wondering thank you
I like to make my magic balls fairly random, but I’ve seen some of the magic balls readers have made and they did match up similar colours. It’s just personal preference. I didn’t cut any of the yarns, but I did try to alternate long and short pieces.
Thank you so much, I am so happy I came upon your post on joining yarn, I had so many scraps of yarn and thought I just cant make anything with it as I also get bored with sewing ends in 🙁 I cant believe how much yarn I now have to make blankets that I also love to give away to friends & family whom think I am so clever ( not really I am self taught by people like you & you tube painstaking following tutorials bit by bit. My beautiful dear old mum now ( deceased tried to teach me when I was young and my other 7 sisters who picked crochet up with ease, but not me I had a very severe eyesight problem and it’s only now years later since I had eye surgery I was determined to learn the beautiful art of crochet and I love it! I know my mum would be so proud of my achievements so far, & my sisters who still do crochet encourage me. Thank you crochet has changed my life and I can be creative and share the love in every stitch. Maree from Tassie 🙂
Hi Maree, so glad you found my posts helpful. I too find crochet therapeutic and it makes me happy to know you have enjoyed using up your yarn scraps. Warmest regards, Cintia.
My leftover yarn seems to vary greatly in amount: a lot of some, a little of others. I’m concerned that I would end up with a lot of rows of one color and then single-row stripes of the others. Is there an ideal range for the length of each color? Then my larger leftovers could be divided up so they are simply used again for another section later in the blanket. Does that make sense?
Yes, If you wanted a more mixed up pattern, you can cut your yarn into shorter lengths. There is no ideal length as the starting and ending corners need shorter lengths of yarn to create stripes. I try and keep my longer lengths for the middle section of the blanket. If you feel that the clour blocks are still too large, cut the yarn and switch to another.
I haven’t noticed anyone inquiring about washing the blanket. I am guessing that hand washing in cold water and drying flat is the way to go.
How you wash will depend on the yarn used. Most acrylic yarns can be gentle machine wash. Hand wash is recommended for wool yarn. If you have mixed yarns (ie. you’ve used both acrylic and wool) I’d suggest hand wash in lukewarm water with a wool safe detergent and dry flat as you’ve suggested.
I love doing c2c and I would love to print out this pattern but when I try to I get 78 pages of stuff I don’t need do you have just the pattern someplace?
If it’s for personal use, I’m happy for you to copy and paste the relevant pattern section into a word doc for ease of printing.
I just started learning C2C
It’s going really nicely but I don’t fully understand how to increase the length without the width.
Could you recommend any videos? Find it really difficult to read the patterns/ stitch numbers
Thank you for the inspiration xx
This video explains it well. Just be mindful that in the video they chain 6 to start each block instead of my 5, but it all works out the same in the end. https://youtu.be/mQPVlaRE4Gw
Also this video shows making a similar baby blanket https://youtu.be/JeX1BiJih5s
Hi Cintia
I have just found your wonderful tutorial on C2C crochet & the gorgeous scrappy yarn blanket & had to say how easy it is to follow your instructions, thank you.
Please may I ask if I can recommend your magic scrappy yarn ball tutorial & scrappy blanket on a charity group post please?
We make blankets, hats etc for ‘Blankets for Baby Rhinos’ charity. They support baby rhinos (orphaned by poachers who kill the mothers for their horns), the local rangers, plus local people & children in need. The C2C blanket is a popular one so your scrappy yarn one would be perfect for this as many will have odd bits of yarn building up I’m sure (I know I do). We also make other items to fundraise in the UK etc to provide essential funds for feeding & medicines etc, so any great ideas like your scrappy yarn ball would be a great asset.
Thank you again for your wonderful tutorials. Linda x
Sounds like a fantastic cause. I’m happy for you to share the post link to all the group members.
When you have enlarged the blanket, how do you know how many rows of the slip stitch decreases to do?
I’m sorry, I don’t quite understand your question.
this made C2C so approachable for me, I’ve been using all my fall-toned scrapes. Your magic yarn ball tutorial makes this project so enjoyable and great to mindlessly work on. thanks!
i am blind and have lots of bits of yarn. i am wanting to try this.
I would like to make a smaller blanket. How can I adjust the pattern to make it a bit smaller, maybe square.
You can make it smaller by stopping the increases at your desired size.