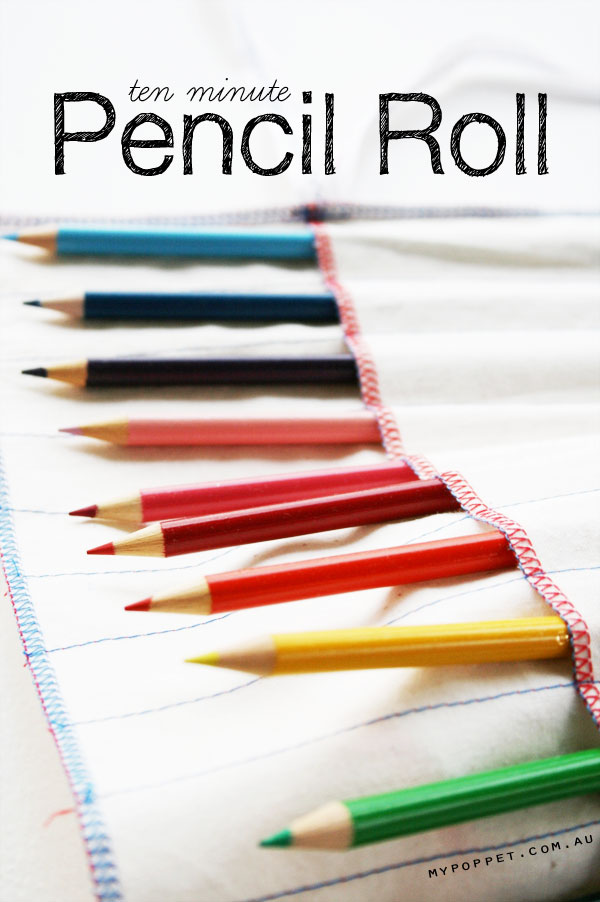
This pencil roll is a quick little project that makes a great gift for a child or creative adult. As long as you have a pack of coloured pencils lying about, it can be whipped up at short notice with just materials from your stash.
I can’t promise it will take you only 10 minutes, that depends on your skill level with the sewing machine, but regardless, it’s a very easy sewing project that is ideal for beginner sewists.
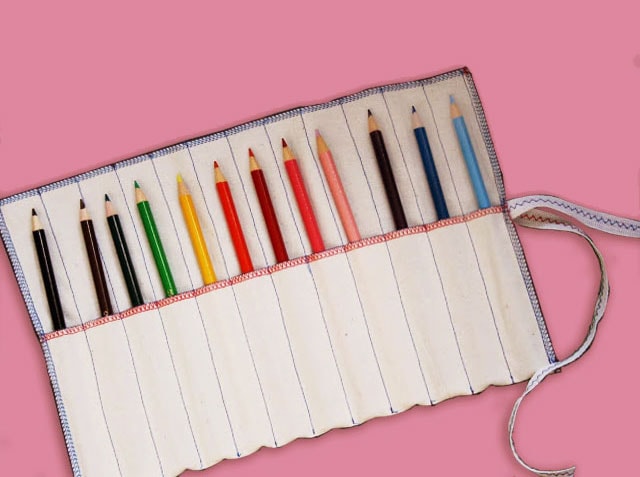
I actually made up a big batch of these as party favors a while ago, and they were a big hit. These pencil rolls are compact when rolled up, and an ideal size to throw in a handbag – fabulous for entertaining the kids with a bit of drawing or colouring when out and about.
If you want to make this sewing project even easier, use a fabric that doesn’t fray, which saves needing to finish the off the edges. Felt, faux leather or waxed canvas are all great options for non-fraying fabrics that are robust enough for every day use.
This pencil roll pattern is very versatile and can be adapted to store all sorts of other craft supplies. Why not make a crochet hook roll, or one to store knitting needles? It’s simple to adjust the basic measurements to suit differently sized items with the instructions I’ve included below.
Let’s make a Pencil Roll!
You will need:
- 12 coloured pencils (7 inches tall)
- Calico fabric (or cotton fabric of choice) piece about 12″x12.5″ or custom size (see below)
- Cotton tape or ribbon about 50cm (19.5″)
- Sewing thread in desired colours
- Tailors chalk (optional)
- Scissors
- Pins
- Sewing machine with quilting guide
- Overlocker/Serger (ideal but not essential)
How to:
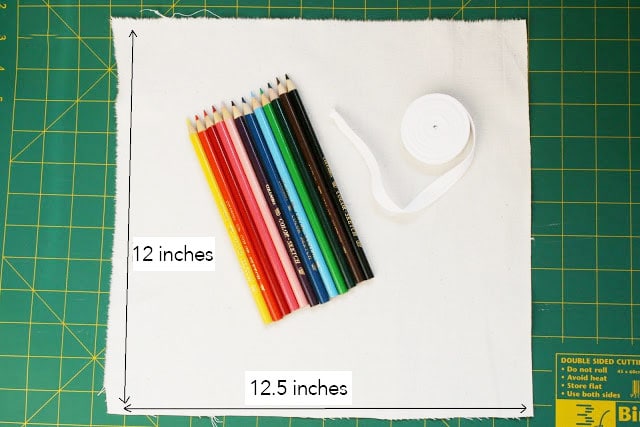
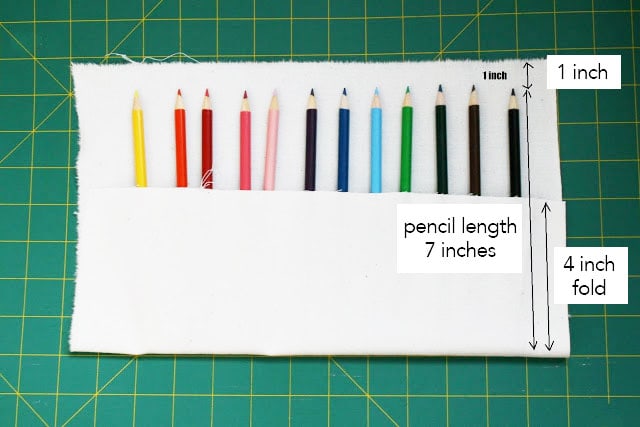
1. Gather your materials – you can choose any mid to heavy weight fabric for this project. The pencils pictured are 7 inches long, if yours are longer or shorter I will show you how to adjust your measurements in step 2.
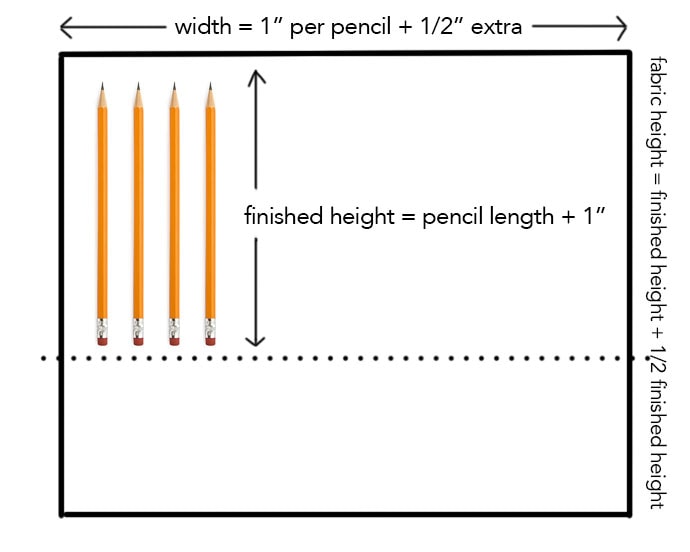
2. Cut your fabric into a rectangular shape. My measurements are 12 inches tall by 12.5 inches wide. You may need to change this measurement if you have more pencils or they are longer or shorter than those pictures.
How much to cut?
Fabric Width = 1 inch per pencil + an extra ½ inch
Fabric Height = finished height (pencil height + 1 inch) + half finished height
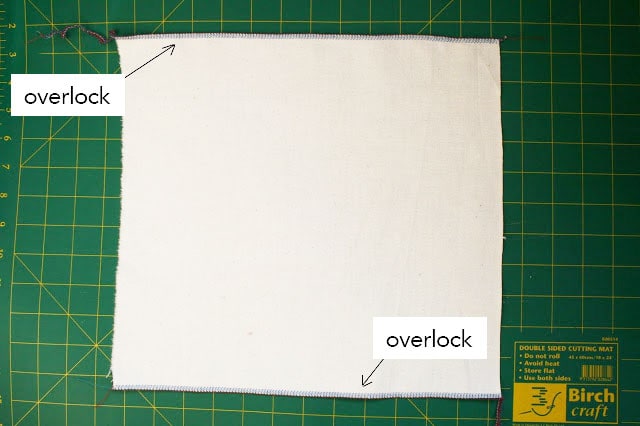
3. Overlock (serge) top and bottom edges. If you don’t have an overlocker (serger) you can zig zag around the edges or use pinking shears so the fabric doesn’t fray. I’ve used red and blue thread to add a bit of colour.
4. Fold the bottom half way up and pin into place. You can use the pencils as a guide.
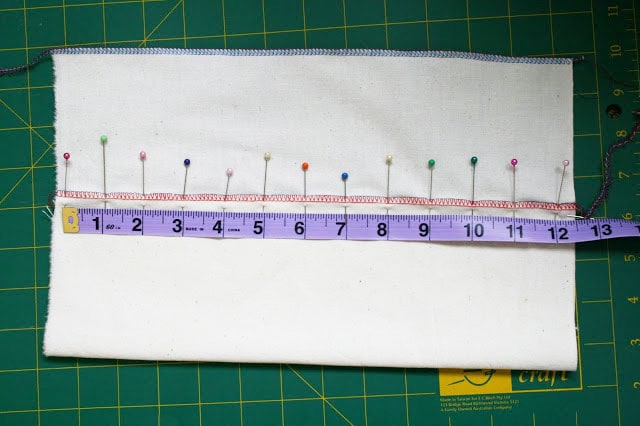
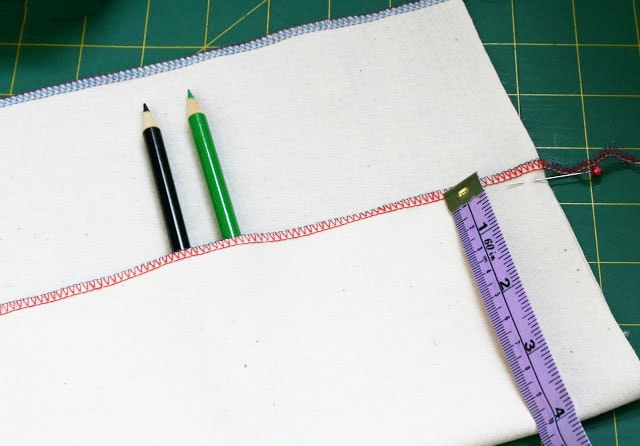
5. Now mark with pins where you will stitch your lines to make the compartments for each pencil. I have allowed 1 inch between each seam. You can reduce this if you want a snugger fit for each pencil. Start you measurements about ¼ inch from the left side. If you like you can mark your lines with tailors chalk as a guide.
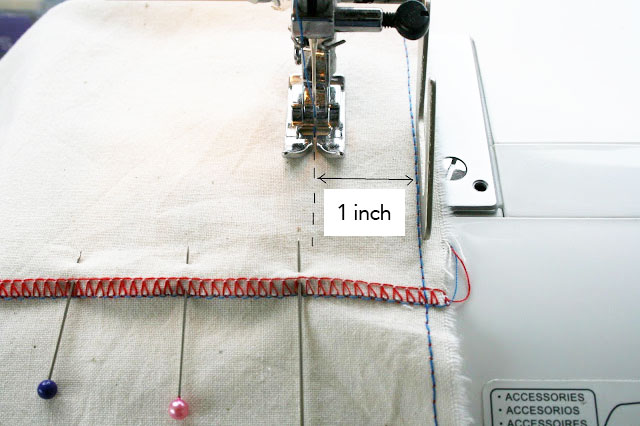
6. Sew a nice straight line ¼ inch from the left side to use as a reference for your quilting guide (if using one). Set your quilt guide to 1 inch and sew a line from the bottom to the top of the pencil roll. Remember to do a couple of back stitches at the start and end of each row so the stitches don’t unravel.
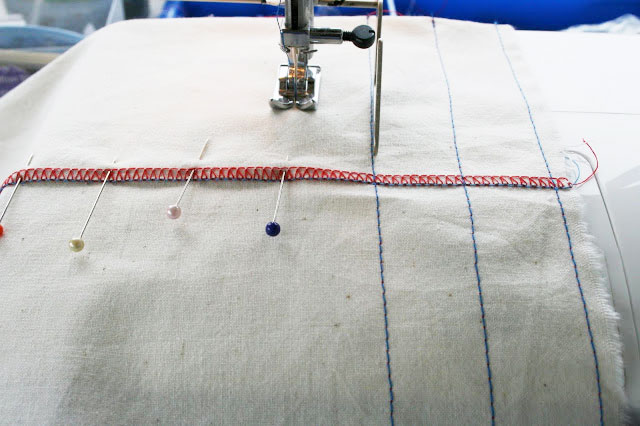
7. Continue sewing rows all the way to the end of the roll. The straighter your guide line is the straighter the stitched lines that follow will be.
Don’t have a quilting guide? Mark your lines with tailors chalk or an erasable fabric marker.
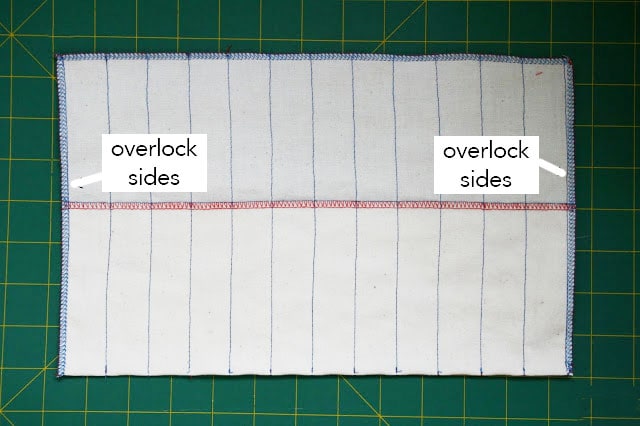
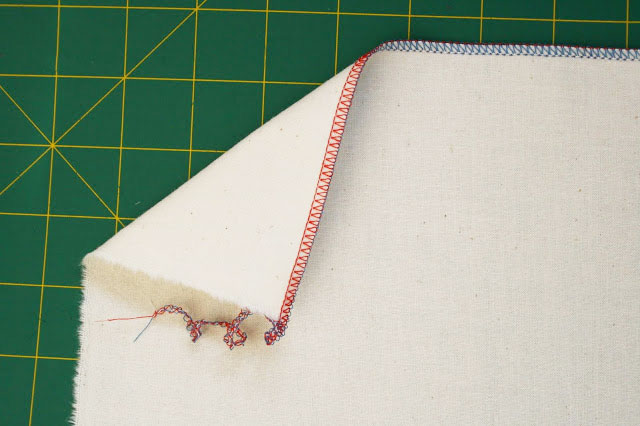
8. Trim threads then overlock or finish sides as desired. Neaten threads on corners.
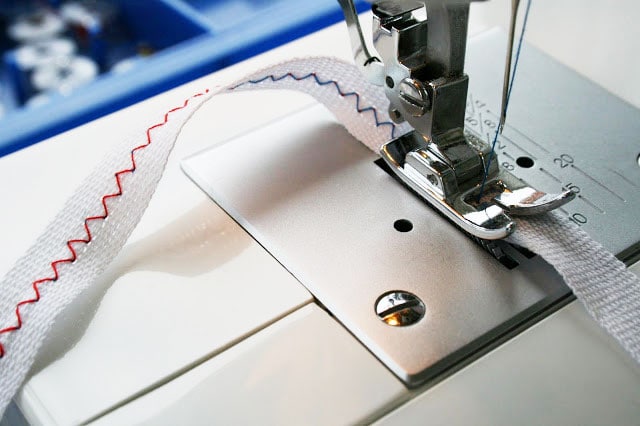
9. Optional, zig zag stitch down the length of tape. If you have decorative stitch settings on your sewing machine why not get creative and try out some fancy stitches.
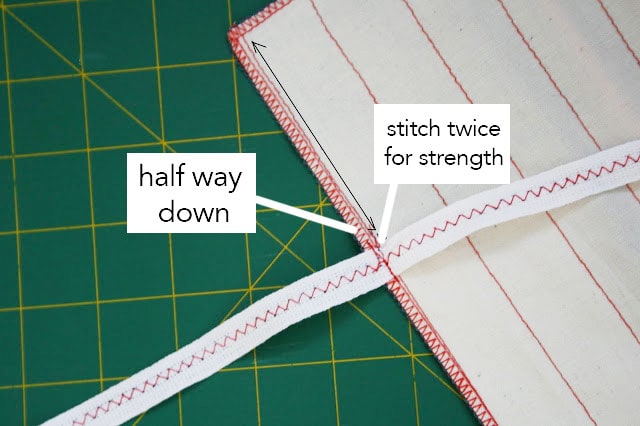
10. Find the centre of the length of the tape/ribbon. Stitch centre of the tape securely to the outside edge of the pencil roll halfway up the roll.
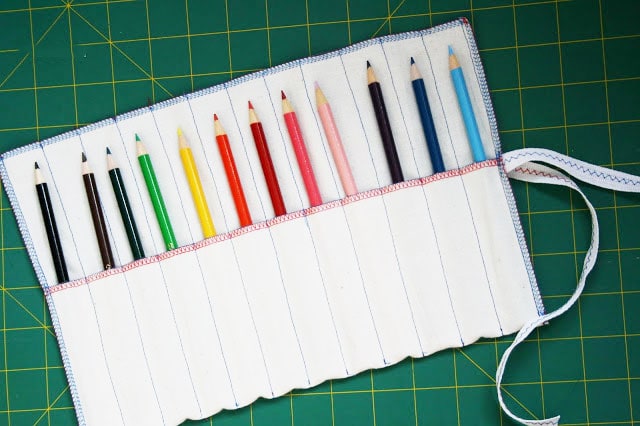
11. Insert your pencils and you’re done!
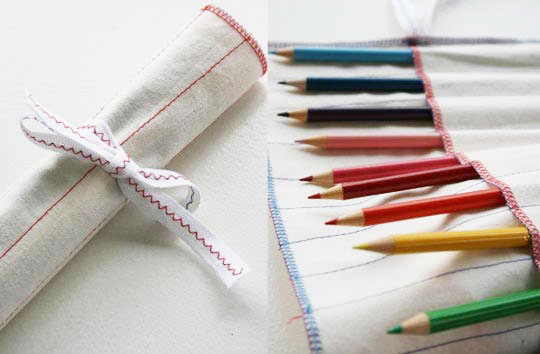
Just roll up your pencil roll, tie a bow around with the ribbon and bask in the loveliness of your creation.
In the mood for colouring? Print off these colouring pages!

what a great tutorial, I wish I could sew, I just bought a sewing machine…hehe!
I've always wanted to make one of these, and your tutorial is positively the best I've ever seen! Now, to check to see if my sewing machine has an overlocker. If not, I'm buying one. That function is simply too cool!!
Jenn/Rook No. 17
Love this and I have 10 minutes (once I figure out how to use that serger I have on extended loan!).
Found you via One Pretty Thing.
This is great!! I need to make something to hold my crochet hooks so I think something like this would work great. Thank you! Love your blog!
I can't find any in the shop?
I made this as my first ever sewing project yesterday. It took me more than 10 minutes but I had a great time learning. Thanks for the great tutorial.
Cute! I'm gonna hand-sew this with my girls today! Thanks so much for the tute!!
I'm seeing this as a paint brush holder… may have to make them longer… thanks for the idea & tutorial…
great tutorial! I'm going to make this now!!!
awesome tutorial! the red and blue remind me of notebook paper, which makes this perfect for school.
Thank you SO Much for this!! I just made my 4 year old daughter one for Christmas. I did mine a bit differently and left a larger pocket at the end for folded papers. Turned out great though and super quick and easy to do!
great idea. you could also put a note book in there too.
Genial!!!
Gracias por la idea 🙂
I loved this so much! I am very artsy so thank you for giving me a way to organize my drawing items!I love it! Best tutorial EVER!
sorry to hear that ann. was there any part in particular that was extra confusing?
I just did this, and it works great. I had to hem the cloth and walk the dog, so it took substantially longer than ten minutes, but it was still super quick!
Walking the dog is important. Glad you enjoyed this project.
Hi Cintia! I love easy and fun sewing projects like this! I’ve got a round-up scheduled for today that links to your pencil roll tutorial:
https://icansewthis.com/easy-sewing-projects-for-beginners/