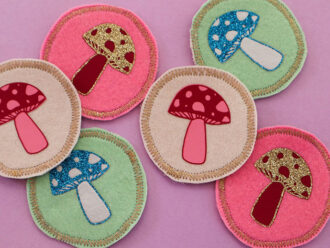
How To: Harlequin Bangles

Harlequin Decoupage Bangle DIY My Poppet
Statement Jewellery is a fabulous way to bring an old outfit bang up to date, but designer pieces can be a little expensive. Instead try making these Harlequin Bangles yourself with some inexpensive supplies, no special skills required. Choose colours that suit your style, wear several stacked together or mix and match them with other plain pieces. Read on for step by step instructions…
Continue reading →

Upcycle Style: Monster Tote Bag from an Old Cushion Cover

DIY monster face tote bag
There is nothing I find more satisfying than reusing something unwanted to create something practical. This Monster Tote bag is made from an unwanted cushion cover that has seen better days. The fabric was still good but the design a bit tired, so rather than throwing it away, I put is aside for the right project to come along. I’m not one to craft or make just for that sake of it, and am more inspired to create an object if there is a need. I’ve been feeling a little uninspired to craft lately because we just don’t need much stuff at the moment, so when one of the mums at school was a little concerned that she’d forgotten to get a book bag for Library day, I came to the rescue and told her I’d make one. The truth is, she came to my rescue, because I was needing a project to get motivated to sew again.
This bag is super easy to make even for a beginner, I’ve photographed every step and even created a template for the monster face. If you aren’t into monsters, you can still use the basic steps to make a tote bag from a thrifted cushion cover you like the design of.
Continue reading →

How To: Frida Kahlo inspired Floral Headband

It’s fun having creative friends, friends that love colour and irreverence and fun. Friends that make art and think it’s awesome when you show up to their exhibition opening night dresses as Frida Kahlo. Maddie had suggested it in passing, “you should come as Frida” and I thought, yes I will, and so will Emma, because the only thing better than one Frida is two Fridas. The exhibition had a Day of the Dead theme (Dia de los Muertos), so we fit right into the riot of colour.
The costumes were easy to put together with clothing and accessories we already had at home, I only had to make the headbands. It didn’t take very long, and Emma enjoyed helping me choose the colours and bend the wires.
If you want to make a floral headband for your own costume or even as a bridal wedding headpiece read on…

Continue reading →

How To: Hama bead Medal Brooch –> Give yourself a Medal

Being a mum is a hard and sometimes thankless job, as awesome as my kid is, some days I feel like I deserve a medal. (She is usually pretty great, so I shouldn’t really complain)
Well, I’m not one to rest on my laurels, so I decided to make a few medals of my own with some Hama beads. They are colourful, plastic fantastic ones, perfect for reminding myself that I’m pretty great at my job, when things aren’t always going my way.
I think you deserve one too, so read on and make some of your own…

Continue reading →

How To: Retro Placemat Bag

I come across so many beautiful vintage linens in my op-shopping (thrifting) adventures, but I rarely seem to use them for their original purpose. These linen placemats with their geometric retro design, I’m particularly taken by. I’ve had them for years, waiting for the perfect project, but could never bare to cut into them.
Whilst tidying up my sewing space I uncovered a set of vintage bamboo bag handles…then the perfect project came to mind.
This bag only took me a few minutes to construct. With no cutting and only three seams required, one can be whipped up at short notice to match any outfit.
Read on to see how to make this simple placemat bag…

Continue reading →

How To: Vintage Hankie Tissue Holder

It’s officially Spring in Melbourne, which for me means hayfever! I suffer terribly and always have tissues handy at all times. Rather than having ugly boxes all over the house, I thought making a cute tissue holder from a vintage hankie would be a fun (and very meta) idea. Inspired by those cute pocket size tissue pouches, but much larger to fit full sized tissues.
I’d also recommend this tissue holder when traveling to avoid having to buy those ludicrously over priced travel tissue packs.

This has got to be one of the easiest sewing projects ever. If you don’t have a sewing machine, it’s easy enough to hand stitch.

Continue reading →

How to: Scrappy Felt iPad Cover

I couldn’t wait to make a cover for my new iPad this weekend, and there is nothing I love more than using up my scraps…so it was logical to make a felty patched cover sleeve.
This tutorial will show you how to make the felted patchwork for the outer part of the cover and the instructions of how to measure and sew up a cover of your own.

You will need:
a bunch of wool felt scraps – I’ve used some blanket and felted sweater scraps from my scrap bags
cotton or bamboo batting (low loft)
Cotton fabric to line
Standard sewing supplies
1. gather your scraps, choose whichever colours appeal
2. Cut your scraps into rectangles and squares, these don’t have to be perfect and the size will depend on your scraps. They can be different lengths, as long as the width is about the same.
3. arrange in your desired pattern. Ideally the patched layer should be at least 30x43cm when finished. Arrange your rows to start your piecing.
4. butt join the felt squares with your widest zig zag stitch.
5&6. do that for all the pieces in each row
7. With a rotary cutter or scissors, neaten the edges to make them straight
8. line up all the strips and zig zag them together
9. here is the finished patched piece after it was pressed.
10. fold it in half and lay your iPad on top to take your measurements, I have left about 1.5cm on each side and 2cm at the opening top end.
11. cut batting and lining to match (approx 30x43cm) lay patched top over batting
12. fold in half with the batting side out, stitch where the dotted line indicates 1cm seam allowance.

13 & 14 & 15. turn inside out
16. repeat with lining fabric but leave an opening on one side seam of about 10cm as seen in picture 17

17. Slide outer cover (right side out) into lining (seams out) the right side of the lining and the outer should be facing.
18. sew the lining to the outer cover where indicated by the dotted line, all the way around the edge of opening with a 1cm seam allowance. It may help to pin before sewing.
Turn it all the right way round through the opening in the lining and sew hole in lining closed.
19. press and top stitch the seam. Cut a tab out of leftover felt and sew on to the back of the cover.
20. Make a button hole in the tab and sew on your button. I found a cute apple one in my jar!

I hope the instructions were clear enough, it was all a bit of trial and error on my part, some unpicking and a minor amount of swearing, but I thing the results are worth it.

I suggest to keep trying it on your iPad as you go along to make sure it is all fitting nicely, please make your own measurements as mine are all approximate and will depend on how thick your batting and felt layer is.

I did have to hand stitch a few of the felt squares corners where the zig zag didn’t quite catch just to re-enforce the patched top but you could avoid doing this by ironing on a fusible interfacing to the patched fabric at stage 9

I hope you like it, Emma has been using it as her dolly sleeping bag!

You can buy felty scraps from my shop if you want an assortment to add to your own.
This tutorial is for personal use only, thanks for understanding.
Please leave any questions as a comment and I will try and answer it as soon as possible.

x Cinti

www.mypoppet.com.au