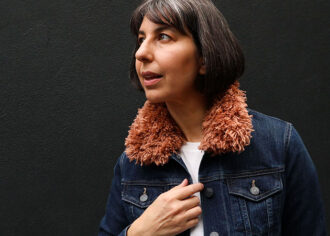
Easy Cable Knit Skirt – A wardrobe refashion

Make a Cable Knit Skirt DIY
Do you like cable knits? I do. I love the chunky texture of the cables, and the way they automatically evoke the feeling of ‘cozy’. I’m not a knitter but appreciate the skill involved in making all the patterns and designs, so sometimes I wonder why knitters spend so much effort making such labour intensive projects with less than pleasant yarns?

The sweater I’ve refashioned here was once a sad, shapeless and unloved acrylic sack, passed onto me by a family friend who no longer had a need for it. She knew that I like to felt knitwear, so thought it would be useful for one of my projects. Because acrylic doesn’t felt, it has sat around my sewing room waiting to be remade into something wearable.

Now that the weather is cooling down in Melbourne, it was the perfect opportunity to refashion the sweater into an Easy Cable Knit Skirt.
Both easy to make and easy to wear, I’ll be making a few more before the season is up.
Read on for instructions…
Continue reading →

How To: Frida Kahlo inspired Floral Headband

It’s fun having creative friends, friends that love colour and irreverence and fun. Friends that make art and think it’s awesome when you show up to their exhibition opening night dresses as Frida Kahlo. Maddie had suggested it in passing, “you should come as Frida” and I thought, yes I will, and so will Emma, because the only thing better than one Frida is two Fridas. The exhibition had a Day of the Dead theme (Dia de los Muertos), so we fit right into the riot of colour.
The costumes were easy to put together with clothing and accessories we already had at home, I only had to make the headbands. It didn’t take very long, and Emma enjoyed helping me choose the colours and bend the wires.
If you want to make a floral headband for your own costume or even as a bridal wedding headpiece read on…

Continue reading →

How To: Making a Toddler Sleep Sac without a Pattern

This tutorial was originally created and published last winter on my (sadly neglected) sewing blog MADE OF CLOTH. It had a great positive feedback so I thought it was worth revisiting. 
I recommend this as a project for intermediate sewers and assumes some experience with inserting zips and attaching bias binding. 

Last winter Emma had a giant growth spurt, her old sleeping bag is too short for her and a little fitted around the armholes. I had a few hours to spare today and thought it was time to make a nice warm one for this winter. I will share the steps I used to make her new sleeping sac/bag without using a pattern…

1. I choose to use a thrifted vintage woolen blanket which was going cheap due to several holes, some vintage cotton flannel (pre-washed) and the longest zip I could find in my sewing room (I’d probably reccommend buying a new one that locks nicely once zipped up, I used an older one here that opened very easily which meant that Emma could unzip the bag and climb out of her cot). You will also need some bias binding for the neck and arm holes. 2. You will need to use the old sleeping bag as the pattern template.

3. With a washable marker roughly sketch the new sleeping bag shape using the old bag as a guide. I added about a 2 finger width on the body, made the armholes a bit deeper and longer and made the total length about 20cm longer. You can tweak the shape a little as you go.
4. Cutting the back: To get a symmetrical body fold the blanket in half and cut on your markings.
5. You can see how much larger the new back panel is compared to the old sleeping bag.
6. Cutting the front: On a fold place the folded back panel to use as your pattern but place it 1cm in, this will be your seam allowance to insert zip. 7. Cut front and then cut along centre fold to make the 2 halves of the front. Cut a V panel out of the front using the original bag as a guide.
8. Use your back and front blanket panels to cut the same pieces in the lining fabric. (It’s a good idea to have the lining a little bit smaller than the outside but I’ll tell you how to adjust this at the sewing stage)
9. Insert the zip using this technique but skip the top stitching stage for now.
10. Because the zip doesn’t go all the way down, you will need to continue the seam down on the zipper line. Fold your lining onto itself (right sides together and seam, do the same for blanket front panel pieces) 11. Your seam should look like this
12. Now its time to sew the backs to the fronts. Blanket outer, right sides together, 1cm seam allowance, sew around from under arm to under arm, and then the top of the shoulders. Do the same with the lining but use a 1.5-2cm seam allowance. (this will make the lining sit in more comfortably) 12a. Make sure you leave the arm openings open!
13. Turn it all the right way, lining in and outer out.
14. So the zip doesn’t get caught in the lining, top stitch around the zip. 15. Pin and trim any protruding lining.
16. Attach the bias binding around the neck and arm holes. This armhole bias binding tutorial will help.
Optional- Adding a little tab with a press stud at the neckline over the zip will help prevent the bag being unzipped by a clever toddler.
So what do you think. I saved myself around $80-$120, the cost of a new woolen sleeping bag, just by making my own with material from my stash. I think this one would be warmer and much nicer than any bought ones. I am quite pleased with how it turned out, I have a fear of projects with zips so I pleasantly surprised myself. I would love your feedback if you give this a try.
www.mypoppet.com.au