This craft project is a collaboration with Cricut – This post contains affiliate links
It’s back to school time! The summer holidays are nearly over, and this week has been all about getting school ready!
We are pretty set for stationery and uniforms, but the one thing Emma did need was a new lunch bag. She’s been wanting to take hot food to school for a while now, so I picked up some insulated food flasks as well.
Instead of labeling her lunch bag and boxes with a marker (like I normally do), I thought her new lunch kit could do with some deluxe personalisation.
It was time to fire up my new Cricut Maker cutting machine and try out the various iron-on and adhesive vinyls that Cricut very generously sent me to review.

Cutting personalised vinyl labels is really so easy with a Cricut machine. With a fancy cursive font, and a little bit of gold sparkle, you’d never guess that this lunch kit was from Kmart.
I used 2 different styles of adhesive vinyl for this Cricut craft project. The insulated lunch bag was personalised with Cricut Glitter Iron-On heat transfer vinyl, and the food flasks were labeled with Cricut Premium vinyl.

As a Cricut newbie, I was a little bit intimidated to use vinyls in a craft project, but it was surprisingly easy, and I’m super pleased with the results.
Admittedly a Cricut Maker machine and the various associated Cricut accessories required to get started are a big up-front investment. But the ability to personalise basic store bought or thrifted items is quite appealing to me.
You may also enjoy:
How to make your own Personalised Lunch Kit
Whether you are putting together a school lunch box set or a lunch bag kit to take to work, it’s easy to bring together some disparate elements with a little bit of vinyl design creativity. When choosing vinyls, try and pick out colours that complement all the pieces in your kit.

For example I’ve used the gold glitter vinyl to tie in with the gold flask. The maroon lettering works well with the pink, but also is similar in color to the branches on the lunch bag palm leaf print.
Throw in a reusable napkin and some cutlery and you are all set for an amazing lunchtime feast!
In this tutorial I’ll show you how to design your own custom font in Cricut Design Space, how to apply heat transfer vinyl onto an insulated lunch bag, and how to cut and apply regular adhesive vinyl onto a flask or drink bottle.

How to design custom font in Cricut Maker Space
Before you fire up your cutting machine or warm up your heat press, you’ll need to make your custom design in Cricut Design Space.
I’ll walk you through the design steps I used to create my custom cursive lettering in the Cricut Design Space, so you can do the same with your own names or phrases.
You will need:
- Cricut Design Space account (free to sign up)
- Cricut access subscription (optional)
- Computer, ipad or smart phone
Tip: Some elements and fonts in the design space have to be purchased, but if you sign up for the ‘access subscription’ (there is a 30 day free trial period), nearly everything is included for unlimited use.
Let’s Get Started!
1. Create a ‘New project’ to open up the canvas space. Choose the ‘Text’ button in left hand column and type in your desired name or words. Choose desired font from the pull down menu. I’ve used ‘Babette’ which is free with a Cricut access subscription.
2. To adjust the letter spacing and join the cursive lettering, select your text layer and click on ‘advanced’ to split the word into individual letters.
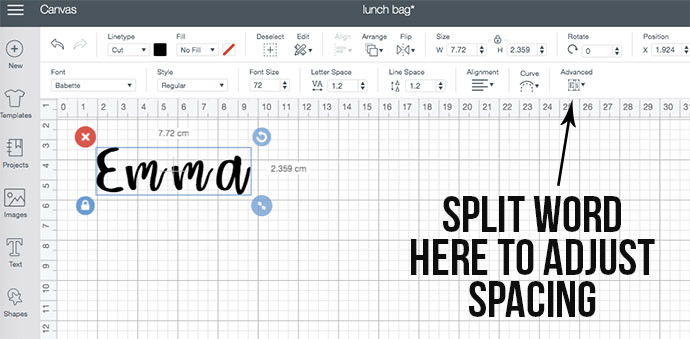
3. Now you can move your letters together so they join up. You can customise your individual letter sizes at this stage to make the script look more like hand lettering. I swapped out the letter ‘E’ for to a different font called ‘Friday’, and increased the size of the ‘a’ slightly to balance out the name.

4. You’ll need to join your letters together so the name will cut out in one piece. Once you are happy with the way your text looks, go ahead and select all the letters then ‘WELD’. This will join the lettering permanently.
Note: If you forget to click ‘weld’ the letters will all cut our individually even if they are ‘attached’ or ‘grouped’.
Now you are ready to customise your lunch bag or flask.

How to Customise and Insulated Lunch Bag with Heat Transfer Vinyl
Time to make your own personalised lunch bag! I bought this basic polyester fabric lunch bag from Kmart. I liked how tall it was so Emma could fit her food flasks, and assorted lunch containers in there with plenty of room for whole fruit as well.
I chose to use gold glitter iron-on to add some bling and coordinate with the gold flask. Because the lunch bag sort of rounded, I had to improvise slightly with my ironing method.

You will need:
- Insulated lunch bag
- Cricut cutting machine with fine point blade (Amazon US | Cricut)
- Cricut Glitter Iron-On vinyl (Amazon US | Cricut)
- Cricut Design Space account (free to sign up)
- Cricut access subscription (optional)
- Computer, ipad or smart phone
- Cricut Standard Grip mat (Amazon US | Cricut)
- Cricut basic tool set (Amazon US | Cricut)
- Cricut Easy Press 2 (Amazon US | Cricut) or regular iron
- Cricut Easy Press Mat (Amazon US | Cricut)
- A pile of books (optional)
- Hand towel or pressing cloth (optional)
- Cricut Heat Resistant Tape (optional) (Amazon US | Cricut)
- Baking paper
How to cut and iron-on glitter vinyl:
1. Measure the desired size of your name or phrase on your lunch bag.

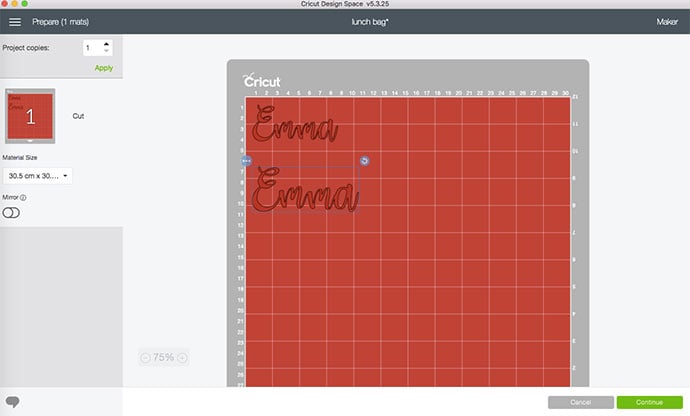
2. In design space adjust the size of your selected name. Hide any other elements (little eyes far right) that you don’t want to cut from glitter vinyl.

3. Click on ‘Make it’ to set up your mat. Make sure you select ‘mirror’ for iron-on vinyl.
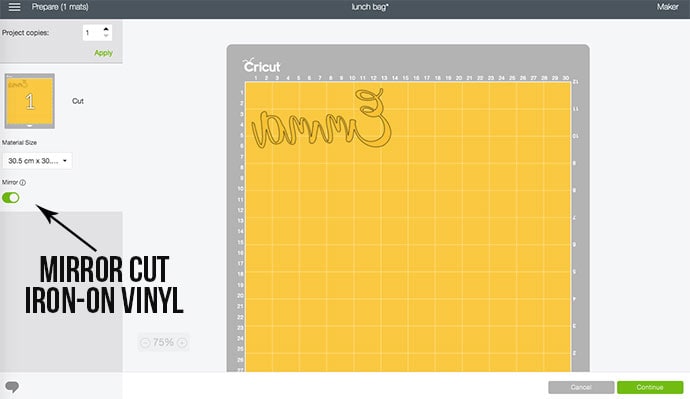
4. Place required sized piece of glitter vinyl on grip mat shiny side down. The dull surface is the heat sensitive glue hence the need to reverse the image.

5. Follow the instructions in maker space to cut the vinyl. Once cut, remove from mat and weed any unwanted vinyl. (Keep the scraps for future projects.)

6. Your iron-on is ready to work with. Set aside for now.

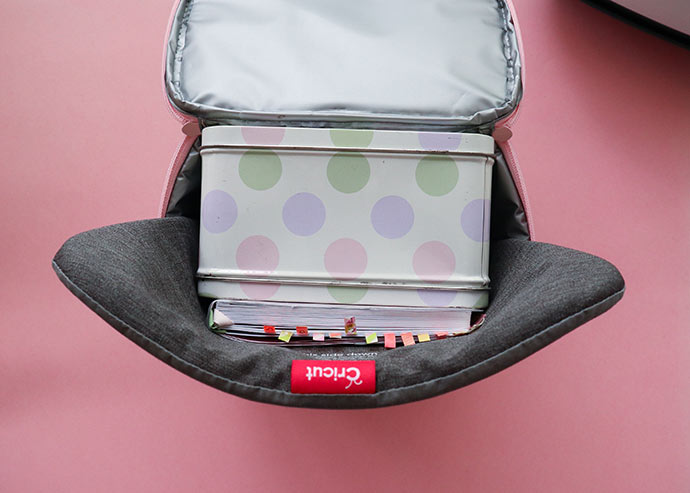
7. Time to prepare your lunch bag for the heat press. Because the surface I wanted to transfer the iron-on to wasn’t flat, I had to stuff it with something to make a flat surface for the Easy Press 2 to press down on. I filled the lunch bag with a metal tin and my diary to get a nice firm surface, then I slipped in the Easy Press mat. If you are ironing onto a flat surface, you can skip this step.
8. Because I have a large heat press I was slightly worried about melting the plastic zipper. To prevent this potential disaster I taped a small cotton towel over the zipper with some Cricut heat resistant tape.


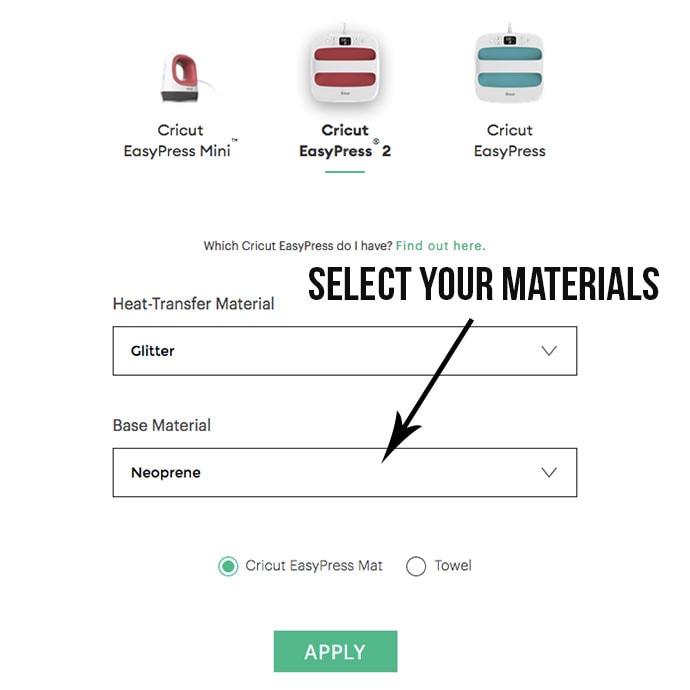
9. Plug in and warm up your Easy Press 2 and select temperature according to the instructions on the Cricut Heat Guide. I’ve selected the base material as Neoprene as it’s the most similar material to what my insulated lunch bag is made of. I was cautious not to choose a high temp fabric setting for fear that the outer or lining fabric may melt.
10. The site will tell you the correct temperature setting and how long to press for.
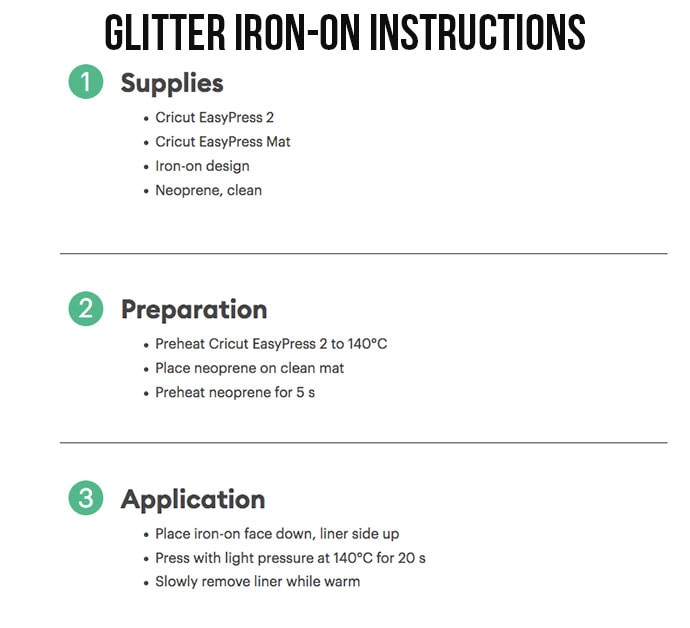
11. Set your Easy Press to required temp and time. If you are using a regular iron you may need to estimate the temperature and count out the time yourself.

12. Preheat lunchbag surface for 5 seconds and then place your vinyl cutout. Make sure it is centered.

13. Iron on vinyl as instructed for 20sec. I’ve used a layer of baking paper in between my press and the lunch bag to protect the fabric surrounding the iron-on transfer paper.

14. Peel while still warm and allow to cool fully. So sparkly! Your personalised lunch bag is all done!


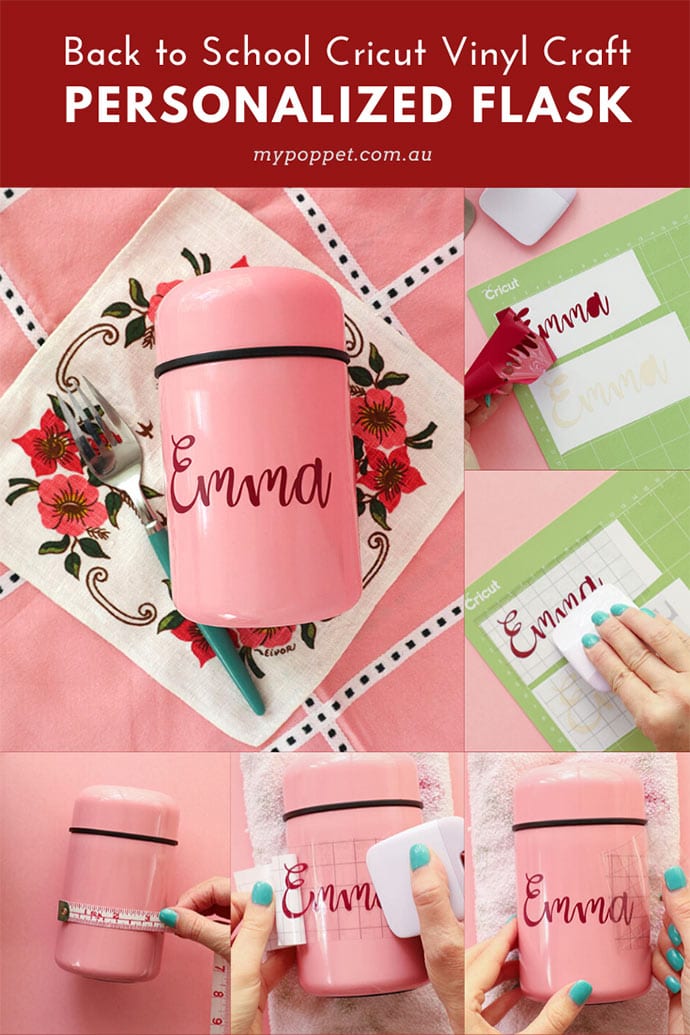
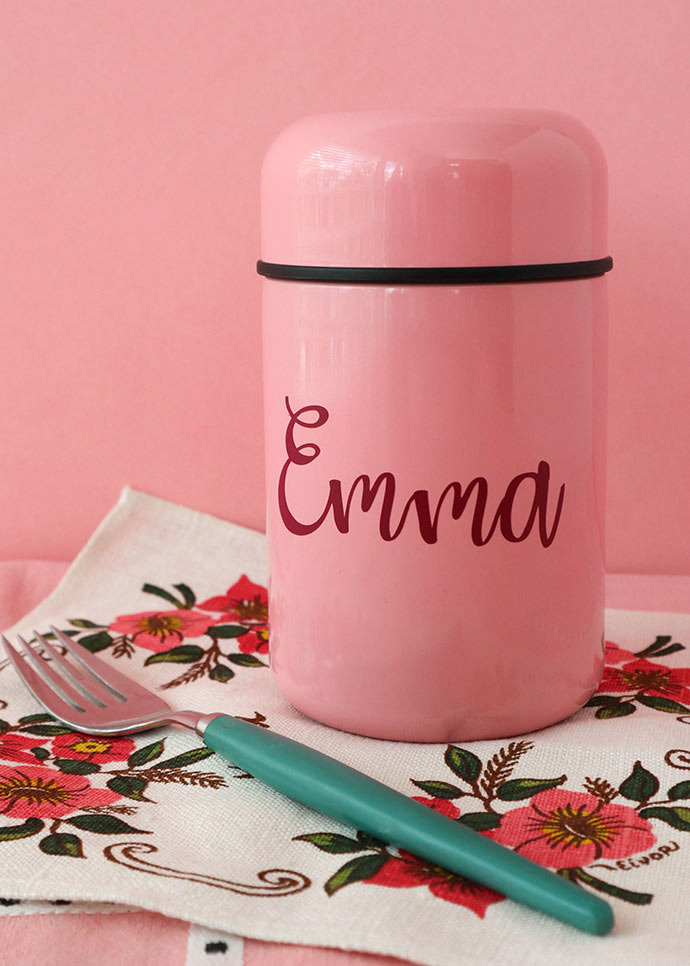
How to Customise a Metal Flask or Drink bottle with Stick on Vinyl
Using stick on vinyl is a super easy way to personalise any glass, metal or plastic container. Use this technique to add names and labels to lunch boxes, drink bottles, glass jars and metal tins. The perfect match for your personalised lunch bag.
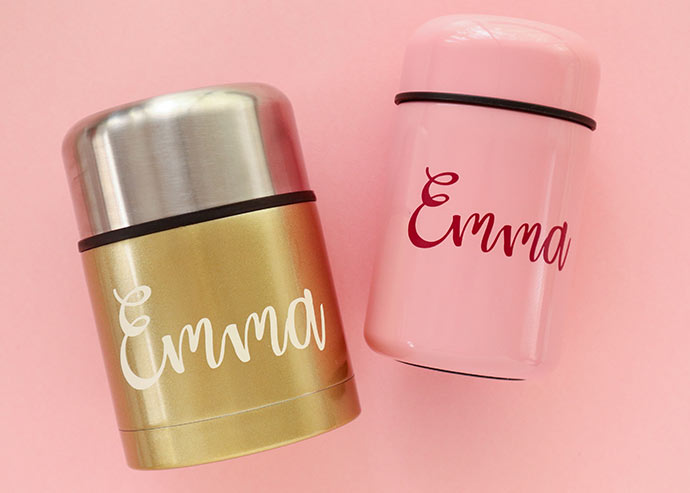
I’m really happy at how these thermos flasks turned out. They look so fancy!
I used removable vinyl for these projects because these flasks are hand-wash only, but if you want to label items that will go in the dishwasher, I recommend ‘permanent’ vinyl which is dishwasher safe.
You will need:
- Insulated Food flask or other container
- Cricut cutting machine with fine point blade (Amazon US | Cricut)
- Cricut Premium vinyl (Amazon US | Cricut)
- Cricut Design Space account (free to sign up)
- Cricut access subscription (optional)
- Computer, ipad or smart phone
- Cricut Standard Grip mat (Amazon US | Cricut)
- Cricut basic tool set (Amazon US | Cricut)
- Cricut Vinyl transfer tape (Amazon US | Cricut) or contact paper/masking tape
- Small towel
How to cut and apply Cricut vinyl:
1. Measure the desired size of your name or phrase on your container.

2. In design space adjust the size of your selected name. Hide any other elements (little eyes far right) that you don’t want to cut from premium vinyl.
3. If you are cutting various labels in assorted colours, here’s a tip to save some time. Select all labels and choose just one colour. Click onto ‘Make it’

4. Move each name/label apart and take note where the placement on the mat is. (DO NOT MIRROR)
5. On the same grip mat add multiple coloured pieces of appropriately sized vinyl where the designed will cut out according to the mat layout.

6. Follow the instructions in maker space to cut the vinyl. Once cut, leave on mat and weed any unwanted vinyl.

7. Once you’ve removed all the unwanted vinyl from the design, cut a piece of vinyl transfer paper (like sticky contact paper) and place it over the design. Rub down firmly to smooth out any bubbles. Remove the vinyl design off the mat.

8. Stick the design onto your clean container by slowly peeling away backing paper while rubbing down with scraper tool to adhere firmly and remove any bubbles.
Tip: To stop your container or water bottle from rolling around, use a small towel with the edges rolled up creating a little valley in the center. Your rounded container should nestle nicely in the valley and stay put.
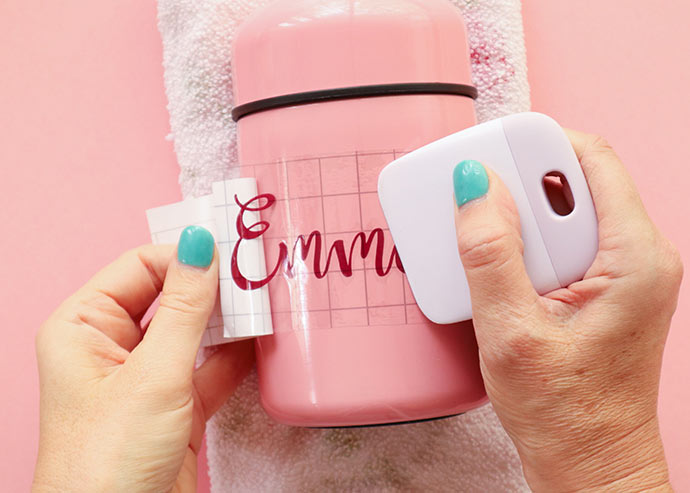
9. Gently remove transfer paper to finish. All done!

This was such an easy Cricut craft project for beginners. The containers turned out super stylish with a bit of a vintage twist. I can’t wait to use this technique to label all the containers in my panty!

I hope I’ve inspired you to fire up your Cricut cutting machine and jazz up your boring old lunch pack and make a personalised lunch bag.

Bon Appétit!
x Cinti
LOVE THIS PERSONALISED LUNCH BAG PROJECT? PIN IT!