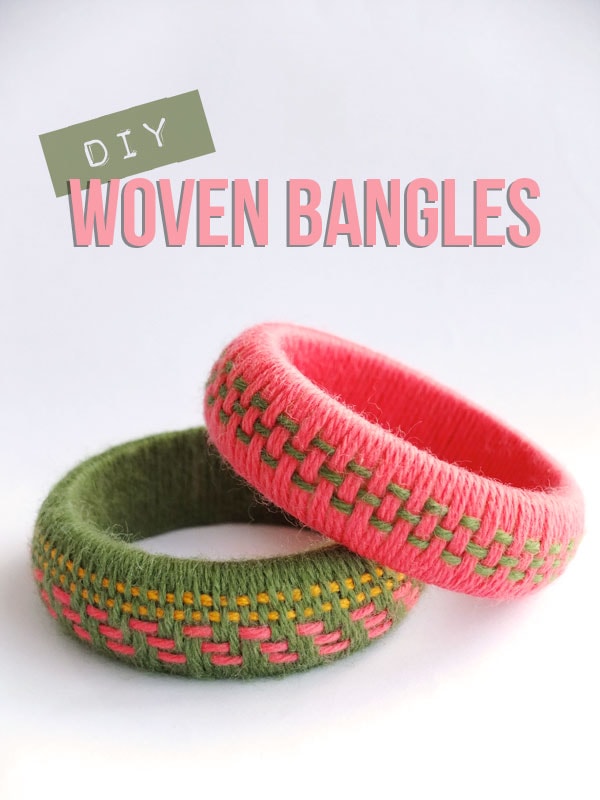
Use those leftover yarn scraps to make Woven Yarn Bangles. A truly unique accessory that will add interest to any Fall or Winter outfit.
This post contains affiliate links
Weaving has had quite a resurgence of late, so I thought it would be fun to translate this craft trend into something wearable.
It’s winter here in Australia, and I liked the idea of a warm cosy bangle wrapped in colourful yarn.
I know yarn wrapped accessories are not a new thing, but the idea of weaving a pattern in is an accessible way to experiment with designing woven patterns without having to commit to a big project.
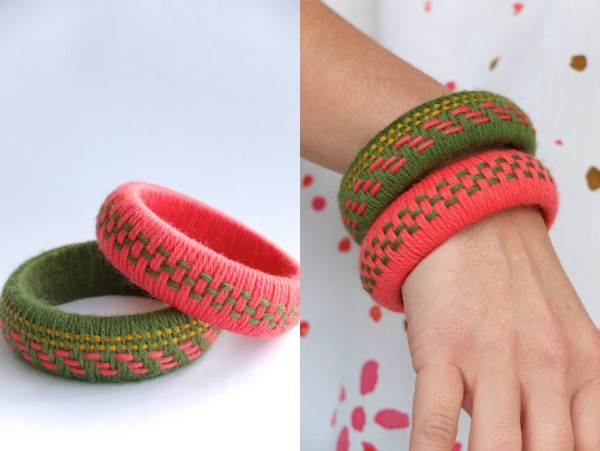
These bangles look great worn as a stack, so make a few that co-ordinate together.
You may also enjoy these scrap yarn projects:
Lets make Woven Yarn Bangles!

I’ve used wooden bangle blanks with rounded edges for this project . If you can’t get suitable wooden bangle blanks, try using plastic bangles from your local thrift store, or unwanted ones from your own wardrobe and refashion them.
Play with different yarn colours and weave patterns to create multiple designs. You could even try using varied materials like string or fine ribbon to create interesting textures.
Fluffy yarn is perfect for winter accessories, but why not try the same technique with embroidery floss for wearing in spring and summer.
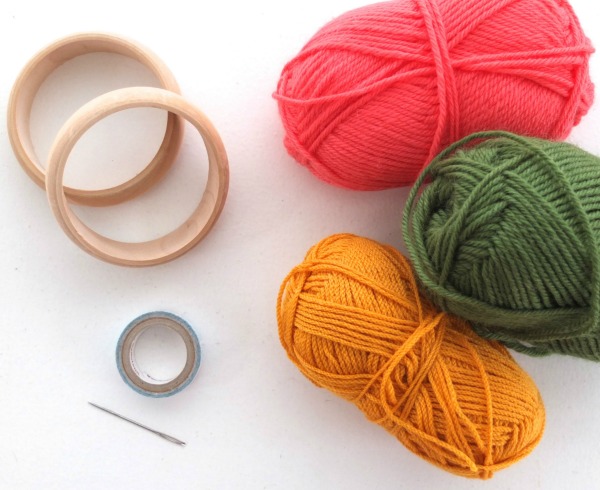
You will need:
- Wooden Bangle blanks (or old thrifted bangles)
- Double sided tape
- Assorted yarn
- Tapestry needle
- Scissors
How to:
To Wrap Bangle
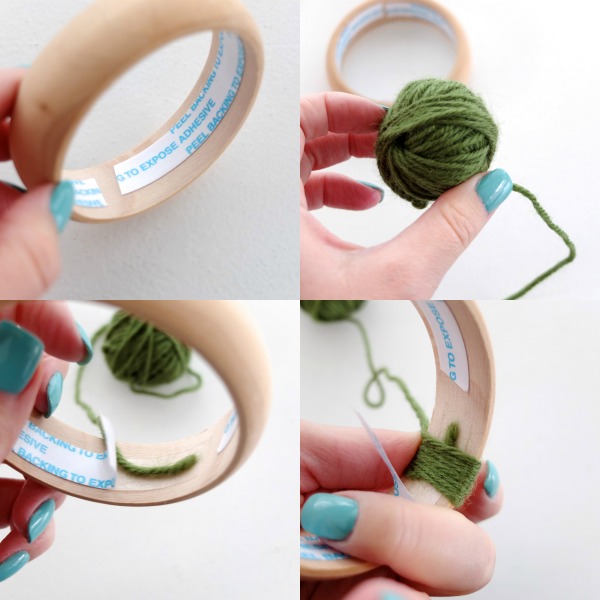
1. Line the inside of your bangle with a strip of double sided tape. Don’t peel it off the backing layer yet.
2. Make a small ball of the yarn colour that you will use as your base. The ball needs to be small enough to fit through the bangle.
3. Peel a short section of tape back and firmly stick down the end of yarn.
4. Start wrapping yarn around the bangle covering the tail.

5. Continue wrapping neatly, peeling back double sided tape protective layer as you go along. Keep the yarn close together and press firmly on back to adhere it to tape.
6. To finish off, thread needle with the tail of remaining yarn and feed it under the tightly wrapped yarn. Trim excess.
To Weave Bangle
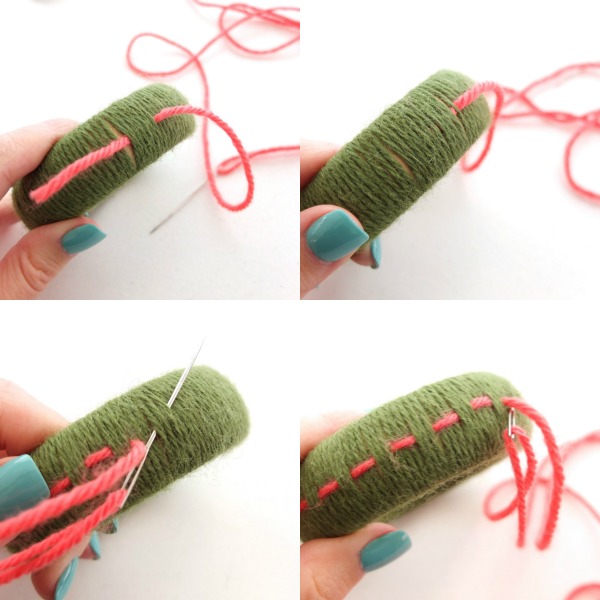
7. Thread tapestry needle with a length of contrasting yarn. Start by passing the needle under several strands of yarn on the bangle, the more strands the better as the tail end will end up more secure.
8. Pull yarn just until you don’t see the tail.
9. Create your design by weaving in and out of the wrapped strands of yarn on bangle.
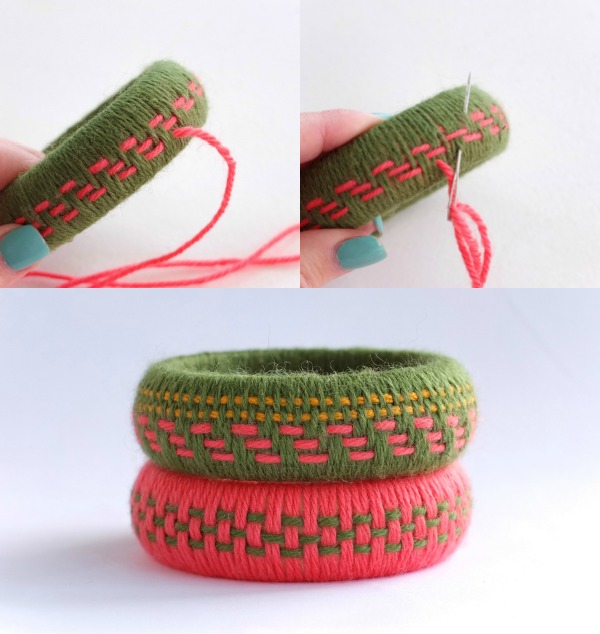
10. When you get back to start, continue weaving another row, slightly shifting your in and out pattern.
11. To finish off, feed yarn under the tightly wrapped base yarn strands. Trim excess.
All done!
Time to accessorize your favourite outfit.
See another DIY bangle project here – Decoupage Harlequin Bangles


Can’t wait to try these!
One tip is the use the blunt end of the needle. You run less of a chance of splitting the yarn you are weaving through if you are in a hurry. 🙂
Yes great tip. I actually used the blunt end myself without thinking to mention it. Glad my readers are full of good suggestions.
It’really a very good idea!!! It can be also a nice present, it’s smart and fashionable!!! Another great tutorial!!! Thank you Cintia! Goodbye from Italy, Katia.
Wow, these look great! Really pretty and they look like cosy winter accessories too! You did a great job with the patterns there.
very very cool
I absolutely love these! I have a couple blank wooden bangles that I planned on wrapping with bakers twine. Putting double sided tape on the inside is brilliant!
Great idea and tutorial! These would look great in so many colors. Thanks for sharing! 🙂
Firstly, love your projects, name & blog here! Thank you for sharing all these hseful ideas w the blogosphere. A special thank you for this post in particular! Youre speaking my language with this simplistic form of weaving for me to start with! Its a DIY weaving project I’m sure to handle. TY ;D
nice.. I love it
Good craft! I love it! Seems like a good christmas gift.