Repair your damaged and worn out clothing with a mending technique inspired by Japanese sashiko stitching.

In Japan, sashiko mending is a technique of repairing torn clothes. It was originally born out of necessity by people who had not the financial means to buy new fabric or clothing.
A farmer’s wife would repair her husband’s clothing with sashiko, and kept up this practice throughout life.
When the husband would retire his son would step up to take care of the farm, and to literally wear his father’s work clothes, which are still durable thanks to a lifetime or reinforced sewing.

For those of us living in a disposable society and wanting to do so much better, it’s actually good to look at how people have managed when life was challenging.
It gives me great hope that there are sustainable options for living on this planet without giving up on things that we like.
Sashiko is most definitely one of those solutions. As one who will wear their favourite clothes long after the holes have appeared, I’m keen to apply the practice of sashiko mending to my wardrobe.
In the past I have repaired torn pants by using a free motion/darning foot on my sewing machine. I don’t mind the free style stitching that results, but it’s not going to have the finesse of sashiko stitching.
Read about why I think mending is so important – Let’s Talk about Mending
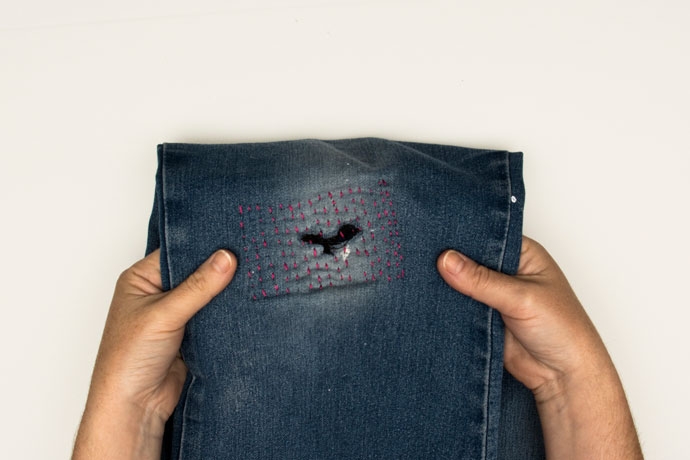
An opportunity presented itself when my beloved, yet cheaply made denim pants tore at the knee. Let me show you how I repaired the pants.
You may also enjoy:
- Joyful Mending Book Review
- How to repair worn out Velcro shoe straps
- How to Darn Large Holes in Socks
- How to add Knee Patches to Jeans
Try your hand at clothing repair with Sashiko

You will need:
- Torn clothing
- Scrap fabric
- 9 cm sewing needle
- Cotton embroidery thread
- Scissors
- Dressmakers pins
Note:
Traditionally there is a specific needle and tightly twisted cotton thread that is used for sashiko repairs. However in the interest of not spending more money I worked with tools and materials I already had in my possession.
You can purchase sashiko thread here – Amazon US | Etsy
With some experimentation I found that a long needle was more practical than a short needle. I also practiced sewing with twine and embroidery thread, both of which worked just fine.

Front of sample piece

Back of sample piece
Take your sashiko embroidery to the next level with Sashiko sewing classes by Creative Bug – Use this coupon link to get 5 Months of unlimited classes For only $5
How to:

1. Cut out a piece of scrap denim that is a few centimetres longer and wider than the hole in the clothing. This will be the patch.


2. Place the patch behind the hole and hold in place with dressmakers pins.

3. Thread a needle with a long length of thread. Tie a knot at the thread end.


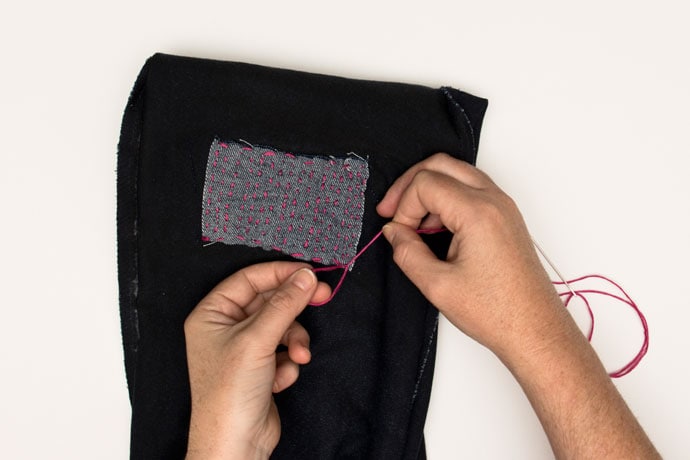
4. Turn the clothing inside out. Sew a running stitch along in a straight line along one edge of the patch. Ensure the stitching is also passing through the clothing. Pull on the fabric for the needle to pass through.

5. Continue to create a running stitch in parallel lines across the patch and damaged clothing. Remove the dressmakers’ pins as you go.

6. When you have finished stitching the patch to the damaged clothing, tie a knot in the thread end. Then cut off the excess thread.

You will now have extended the life of your clothing, and in the process made the item ever so much more uniquely yours.


 Melissa is a content creator and hyper creative artist.To see more of Melissa’s work, follow these links:


This is great! I’ve been curious to try Sashiko mending, too. I love the way it looks, and saving clothing is always wonderful!
Lisa, the other thing I like about sashiko is that it’s also a form of art.
Love that! I will try that .. Sewing is my favorite is embroidery!
Fantastic! I think you’ll enjoy the process.